Monday, March 25, 2013

Multipass Tutorial - Step 16


This step can be a little difficult, but there is only one real word of caution that you need heed in order to get it right: TAKE YOUR TIME. Do this step slowly. Sand and file a little tiny bit at a time. If you sand off too much, you cannot go back. Be patient. Take it slow.

Get the message??

For this step, we're going to be using the body assembly, and the little acrylic rod that came with the kit. Your first step is to test fit the rod. Eyeball it against one of the reference photos in this tutorial to figure out where it should fit. This will give you an idea of how much you need to file off.

All you really need now is a file and some sand paper. Heck, you can accomplish this with only one of these.

After a little work and some patience, your rod will be ready to glue. The top of the rod should be flat, and the bottom should be angled to match the angle on the button holder of the pass. It doesn't need to match the curvature, but hey, if you want to get that crazy about it, go right ahead.

For putting the rod in place, I recommend some epoxy cement. Get the quick set stuff. I like to use a pair of tweezers to set the piece in place. I mix my epoxy using popsicle sticks. I do the actual mixing on a stack of post it notes. They don't take up much space on the work bench, and when the glue cures, you can just peel off the top piece and throw it away. Very efficient!

Another pro-tip here is to use a twisted/broken popsicle stick to actualy apply the glue. Toothpicks work just as good, though I did not have any on hand. The great thing about a snapped stick is that you can also use it to scoop up excess glue that you may drop on the body.

Once you have some glue mixed up, apply it to the body. The kit has two little pockets where you can shove some glue. These pockets also indicate the placement of the rod. The idea is that if you get some glue in the pocket, it will hold onto the body a little better.

Using the tweezers, put the rod into place. You will need to eyeball the placement to make sure it is sitting not only horizontal to the size, but is also seated properly along the thickness of the body. If you screw this part up, you can always pull it out and do it again. This is one of the main reasons I prefer epoxy over super glue.

Once the glue has dried, you are all set!

Multipass Tutorial - Step 17


This is a really easy step. We are going to glue a couple of components into the main body. The only real danger in this step is that you'll get sloppy with the glue. Which I happened to do in my tutorial. But no worries, if you use the right glue, you can recover easily.

Here's what we're going to use in this step. The main body, the LED that we filed down earlier, and the yellow dome that we prepared in one of the early steps.

First order of business is to do a test fitting. For my build, I was very lucky to have everything just drop into place perfectly. If the pieces are too big, or too tight, don't force it. Sand down the edges of the dome or the LED. Do not try to sand the body. You'll just screw up the paint.

Mix up a little bit of the two part epoxy, and go to town. Use the same epoxy that I mentioned in the yellow rod step. You don't need a ton of the stuff. I recommend you put a little dab in the bottom of each of the wells, then just push it around a bit to get even coverage. You do NOT need a big glob of glue. Though I forgot to do it in this step, you should take the tip of your x-acto blade and scrape up a little bit of the paint in the places where the glue is going to go. This will give the glue a little something extra to bite into. It's not super important, but it can only help.

Here's what the pieces look like installed. You can see I globbed too much glue, and ended up with a drop just to the right of the LED. The good news is that once the glue dries, it will snap right off the painted part without causing any trouble.

Multipass Tutorial - Step 18


This little red detail thingie on the pass is an oddball. It seems to be different sizes based on what reference picture you look at, so a big part of this step is really at the builders discretion. In some pictures it looks very rectangular, and in other pictures it looks like the bottom is chopped at an angle. I really don't know what is right. I am using as my primary reference the screen grab of the pass sitting on Korben's desk. In that picture, the red strip looks to be roughly the same height as the LED, and is placed in line with it.

The LED measures .04" high, so I pulled out my calipers and measured it against the strip that comes with the kit. Trim accordingly.

To make life simple, and to keep things neat, I stab the strip with my x-acto knife. It will live here for a while. Because the piece is so small, it would be difficult to hold this for painting and application. You can probably also get away with using a pin or needle, though I find the x-acto blade optimal as it has a built in handle.

Primer the strip using the same primer we used for the body. Dupli-Color sandable grey.

I don't really have any insight into what red they used on the screen used multipass, so I just found one at the auto supply store that looked pretty good. It's red. It's bright. It's pretty. I'm using BCC0419 Flame Red (PR4) Replaces T354. If you find a color that makes you happier, go for it.

Once the primer is dry, blast the strip while it is still on the x-acto.

Once the red paint is dry, it's time to pull it off the blade. Be careful, it's tiny!

Using the same blade, scrape the paint off the back side of the strip. This will be where the glue goes.

Time to scrape a matching spot on the pass. Use the knife.

You just need to expose a little tiny bit of the styrene. Don't go too crazy with this. The styrene strip is very thin, and if you scrape off too much, you're sunk.

Mix up a little batch of two part epoxy. Use a splintered popsicle stick to aply it.

I recommend using tweezers to drop the strip into place. Then nudge it around until it's exactly where you want it to be. Press down on it a bit to squish out any excess glue. If you've got a bunch of glue squising out, use the popsicle stick to scoop it up.

All done. Looking REALLY good now. We just need to get the graphics on, and we can call this thing done!

Multipass Tutorial - Step 19


We are just about done with the build up. This is the last step, all things considered. The big tip for this step is this: Take your time, and cut ALONG the lines. Test fit, and cut again if necessary. Take off little nibbles of paper at a time. Multiple small cuts are safer than one big cut.

There are two graphics for the pass, the front and back.

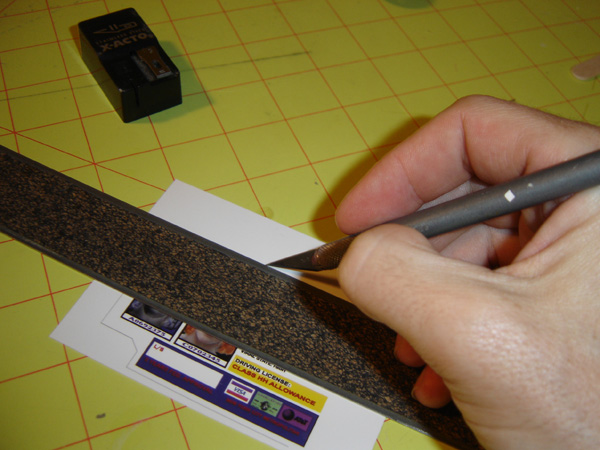
Switch to a fresh x-acto blade. Use a straight edge, and line it up along the black lines on the graphics. You should cut directly along the black lines. Not inside. Not outside. Right on them.

This picture shows my preferred technique. The body of the ruler goes over the graphic, which lets me isolate the black line easily, and the ruler stops the graphic from slipping. If you do this from the other direction, I find that the graphic tends to slip around as I cut. As with all of our previous cuts, you should do three or four light cuts. You don't want to be applying too much pressure to the graphics. This leads to slips and mistakes. Just a little bit of pressure each cut, doing three or four cuts. Whatever it takes.

Here's the front graphic, all cut out.

Test fit! This step is critical! If it's too tight, or too big, just slice off a tiny bit more using the straight edge. Keep going until you get it right.

My method of choice for attaching the graphics is with the two sided tape shown in this photo. It's thinner than the stuff I used earlier in the tutorial, and it has a good grip. Strong enough to keep the graphics in place, but not SO strong that you cannot peel them off if you need to reposition or replace.

Cover the back of the graphic with the tape. You don't need to be too precise.

And fit the graphic into place. I always start by placing the left hand side of the graphic against the stepped styrene part, then just let the rest of it drop into place.

Flip the pass over. Using an x-acto and the lip of the pass body, trim away the excess tape and graphics.

Repeat these steps for the back side graphics.

And that's it! You've now completed building up the kit! Pat yourself on the back, notify your facebook friends, and take a few pictures for your website! Congratulations!!!

Go stand in front of the mirror and yell "moooolteeee passssss" a few times. I assure you, it's very gratifying.

Multipass Tutorial - Step 20


Below are some pictures of my finished pass. This is what it should look like, assuming you didn't screw anything up.

I found this little beaded chain at Michaels, of all places. This is my least favorite store in the entire universe, but this one time, they came through. You can probably find these online or in hardware stores. Whatever works. There's a scene in the movie where General Munro is seen wearing his around his neck using one of these.