Thursday, October 14, 2010

Why No Suit-Up Pics?

I have gotten a few emails asking me why I don't show pictures of me wearing whatever I'm working on. You know, to show off progress. Honestly, I have one word for you.

The Tron Guy.

He ruined it. Really it was one picture that did it, and he will forever be known for it.

THIS IS NOT A PIC OF ME!!!! THIS IS THE TRON GUY!!!


Don't get me wrong, I think I look a tad better than the Tron Guy, but this photo sort of reveals the perils of showing things that are only half way done, and perhaps also how some folks (myself included, possibly) are not capable of making good decisions about how to represent themselves online.

So I don't post pictures of me wearing stuff that's only half way done. Heck, in general, I try to keep the pics of me to a minumum, because this blog is really supposed to be all about the build.

You can visit the Tron Guy at http://www.tronguy.net/

TDK Hood Is Getting There

I am just about done with what I'm calling the "under hood", as I still need to add the mesh on top of it. This is version three of the pattern, and many changes have been made along the way.

Here's the start of it all, the newest pattern. You can see where I've modified the previous version a bunch to make it do more of what I want.


The technique that I developed for doing zippers while working on my body suit was applied here, with just fantastic results. I am so happy with how well the zippers are coming out lately. It's the little things.


And I realize it's pretty hard to see what's going on here, but this is the finished hood. It still needs a little detail work, and some clean up of the stray serger chains, but the overall shape is right where I need it.


As with everything on this project, there are some TINY changes I could probably make if I wanted to go another iteration with this thing. But I really don't. My fingers are hurting, and I need a change of pace. So it's on to finishing up the mesh body suit.

TDK Urethane Belt Has Arrived.

ANNNNND it's a thing of beauty.


The timing on the arrival of this piece could not be better. I had just finished up the hood, and was looking for something different to do. I went down to get my mail, and as I was there the post office dude drove up and handed me the box. Perfect timing.

Even better, the thing fit just perfectly, straight out of the box. I could not be happier.

Overall, it's very nice, though it could have used some TLC on the finer details. There are some air bubbles here and there, and a few mold blow outs in little places. TOTALLY not distracting, and you would have to be examining the belt to find them. For the stroll/photograph mission I have planned, I think this will be perfect.

And the more that I think about it, the more confident I become that THIS will be the belt I wear on the big night out. The rigid belt that is also on its way is probably going to just be too darn pretty to risk wearing out and getting damaged. That's the last thing I would want to have happen to something that looks so beautiful. So the rigid one may just turn out to be a display piece. It will work really well with all of the other Batman Begins and The Dark Knight props I have collected over the years.

Big thanks to the seller for providing not only a really great looking belt, but also following through on quick shipment, and answering all of my lame questions.

Dark Knight Hood Progress

Though I did not intend to stay up until four in the morning working on it, I decided to tackle the hood tonight. The great thing about this piece, which I REALLY need to keep in mind is that it is barely visible. There are like tiny slivers of it that peek out in between the neck armor and the cowl, and that is about it.

But, just like everything else, I have to make it perfect.

An online buddy was kind enough to send me some photos of a pattern he made. I believe he pulled this pattern off a hood that he purchased from someone online, though I cannot say for sure. This is pure conjecture on my behalf. Anyhow, he sent over some photos of the pattern. I had to resize them in photoshop so they would print at the right size. Good thing he included measurements on the drawings.

Here's a picture of the original pattern after I had resized it, printed it, and cut it out.


The next step was to make one. I wanted to use blue material, as that's much easier to see. Black is just a little harder to work with, and I wanted to eliminate as many barriers as possible for this early development phase of the hood. This is my first attempt.


Without the hood being on a display skull, it's sort of hard to see what is going on here. Not really important at this point, but I will tell you that this is the most complex pattern I have ever worked with in my life. Not that I've been doing this for very long, but this is a REALLY complex piece. There's a lot going on in there, and a lot of compound curves. I'm sure all of that is necessary to make it fit around a shape as complex as my melon.

As with all of these things, I learned a lot from my first iteration. In building the hood, I saw little places I needed to change the pattern to make the thing go together better. And once I got it on my head, I found all kinds of places that need to be a little tightened up, or loosened up. Just like with the body suit, I marked directly on the hood, and then went back to my pattern to make some adjustments.

Here's my version 2 pattern in progress. I'm still not 100% confident in how to adjust the pattern to make the finished product fit differently. It's very complex, especially with a shape like this.


Here's a progress shot that shows how the back of the hood is coming together. In the final piece, that center seam will be a zipper.


Here is the most complex part of the build, the skull cap. This is the part that sits on top. LOTS of pins needed to get the different pieces of fabric to fit together right.


This pic shows the product a little better. This is the finished version 2 hood.


ALL of the changes I made to the pattern worked out really well. The neck was tighter in all the right places, and more loose in the front, just the way I had planned. The shoulders still need some work, and I'm going to make the forehead line come down a little lower.

Which means it's back to the drawing board once again. Here is the very start of the version 3 pattern. You can see how significantly I am reworking it from the version 2. Lots of little changes, and a few big ones.


Because I do not want to spend the entire week on the hood, I'm going to make the next hood be the final one. Even if there are a few flaws, it just won't matter as the entire thing will be covered. If I get really crazy about it, I can revisit it after halloween.

Wednesday, October 13, 2010

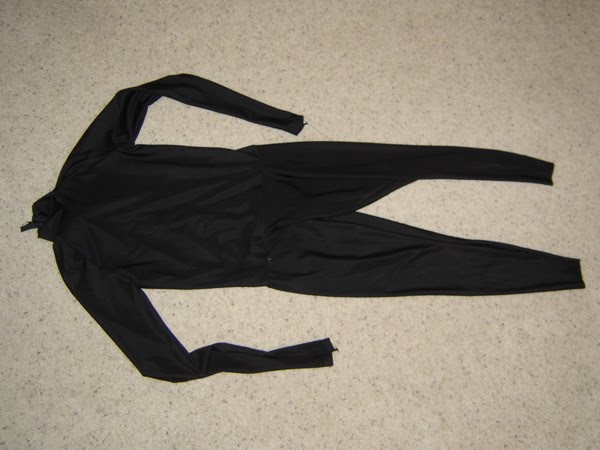
Dark Knight Unitard Is Just About Done

I woke up today and was on the fence about the unitard. I ordered some black milliskin a few days ago, and I was thinking maybe I should wait for that to arrive, and then just start again. Then I started thinking of the project pipeline, and the unitard is REALLY the thing I should be working on today.

I rolled out of bed with the committment to finish the unitard.

Great news: it's done!


well, almost. I still need to do the cuffs and the ankles, but other than that, it's done. It turned out really well, though not perfect. For THIS project, it is as good as it needs to be, as this will be an undersuit. It will barely be seen. So any slop or bad seams won't even show. I'm not too worried about it.

I did learn a lot though. This was the first zipper I've ever done on a stretch fabric, and it just turned out really well. Well, ONE half turned out really well. After doing the left side, I changed my technique. I used that water soluble two sided tape that I got at the fabric store. First I folded over the fabric about a quarter of an inch, with the tape inside it. This gave me a really nice, semi-rigid surface that I could then tape down to the zipper. On the right side, there were NO pins used at all to hold it in place. It was all tape. And it just turned out beautifully. From now on, this is how I will do all of my zippers on stretch fabric.


The punchline to the joke is that just as I was putting the finishing touches on the unitard, the order of black milliskin showed up at my door!! hah!


If I end up having a free day to myself, I may take another shot at doing the unitard again, this time in milliskin. I don't even know why I would bother, other than it would give me a chance to implement some of the changes to the pattern that I came up with, and also to practice my new zipper technique once more. It would also be valuable knowledge and experience that I could apply to the Superman Returns project, so it would not be a total waste. But with all of the other tasks pending on this project, I just don't think I have the time for it.

Dark Knight Boots Arrive

I swear, I am on a roll lately. I have just had SUCH great luck with online purchases this year that I'm starting to think that maybe people out there are FINALLY starting to catch on to the fact that you actually need to supply a quality product.

Witness these boots:


Just stunning in their construction and fit. They feel like sneakers when I put them on. The leather is really soft (cue Ricardo Montelban and his "Corinthian leather" pitch) and they move really well. I'm just stunned at the quality of these boots, and SO happy with them. I cannot say for sure how they match up to the screen used boots, only because I have not done ANY research. I am told they are quite accurate, but I will do my own investigation later on. For now, I'm competely happy with them.

Boots are always such an interesting part of a costume, because for the most part, they go unnoticed. Unless they are totally hideous. I have rambled about accuracy on this blog before, but it's worth repeating here that I am not going for 100% accuracy with this costume. I want it to look great, and present well. This is not the piece that will be on display in my living room, that will impress even the most learned of Batman fans. I just want it to look great when I'm walking down the street on halloween night. And I'm pretty sure that will happen. So my point is that if the boots are a little inaccurate, nobody is going to care. And if they do, I will grant them a VERY closeup look at the heel of the boot!!!

Silk Screen Arrives For Briefs

I am very pleased and excited to say that Westar Solutions absolutely hit it out of the park with this screen that was delivered to me today.


The clarity and precision of the design is just stunning. It's so sharp and crisp. I really did not know that the state of the union for this technology was this awesome.

If I was not in the middle of a mad rush to finish up my Dark Knight costume, I would be taking a run at this screen right now. It's just so pretty! I can't wait to give it a shot!

Thanks again to all the folks at Westar who made this possible. Awesome customer service, very knowledgeable staff, and an amazing final product.

Tuesday, October 12, 2010

TDK Mesh Tunic Almost Complete

Today was a VERY big day here at the Project Work Bench. I have been struggling with how to handle the tunic on the mesh body suit. Because of my experience with the pants, and knowing that my pattern may not work well with both muslin AND the mesh, I was very worried about this part. I had originally decided to do a tunic using the same pattern as my Superman Returns body suit, seeing as how I had that all debugged and whatnot. But when I started doing it in muslin, things got complicated. Because I'm not expecting the mesh to stretch as much as the milliskin that is used in the SR body suit, I had to expand it. But I'm not very good at that, so the results were not good.

I eventually decided to simplify the design. I took a regular T-Shirt out of my closet that fits me well, cut it up, and pulled a pattern off that. I made some TINY changes to it so that it would fit a little better, and then took the scissors to the mesh.

The first step was to produce the main tunic. This part was very easy, though making the pattern uniform was a bit of at trick. I knew I was onto something good when this came off the serger and fit really well.


I then sewed up a couple of sleeves. Also stunning how well they fit, straight off the serger. I knew I was on a roll.


I then attached the sleeves to the tunic. It proved to be a little difficult, but I managed to get the sleeves pinned in properly, and it serged up really nicely. I actually ended up breaking a needle on my machine on one of the thick seams with this, but I think it may have been because a pin was in the way.


REALLY surprisingly, the tunic fit pretty well. It was not perfect, and definitely needs to be tailored a little bit to fit better, but overall the fit is really great. The sleeves are bang on, and the shoulders are just great. It needs a little tightening up in the lower back, but that's about it.

The next step is to install the zipper. I've never done this before. I read up a little on the internet, then pulled out my regular sewing machine.


I'm actually NOT a fan of this machine, as it is very difficult to work with, and tends to not give me what I need. For attaching zippers, there is a special zipper-foot that you need to put on it.


Surprisingly, the machine actually worked pretty well. There were far more dropped stitches than I would have liked, but this just means I have to sew over each side twice. No big deal.

At the end of the day, here is what it looked like:


Which is just great ,and I'm really happy. As mentioned, I still need to do a little tailoring to get the lower back to work just right, but overall it's really great, and I'm totaly thrilled with the results.

EDIT: I just noticed that in this picture, the zipper looks ALL wonky. It's not. I don't know why it looks that way in this pic. Please disregard :)

I'm going to wait to join the upper and lower half together. I want to have the belt onhand so I can see where it goes. The seam will go behind the belt.

Have a good night!

TDK Mesh Undersuit Progress

Today was a great day as far as progress on the mesh undersuit goes. This has really been a concern of mine, and I'm a little nervous about it. Maybe anxious is the better word. As mentioned earlier, the fabric that I got for the mesh outer suit is the EXACT same fabric that was used in the production made suits. It took Brad a LONG time to find it, and it was expensive. SO naturally, there is a premium price attached. I'm fine with that.

The bummer is, with my track record for putting stuff together, it usually takes like 10 iterations to get it right. So while I've been burning through twill and muslin to make my pattern correct, you just never know.

After LITERALLY 15 or 20 iterations, I came up with my pattern for the legs. From earlier attempts, you would have seen that I had from the crotch down totally perfected, but everywhere upwards was elusive. It took cutting up a pair of jeans to get it right. Here's the final pattern.


I made one last pair of trousers out of twill to confirm that my pattern was right.


And they fit really really well. I am very pleased. I jumped ahead and tore into the mesh fabric. I was pretty nervous cutting into it. I'm not going to lie.

Ultimately, everything turned out really well. Here is the final results:


Interestingly enough, these did NOT fit the same way the twill pants did. I guess it has something to do with the way the material moves, or something. I really don't know. It took a few tweaks after I had sewn them all up, but they are really nice and should work well.

Serging with this fabric was also challenging, but I got the hang of it pretty quickly, and I'm very happy with the results. I am curious to see how well all of the stitching holds together once I start walking around in the thing.

More Milliskin Arrives

Today my latest order of Milliskin came in, and I must confess, this stuff is just plain perfect. As I was hoping it would be.

You can barely/sorta tell from this picture, but on the right is the fabric I had previously. This is the royal blue from Spandex World. The stuff in the middle is the new arrival from Spandex HOUSE. The fabric on the right is a TAD more green than the other, and for that reason I don't love it as much. By itself, it looks great. But when you hold it next to the stuff in the middle, it looks almost turquoise. I'm VERY happy with this new fabric, and I am finished with my search. All I need to do now is get the diamond pattern printed on it and I will be ready to go.


In order to keep things striaght in my head, I started to put together a swatch book. This will be a three ring binder that has swatches of all of the fabrics I order, and contact information in case I need more. Oh, and part number too. I can't keep this stuff straight in my head anymore, so I have to write it down.


That's all for now. Still no final word on the fabric for the trunks, though I have a lead. The stuff that came today wasn't quite right.