Friday, June 29, 2012

MattMobile Body Work and Fiberglassing

There's been a lot of progress on the car lately, though it is subtle. Primarily I've been working on body work, as I'm waiting for some final chassis work to get finished before I start working on the cockpit.

Here's how things look as of right now. I've got the shell raised up on horses to allow easy access to the chassis. Pretty neat trick, if you ask me.

By now, regular readers are familiar with the gas cap recess areas. These are proving to be particularly problematic, as there is a lot of warping going on in these compound-curve laden areas.

Still, progress is progress, and things are moving along.

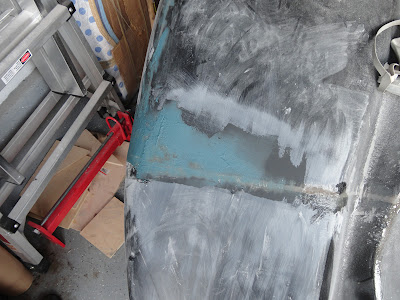
One particular part that has been getting a lot of my attention lately is a combination dip and bulge on what would be the passenger side door, if the car had a passenger side door. I've not only ground down A LOT of material to make the bulge disappear, but I've also filled in the dip with a good chunk of fiberglass. You can see that area right in the middle of the photo where I have ground off the gel coat and gone way into the body.

This was accomplished today, just before this blog post was written. You can see here I've gone in behind the dip/bulge and added in a few layers of fiberglass. I might end up doing a bit more, just to thicken it up. I think there's three layers of fiber there, which probably accounts for an 1/8th of an inch.

I used the same technique today to back fill the passenger side front fender side seam, which has seen a lot of material removed from the outside in order to make it the proper shape. By fiberglassing on the back, I'm not only adding thickness, but also strength on the seam where it's needed most.

Work continues on the passenger side fender too. Not much really to see here, just some sanding down of the putty to smooth out the contours.

I started cleaning up the seam around the nose cone. In this picture, I've done some initial sanding, then an attack of putty, and some sanding on top of that.

Here's another non-trivial dip that I've been working on filling in. I had to purchase a few more tools to make this work properly, but I think it's really coming together now.

Friday, June 22, 2012

Captain Jack Harkness Costume Is Finished

Cardiff, watch out!

For reference, this is the publicity photo that inspired and guided the costume. I'm not entirely sure if he's wearing grey trousers here, but you get the idea.

We didn't quite get the pose or the camera angle right for this photo, but surely you get the idea.

The Breakdown.

For reference, my goal was not to replicate one of Jack's costumes to perfection. I have found that the art of chasing down off the shelf items, especially ones that are a few years old and were probably purchased in the UK, to be extremely daunting at best, often terminally frustrating. My goal for this costume was to make it look recognizable to the human eye, not a perfect match for screen caps and publicity photos. Note that this is NOT my usual process, but for this iconic costume, it seemed the best way to go.

Jacket - In my opinion, the jacket is the critical component on this costume. If you get the jacket right, the details on the rest of the costume don't matter. The opposite is also true.

From Abbyshot clothiers in Canada. An excellent company to work with, they provide high quality clothing from Movies, TV shows, anime, all kinds of stuff. Their focus was originally on jackets and coats, but they've since branched out. I have purchased a few things from them, and have been happy with their customer service, delivery speed, and quality every time.

http://www.abbyshot.com/

Shirt - From Old Navy. Men's Non-Iron Regular-Fit. I chose "Ink Blue". Jack wears many different shirt and suspender combinations in the show, so you'll need to pick one you like and go from there. I like the navy blue, and this shirt, with the light colored buttons, seems a decent match. It's not perfect, and it's not the same manufacturer as the ones used in the show, but it looks great.

http://oldnavy.gap.com/browse/product.do?cid=79372&vid=1&pid=897435&scid=897435052

Suspenders - I went with light grey suspenders, as those are the color Jack wears when he sports the navy shirt. Get the button on kind, not the clasp on, or the combo button/clasp. I got mine here:

http://www.bestsuspenders.com/products/Bostonian-Y-Back-Button-On-Light-Grey.html

To attach the suspenders to the trousers, I went to Michael's (My LEAST favorite store) and just grabbed off the shelf a bag of black buttons. They came in a variety of sizes and hole counts. I chose ones that best matched the ones on the pants, though it didn't matter as they would be covered by the belt.

Belt - I am wearing a medium brown belt from Fossil. This was something I had on hand that happened to match some screen caps I found. Someone on LJ sourced the manufacturer of one of Jack's actual costume belts to Belstaff, though I found the belt to be prohibitively expensive for my needs. See the bottom of this post for a link to the LJ article.

Trousers - I actually like nice pants, and I figured I would just buy a nice pair that I would be able to wear even when not in costume. I picked up a very nice pair of Joseph & Feiss pants at Men's Warehouse. They have all the characteristics I was looking for, including cuffs at the ankle, and a nice sharp crease down the front. They are double pleated, which I cannot say for sure are an exact match for Jack's, but hey... they look great! I got mine in a dark charcoal grey, which seem to match some key publicity shots that I found.

Men's Warehouse - Joseph & Feiss slacks

Vortex Manipulator - A good friend and talented prop maker, Kai Norman made this for me. The one in the pictures is a version 1.0 model, with improvements to come. For costuming purposes, I find it to be perfect. It looks great, and is rugged. I know of no other person making replicas of this piece at this time. The one that comes with the Sonic Screwdriver toy from Character Options is undersized, and wrong in details. It's also not leather. Hit Kai up on facebook if you want one.

http://www.facebook.com/KommissarProps

Holster - I found a great place online that sells Webley holsters. The price is very reasonable, and they look great. The downside is that you'll need to dye it darker in order to make it work for this costume. I used a dye and sealer I got from Tandy leather.

http://www.ima-usa.com/british-455-webley-revolver-holster-ww1-ww2.html

Here's a link to an earlier blog post where I give more details on the dying of this holster.

Gun - This is a Webley Mark IV .38 replica from Denix, I believe. The Webley Mark IV .38 is the EXACT gun that Jack carries, so it's nice that there is a commonly available replica out there of the gun. For reference, the holster I purchased is fit for the .455, though I doubt anyone would notice. The downside to this piece is that it's probably not the smartest thing to carry while costuming. I'll keep this on hand for photo shoots only. Please note that Indiana Jones carries the .455, NOT the .38.

Webley Mark IV .38 at Amazon.com

Under Shirt - I got these at Target. Hanes Premium Comfort Flex undershirts. They are not an exact match. The ones Jack wears are a little higher cut, and the collar is a tad thinner.

Boots - Though not screen accurate, I am wearing a pair of Caterpillar Men's Gunnison Boots I purchased from Amazon.com. Jack actually wears Caterpillar Luke boots, but they have become increasingly rare and high priced. I have never even seen a pair for sale in my size, much less at a price I'm willing to pay. However, since the only part of the boot that is visible on the costume is the lower part, what was important to me was the match of the color, the leather quality, and the sole. I feel that the Gunnison boots accomplish this nicely.

Gunnison Boots at Amazon.com

For reference, I'd like to include (and give credit to) a Harkness breakdown I found on Live Journal a while back, which helped guide me on a few decisions. It covers some details that I ignored, and also skips some details that I paid close attention to.

http://estelofimladris.livejournal.com/246603.html

Wednesday, June 20, 2012

Shell On Chassis, Body Work Continues

The huge news for today is that the shell is now on top of the chassis! It is by no means mounted, it's just sitting on wooden blocks, but this is a HUGE step, and is very gratifying to see it happen.

Before hoisting the shell onto the body, I had to do a little work on the engine to make sure the profile was as low as possible. This basically meant moving all of the cables and lines off the top, and unfastening a mounting bracket that holds the "home plate" in place.

Once it was in place, I had the opportunity to get some body work done. I'm stalling for time until Bo can come back to help address some of the problems I noticed once the shell went on, and this is the best way I could think of doing in.

Here's the gas cap area on the passenger side. I've already given it a lot of work, but it got to a point where it was too hard to access for me to be able to do the kind of precision work I wanted to do.

Here's how it looked after I laid in some putty. Still lots of work to do here, and I found a big dent/recess just behind the gas cap that I need to fix too. It's got putty in it in this photo.

One thing I hadn't really noticed before, as the passenger side of the car was jammed up against the garage wall, was this nasty recess along one of the seam lines. It looks like it's the result of a warp in the mold, or something being miskeyed, or an act of Gandalf.

Of course, I aim to fix it. It's too deep to just putty over, which means I'll start by doing a layer or two of fiberglass. It's great for building up deep recesses, and won't crack. If anything, it's going to make the body that much stronger in this location.

If you look at the first photo in this post, you can see the "before" of the passenger side fender. This was my second pass with the putty, and it had not yet been sanded. I took a swipe at it, and it's coming along really nicely. I'll need at least one more pass to get it smooth and level, but lots of good progress here.

Lastly, I did some more work along the main seam on the passenger side. I sanded down the ridges where I could, and then did a pass with the putty. I haven't sanded it yet, but you get the idea. There is still a LOT of work to be done here, but every little bit counts.

I'll have a new video up soon, showing the shell being lifted into place, so please keep an eye on my youtube channel. If you aren't subscribed, please do!!! :D

http://www.youtube.com/user/TheProjectWorkBench/videos

Tuesday, June 19, 2012

Ready To Hoist! Bo The Welder, Where Are You!!

One genuine disadvantage about having BTW on Team MattMobile is that he makes everything look really easy. Deceptively easy. The reason this sucks is because I'll watch him do something, and say to myself "That didn't look that hard, I'm sure I could do that." Then when I try it myself, it turns out it's a REAL pain in the neck.

More on this in a second.

This is the current state of the union. I've spent the last couple sessions cleaning up the garage, and pretty much removing anything that isn't the chassis or the shell. Reason being is that we're going to need all available room to put the shell onto the chassis. It would be hard to do with a ton of stuff under the shell, which is usually the case.

Here you can see the final state of the hoist. I built a little wooden "H" shaped thingie to go inside the cockpit. All of the weight of the car will go on this. The are arms that go a few feet up and down the length of the car, so all the weight isn't just resting on a 4X4.

One of the things that Bo makes look really easy is the use of the Sawzall. He just cuts straight through stuff. Fast. Like a boss.

Which is why I figured trimming the frame on the front and rear would be no problem. After all, Bo could do this in about five minutes. An hour later, and about six sawzall blades later, I finally got it done. One of the cuts is just awful, but I'll fix it as necessary. The point is, the shell should fit.

Look Ma, Irony!!

In and endless sea of cars that have "My Other Car is The Batmobile" as their license plate frame, I thought it only fair that I turn this convention on its head by getting this for my Batmobile.

It's funny cuz he's fat.

Sunday, June 17, 2012

Captain Jack Harkness Vortex Manipulator V 1.0 Is Here

Made by the very talented Kai Norman, you are looking at the Vortex Manipulator that I will be wearing with my Captain Jack Harkness costume this year at San Diego Comic Con, Anime Expo and Dragon*Con.

I'm super happy with this piece, and Kai did a great job. If you'd like to get ahold of Kai to inquire about commission work, here's his facebook page:

http://www.facebook.com/KommissarProps

The only thing remaining to do on this costume is get some trousers. My plan is to pick those up a few days before AX, and then sew in the buttons for suspenders. At current, I'm a week into the next round of P90X, and hope to be a few lbs lighter by the time the con rolls around. I'm already down about 20 since I started, so all signs point to WIN!

Saturday, June 16, 2012

Hoist Arch Is Finished

After about a day and a half of work, I put the finishing touches on the hoist frame. This is what I will use to pick up the shell and place it onto the chassis. As many builders have told me, this is something you will repeat many times, so finding four dudes to help you lift it just isn't an option.

I took TONS of photos along the way during this build, and I will make a detailed blog post about it later. I don't have a ton of experience working with wood, so there was a good amount of learning going on during this build. But, seeing as how it's really a temporary piece of hardware, I wasn't too stressed about it.

And here's a pic of me in my snazzy new coveralls, MySpace style!

Remember kids, safety first!

Thursday, June 14, 2012

Transmission Cross Member Done.

With the engine mounts finished and the drive shaft in place, the only task remaining was to build out a cross member for the transmission mount.

Bo used some on hand tube stock we had, and drilled out a big hole to insert this mounting thingie. That way, the weight of the transmission won't crush the steel.

Here's a close up, right before Bo Welded it into place.

Here you can see the entire thing all finished. The transmission cross member is in place, the mount is there, and the engine is also on its new mounts.

Here's a close up of the mount. The urethane parts are provided by my sponsor, Energy Suspension.

On the off chance he's reading this post, I really want to give a huge shout out to Bo The Welder, who has made so much of this progress possible! Thanks Bo!

RebelScum Strikes Again!!!!

It's great to have good friends. Especially when they own industrial sized laser cutters and have a creative mind. :D

Today when I opened my door to head out to the gym, I found this leaning up against it.

I was a little surprised, as I couldn't think of anything I had on order lately, especially something concerning the MattMobile. I set it inside, and went to the gym, thus giving me time to savor the unboxing experience.

I cut through a few layers of cardboard to reveal this piece of amazingness:

Courtesy of Philip Wise, my good pal from www.rebelscum.com who has been providing me with laser cutting services and good advice for many years now. Thanks SO much Philip for putting this together for me! It will get a place of honor on the back wall of my garage, and will be featured in an upcoming video. I'm really stoked!!

Wednesday, June 13, 2012

Engine Mounts Finished, Front Fender Body Work.

Work on the MattMobile continues! Of course!

Here's Bo, putting the finishing touches on the engine mounts. He built a tripod like structure on each side of the engine to hold it aloft and in place. Ground clearance under the oil pan is just under 4". The chassis is in its fully lowered position, meaning that under no circumstances will the engine ever get any closer to the ground. It's down on the bump stops right now.

Here's a few shots of the finished motor mounts. They look great!!

While Bo was busy doing the heavy lifting, I was attending to some body work. I ran another pass of putty over the drivers side seams, which are starting to look really good.

As with the drivers side, the front fender on the passengers side had a mis-registered seam that needed some serious attention. I started by building up the dent with fiberglass, which went a long way in solving the problem.

After a light sanding to knock down any hard edges or pointy bits, I then slathered on a layer of putty. Since this photo, I have sanded this once and put on another layer. It's starting to look really good.

In other news, I purchased this hoist from Amazon. It was about 175 bucks with shipping. This will be used to lift the shell on and off the chassis. I will need to build a frame to hold the hoist up. My original hope was to suspend this from the ceiling in the garage, but that proved a bit too problematic for my tastes. I fear I would end up pulling the entire house down.

There's plenty more I still need to post about, so check back soon for more updates.

DareDevil Billy Clubs In One Hour

UPDATE - July 31, 2015 - I have since build a much more screen accurate version of these billy clubs. If you want to check them out, go here:

http://mattmunson.blogspot.com/2015/02/daredevil-billy-clubs-version-20-almost.html

I hate to rush. I also hate to wait. But I think I hate rushing more. Which is why I like to start things like halloween costumes, or con costumes REALLY far in advance. I want them finished WEEKS before the event, so that I don't stress out, freak out, and then make mistakes.

So this is the exception. My friend and fellow Batgirl:Spoiled conspirator Damian Buerer called me at 5:30 in the evening and said "Do you want to go to an Avengers themed party tonight??" Naturally, I did. But I didn't have any Avengers costumes. The only Marvel costume I even had on hand was my shiny new DareDevil suit from UD Replicas. Damian ASSURES me that DD spent some time in the Avengers. Seeing as how he is THE Comic Book Nerd, I took his word for it.

Problem: I have a great costume, but no billy clubs. There's a dude on the RPF who has been working on a VERY excellent budget replica of the billy clubs, of which I will no doubt be acquiring a pair. However, to my knowledge, they are not ready. Even if they were, it's doubtful he would be able to get a pair to me in the next sixty minutes.

Solution: Use whatever you have on hand to build a pair of billy clubs, and quick.

As luck would have it, I had ALMOST everything in my garage that I needed. The other lucky thing is that I live five minutes from Home Depot.

Here's a sneak peek at the final results. CERTAINLY not movie accurate, and borderline cheesy. However, as I suspected, everyone thought they were just great.

It all started with a length of 1" dowel I had in the closet. I held this next to the holster of the DD costume, and roughly guesstimated how long the clubs should be. I wanted them sticking out of the holster, but not too far. I really just eyeballed this. I did not use any reference or anything.

I then took my rotary saw and cut it as close to the mark as I possibly could. I did not square it off, didn't measure. Just held it with my foot against a piece of the car chassis, and sawed. Close enough for costume parties!

I now had my first piece cut. The next task was to cut another piece the same size.

To do this I taped the already cut piece to the uncut piece, and made sure the two ends lined up pretty well.

Then I made another cut, clipping off a tiny length of the original piece, but cutting through the longer stock. I now had two equal length pieces of dowel rod.

I happen to have some grey primer on hand that works really great with wood. It goes on pretty thickly, and dries quickly. Another piece of good news is that it was a very warm, dry day here in Irvine, so paint would be drying quickly. I quickly sanded off any splinters that had shown up around the cut edges of the wood.

I employed one of my favorite tricks for painting things like this. The problem here is that you don't want to have to sit the piece down, spray one side, then flip it over to paint the other. This usually leads to a pretty bad paint job. I like to embed a wood screw in one end, then clamp onto the part of the screw that is sticking out. This means I can paint the entire piece in one pass.

Here are the clubs after a coat of primer. I only had time for one coat! (for those of you that are new to my blog, Yes, that's the batmobile in the background.)

And then it was on to painting! Again, as luck would have it, I had some red paint on hand, along with some silver.

I blasted on two coats of red paint, which seemed like more than enough. Coverage was certainly not perfect. Because of the wood grain, there was still some grey visible here and there. But who cares! I've only got 30 minutes left before I have to leave for the party!!!

The heat of the evening helped the paint dry pretty quickly, and it was then time to work on the silver tips. I stared by using green painters tape to mask off what I thought was a decent length on both clubs.

Then I masked off the bodies of the clubs with some printer paper, which was taped into place using the same painters tape.

Then I hit them with the silver paint.

And FINALLY I was at a point where I had to run to home depot. I wanted to make nun-chuck style billy clubs, which meant I need some chain and a way to fasten it to each club. About 15 minutes later, I came home with this. A six link section of chain, and a bunch of U nails. I don't even know if that's the right word for it, but you can see them right there in the box.

The timing of the Home Depot run worked out great, as it gave the paint time to dry. I peeled off the masking tape. There was of course a TINY little flaw where the paint sank underneath the tape seam, but oh well. (flash forward: guess what? Nobody noticed!!!!!)

I didn't want to risk splitting the wood on the dowels, so I drilled two pilot holes for each nail.

I tapped the nails into place with a hammer, and that was it! All done!!!!

You can see from this pic that the coloring wasn't quite right, but again... nobody seemed to notice!!!!