Through an unforseen and unexpected twist of events, it has come time to revisit this project, and put together a much more accurate version of these billy clubs.
My goal is still to build them at the "cosplay" level, meaning only that I will not be attempting to make them museum quality. It does not mean that costuming stuff is lower quality, or that less effort goes into it. Only that I will be focusing on a different set of requirements. For example, one of my goals is to make sure that these are robust enough to withstand constant handling, dropping, slipping in and out of the holster, etc. Will this be less work than a museum quality set? Probably not. Will it be a different KIND of work? Absolutely.
I start off with two raw, resin castings of a stunt billy club. The master for these is a made for production piece. This is great because I know it's 100% accurate. The master also serves as great color reference.
I did a bit of clean up on the pieces, but nothing too extreme. Remember, the goal is that these look good in photos, and from ten feet away. This allows me a lot of freedom in the process, and doesn't require that each little bubble be filled, or that the seam be completely cleaned up.
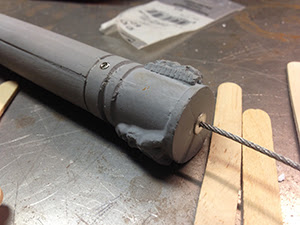
I had to do some serious thinking about how I was going to manage keeping these two clubs together. I ended up choosing some 1/16" cable that I got from home depot. There's some little crimping widgets that I used to form the ends into a loop, which a set screw is threaded through.
To get the set screw into place, I had to drill a hole through the club and tap it. Then I had to drill a hold down the top of the club, through which the cable and newly formed loop would feed.
Though this looks pretty simple, you are looking at the culmination of a few hours of work here.
As of today, that's all the progress I have. I will need to do some more primering on these before painting, but they are almost ready for the next steps now.


No comments:
Post a Comment