This post is dedicated to the gun doors, which I have been remastering. The work accomplished so far hasn't really consumed a ton of time, it's just been spread out over a week or ten days. I am definitely bouncing back and forth between a few projects right now, and this is one that I jump on as time permits.
The part of the process I have really loathed the most is the perfecting of the master. As regular readers of my blog will know, I struggle with perfection. That is to say, I want stuff to be perfect, but I recognize that achieving that level that I'm looking for often takes immense amounts of time and focus. The double bummer is that I'm far more likely to abandon a project out of frustration because I've already invested so much time and I've grown bored with it... before it reaches perfection.
One of the trends you may have noticed in recent posts is my slipping more towards the "done" side of the scale, and away from "perfect." I should really change the name of my blog to "Perfect Is The Enemy Of Done."
For this project, Done is an important factor, but that doesn't mean I want it to look crappy. What that means for this master is that I limited myself to two passes with primer and putty. Primer/putty/sand/repeat is a rock solid recipe for madness when it comes to me and my projects. I just want to noodle the thing to death until it's perfect. The only way I seem to be able to triumph is to put hard restrictions on myself.
Here you can see my second pass at the putty. I had already done one pass where I filled in the main seams, but there were still some lumps and dents after the coat of primer went down.
A progress shot showing the clean up process.
And now the second pass of putty has been all cleaned up.
Time for molding!
I secured the master to a larger piece of MDF with a couple of tiny dabs of wood glue. I didn't need to to be really secure, just enough for it to stay flat against the panel.
One thing I've learned over the years is to make sure your work bench is level when you're pouring a mold. I ended up with wedges under two of my table legs in order to get the top surface flat.
I tried something new with this mold. Because the gun door is for the most part flat, but with a really tall bit in the middle, I thought it wise to do a two pour mold. This is done entirely to minimize the amount of rubber I have to pour. Rubber is expensive.
I did one pour, which covered most of the mold. Then I hot glued in a couple more pieces of foam core to dam off the louver section of the master.
Another pour later and we are good to go!
A day later, here's the rubber all cured, and the dams removed. Turned out great!
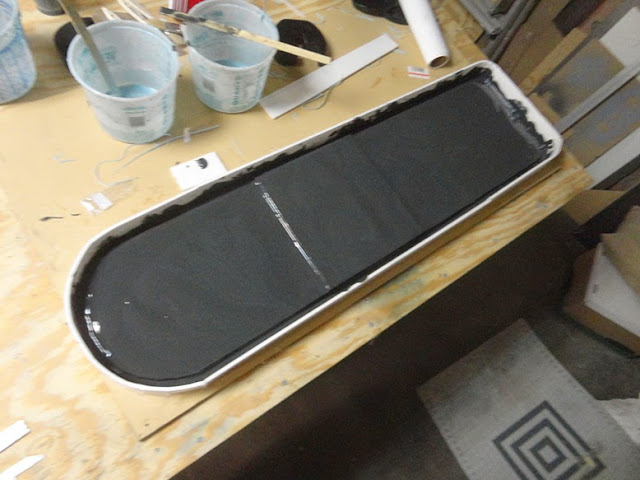
I next built an even wider dam, which is going to hold in the rigid matrix that I then poured. The idea behind a matrix is that it serves as a back bone for the flexible rubber mold. Because the fit of the gun doors is very precise, and the dimensions are very meticulous, I want the pulls to be the right shape. So I make a rigid matrix to ensure that the mold retains it's shape when it comes time to pour up a positive. Or in this case, do a fiberglass layup of the positive.
I used BJB TC-1630 for this matrix, which is NOT what the stuff is intended for. However, I had the remnants of a 2 gallon kit lying around, and it's way past its expiration date. I tested a bit of the stuff, and while it still cured properly, it was far less viscous and a bit more sandy than a fresh batch would have been. I considered this a perfect use for this dead stock.
For reference, I also laid in some fiberglass matting in between coats of 1630. Just for strength.
After a few hours to cure, I popped the matrix mold off. Please note that I brushed on a layer of vaseline before pouring the 1630. Without it, it would have bonded VERY securely to the MDF and the foam core I used to build the dam with.
After a little bit of trimming, the mold sits in the matrix perfectly!
Next step is to do a fiberglass layup and see how it fits in the car!
I may end up offering copies of my gun doors to fellow batmobile builders if anyone is interested. As it was a pattern I build from scratch, I'm hoping I won't be stepping on any toes by doing so. If you're interested in a set, please drop me a line.


No comments:
Post a Comment