Showing posts with label Batman. Show all posts

Thursday, February 12, 2015

MattMobile - Shell Separation and Cockpit Fabrication

Greetings all and welcome back.

It's been a very busy time at the workshop, and much has been accomplished. Not just that, but the work is visually pretty impressive. Let's get to it!

The big thing that happened this week was the cutting in half of the shell.

Here you can see I've made the first major cut. I did this will my skill saw and a high tooth count blade. I recall all the times I looked at other people's builds and thought to myself "What a bunch of losers! They can't even make a straight cut!" Turns out, it's really hard to be accurate!! Go figure.

Here's a little more progress on the cut. To get around the corners and into the weird spots I ended up using a variety of tools. A reciprocating saw, a hack saw blade, a coping saw blade, and even a dremel tool. Oh and a drill too.

And here's the money shot.

Kinda crazy seeing it like this. Amazing how much of my workshop is now filled up with MattMobile stuff.

This is how the main part of the car looks now. So tiny!

Look at those guts!

The second big piece of work done lately was the rebuilding of the drive shaft tunnel. Interesting fun fact. The work you see in the picture below is the result of dozens of hours of work. The rebuild, which I explain below, took about three hours total. I guess once I wrapped my head around what was required, and had it all figured out, it was far easier to do a second one.

The main problem with this first version is that it's too short. I'm a pretty tall guy, and my fear is that with that bar at the back positioned the way it is, I may very well run out of room. The goal was to rebuild it, but using the next support bar back as the anchor point.

With so many lessons learned from the first effort, cutting the stuff to length and getting it all clamped in and blocked out was pretty easy.

I use blocks of wood, stacked to the correct height, as spacers. This allows me to position everything properly, and have it held in place as I weld. The profoundest lesson I learned from version one is just how much the metal moves when you weld. It's actually kind of staggering the amount of heat that is generated from that torch, and it's no wonder that the metal warps and moves from the heat. Clamping everything down is essential, and so is doing tack welds to hold everything in place. By minimizing the heat that is transferred to the metal prior to everything being firmly affixed into place, you can control how much warping happens once you start laying down thick welds.

And here she is, all tack welded into place. I'm going to skip the full welds for now, until I have a little more of the cockpit built out. I would hate to change my mind again, and have to go back and tear the whole thing out. Again.

As you can see, definitely a very busy month for the MattMobile! I really want to focus on building out the cockpit for the next couple of weeks. The bummer is that it's very slow going, as the metal fabrication requires a lot of attention and care. The old thing about "Measure twice, cut once" is never more true than with metal work. Ok, it's probably more true with brain surgery, but that's not my thing.

Wednesday, February 11, 2015

MattMobile Gun Door ReBuild - Mold Is Now Complete

The past week has been a wildly productive one on the car, and I'm really excited with all of the progress I've made. Not only on the build, but also the logistics behind it. Hopefully will have a big announcement to make soon that will be in regards to a burst of productivity which should be forthcoming.
This post is dedicated to the gun doors, which I have been remastering. The work accomplished so far hasn't really consumed a ton of time, it's just been spread out over a week or ten days. I am definitely bouncing back and forth between a few projects right now, and this is one that I jump on as time permits.

The part of the process I have really loathed the most is the perfecting of the master. As regular readers of my blog will know, I struggle with perfection. That is to say, I want stuff to be perfect, but I recognize that achieving that level that I'm looking for often takes immense amounts of time and focus. The double bummer is that I'm far more likely to abandon a project out of frustration because I've already invested so much time and I've grown bored with it... before it reaches perfection.

One of the trends you may have noticed in recent posts is my slipping more towards the "done" side of the scale, and away from "perfect." I should really change the name of my blog to "Perfect Is The Enemy Of Done."

For this project, Done is an important factor, but that doesn't mean I want it to look crappy. What that means for this master is that I limited myself to two passes with primer and putty. Primer/putty/sand/repeat is a rock solid recipe for madness when it comes to me and my projects. I just want to noodle the thing to death until it's perfect. The only way I seem to be able to triumph is to put hard restrictions on myself.

Here you can see my second pass at the putty. I had already done one pass where I filled in the main seams, but there were still some lumps and dents after the coat of primer went down.

A progress shot showing the clean up process.

And now the second pass of putty has been all cleaned up.

Time for molding!

I secured the master to a larger piece of MDF with a couple of tiny dabs of wood glue. I didn't need to to be really secure, just enough for it to stay flat against the panel.

One thing I've learned over the years is to make sure your work bench is level when you're pouring a mold. I ended up with wedges under two of my table legs in order to get the top surface flat.

I tried something new with this mold. Because the gun door is for the most part flat, but with a really tall bit in the middle, I thought it wise to do a two pour mold. This is done entirely to minimize the amount of rubber I have to pour. Rubber is expensive.

I did one pour, which covered most of the mold. Then I hot glued in a couple more pieces of foam core to dam off the louver section of the master.

Another pour later and we are good to go!

A day later, here's the rubber all cured, and the dams removed. Turned out great!

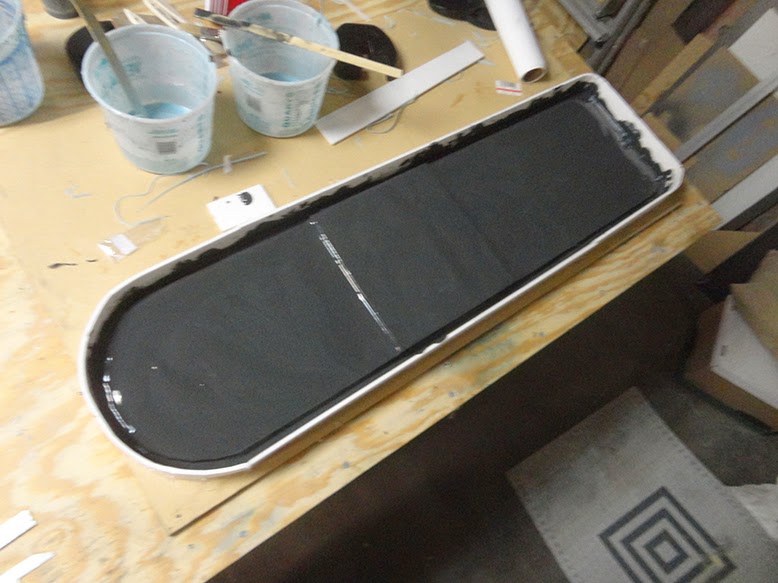
I next built an even wider dam, which is going to hold in the rigid matrix that I then poured. The idea behind a matrix is that it serves as a back bone for the flexible rubber mold. Because the fit of the gun doors is very precise, and the dimensions are very meticulous, I want the pulls to be the right shape. So I make a rigid matrix to ensure that the mold retains it's shape when it comes time to pour up a positive. Or in this case, do a fiberglass layup of the positive.

I used BJB TC-1630 for this matrix, which is NOT what the stuff is intended for. However, I had the remnants of a 2 gallon kit lying around, and it's way past its expiration date. I tested a bit of the stuff, and while it still cured properly, it was far less viscous and a bit more sandy than a fresh batch would have been. I considered this a perfect use for this dead stock.

For reference, I also laid in some fiberglass matting in between coats of 1630. Just for strength.

After a few hours to cure, I popped the matrix mold off. Please note that I brushed on a layer of vaseline before pouring the 1630. Without it, it would have bonded VERY securely to the MDF and the foam core I used to build the dam with.

After a little bit of trimming, the mold sits in the matrix perfectly!

Next step is to do a fiberglass layup and see how it fits in the car!

I may end up offering copies of my gun doors to fellow batmobile builders if anyone is interested. As it was a pattern I build from scratch, I'm hoping I won't be stepping on any toes by doing so. If you're interested in a set, please drop me a line.

Saturday, December 28, 2013

Fender Work and Support Boxes

Today was definitely a "two steps forward, one steps back" kind of day. I started out pretty strong by putting another layer of glass on the rearmost support mount boxes. These are right at the tail end of the rear fenders. These should help lift up the butt-end of the shell a little bit, and correct about a vertical inch-worth of sag that is in the kit.

My next task for the day was to build some support lips for the two front fender add-ons. The idea is that I would fix the fenders in place, then go up inside the shell and lay down some fiberglass on top of the fender, thus creating a lip that can be used to secure the fenders to the body. The idea seemed simple enough to me.

I spent a lot of time with my disk sander, dremel tool and coping saw, making sure that the fender fit pretty snugly into the shell. My plan was to use a "bondo squish" style method with some cabosil thickened epoxy resin to fill in the gaps and make them perfect. I got the drivers side all figured out, clamped in, and laid in some fiberglass.

Then I switched over to the passenger side, and that's when things kind of fell apart. What I realized is that not only are the two sides of the car asymmetrical when it comes to the front fenders and headlight recesses, but also that the fender extensions are VERY wonky. They are not flat on the top, nor are they flat on the bottom. Flat on the bottom I can deal with, as nobody will ever see that. But not flat on the top is a problem, as that effects the way the fender fits into the shell, and it will also be visible. I quickly pulled out the drivers side fender addition and wiped off as much fiberglass resin as I could find. NOT a fun process.

The next step was to create a flat top surface for the passenger side fender. I did this by again doing a bondo-squish method. I laid some wax paper down on my work bench ( a pretty darn flat surface. Well, flat enough for my purposes) and first put down some epoxy resin with a few strips of matting. The matting was cut to roughly cover the most drastic void on the fender.

I then mixed up a big batch of resin and put LOADS of cabosil in it, turning it into a thick paste. I laid this down on the wax paper, on top of the fiberglass I had already set down, and built it up into roughly what I beleived to be the shape of the void on the fender. Then I pushed the fender down on top of it. SQUISH! The thickened resin filled the void perfectly and completely.

In this picture you can really see how big of a void there was to fill. A bit more than a quarter of an inch in its worst places.

Now I just need to wait until the resin cures, and I can pull the fender off the table, sand it down a bit, then try attaching it to the body again.

Overall a very busy day, and a lot of really good experience. BUT not the amount of progress I was hoping for.

Sunday, August 4, 2013

Batman Forever Gloves - From www.superherogloves.com

It was a big delight when www.superherogloves.com came on the scene and started offering reasonably priced, high quality Batman replica gloves. I of course jumped on the Batman Forever gloves, as that has been a costume I've wanted to complete for years now.

The gloves appear to be very accurate in stylings to the movie ones, and I'm super happy with them. They currently have a few different styles available, and what's great about them is that they are certainly going to deliver. I don't know about you, but I put a huge premium on reputation, and it's nice to know that when you send someone your money, you'll actually get what you ordered.

Friday, June 14, 2013

MattCave Pics

I went to the MattCave this morning to drop off some stuff, and happened to take with me my Canon. I took some photos of the shop and the car, though there's not a lot of progress to show since the last round. Most of the progress lately has been in the form of some steel that has been welded into place to help support the shell. Not very glamorous work, but entirely necessary.

For reference, here's the most recent episode of Rise of The MattMobile that shows the progress I'm talking about. Best of all it's got an introduction by Walter Koenig, the dude who played Chekov in Star Trek.

Tuesday, December 25, 2012

Dark Knight Costume from UD Replicas

This is my second purchase from UD Replicas, and I'm just as happy with this suit as I was with my DareDevil suit. Great work, as always David!

Since this type of suit has already been documented pretty heavily online, I won't really go into photographic detail too much. But it is pretty fantastic.

Thursday, January 26, 2012

Custom Batarangs

I drew these up in Adobe Illustrator and had them laser cut on black plexiglass. I used some 300 grit sandpaper to knock down the sharp edges, and now they are ready for molding. I need to bevel the edges and do some surface contouring. The overall shape is really nice, and I'm happy with them.

Wednesday, January 25, 2012

Batman Stuff Progress

I'm taking full advantage of the beautiful SoCal weather today, and got some painting done. Nothing makes paint dry better than some direct sunlight on a warm day.

Here's a couple misc batarangs I'm working on, along with the side disks to the Arkham City grapple gun.


A few more side disks to the grapple gun, just after some primer.