Showing posts with label TARDIS Build. Show all posts

Thursday, January 23, 2014

TARDIS Painting Booth & MattMobile Fenders

When I painted my TARDIS, I did it in my garage. It was a big mess, smelled really bad, and I got blue overspray everywhere. This time around, with the work shop in full swing, we decided to do something different. FULL credit goes to Ewan for coming up with this idea.

My workshop has a big door that opens upward. Ewans idea was basically to attach plastic sheets to the door. That way, when the door opens, a "room" is automatically formed that happens to have one wall open to the outside. You know, fresh air. When we are done for the day, we simply close the door and the room collapses.

Here's how it looks collapsed:

And here's what it looks like with the door open. Pure genius.

Here are some of the results from the painting room.

In unrelated news, work continues on the MattMobile. Here I am working on making the sub-fender uniform.

Workshop Tour

As of late January, 2014, here's what my workshop looks like:

I set up a welding station by the main door so that some work could be done on the shell supports for the MattMobile.

This table is the exclusive domain of Bo The Welder, my friend and cohort who has been invaluable on many of my projects.

A 2 ton engine hoist, just in case. I actually used this recently to lift the mill onto my workbench.

I build this workbench a few months, and it has since been taken over by my girlfriend, who also happens to be a super talented fabricator and costumer.

You can tell it belongs to a girl because the molds are pink.

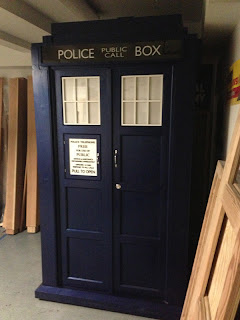
Nothing ties a room together like a TARDIS replica.

A pretty good master shot of the workshop, from the back wall looking forward. You can see the Dexter kill room that was the brainchild of my friend Ewan. We set this up to use as a spray booth for his TARDIS build. Works like a frickin' charm.

These are most of my small hand tools and stuff that I use to build smaller things.

This is kind of my wall of supplies. In the boxes are materials, tools, paint... stuff that is used in the creation of all kinds of stuff. A bunch of the boxes on the right hand side are filled with R2 parts and paints.

This is my primary work bench. This is where most of the action takes place, when I'm not working on the car.

The current state of Ewan's TARDIS build.

Another workstation near the front door where I keep my drill press, belt sander, vacuum pump, and some misc supplies.

My lathe is still there too. I need to figure out where that will go.

Lastly, one of the things I love most about the shop... a bathroom!!

Saturday, December 28, 2013

Batmobile Fender Work Continues, Tardis Paint

As new years eve rapidly approaches, I'm on a mad man's mission to squeeze out every last ounce of potential productivity in the remainder of 2013. Today also featured a reunion of Team Tardis, an outfit that has been on an unintentional hiatus for the past couple of months. Executive summary: Awesome.

The day started with me tackling the other fender, using the same bondo squish style technique I used the other day on the opposing fender. Same tactic, hopefully the same great results.

Here's what the repaired one looks like, the one I squished yesterday.

This is after a bit of sanding and clean up, where I got rid of all the excess fiber and resin. Overall I am extremely pleased with the results. It still needs a bit of fine tuning around the edges, but it really turned out wonderfully. It was based on the success of this piece that I gained the confidence to tackle the other fender.

Here's another shot of the fender that kind of shows a different view of how the top is now pretty flat. It was NOT like this before I started! I promise you this!!

the other big accomplishment of the day was getting some paint finally laid down on Ewan's Tardis. We had to buy a new spray gun, as mine was pretty well gummed up and we couldn't seem to get it apart to clean it out. A quick trip to Home Depot (and a stop at Five Guys along the way) we were back in business.

We did the roof first, and it turned out really nicely.

We took a calculated risk and kept painting after the sun had set. Mixed results, to be sure. Word of advice: paint in warm weather, and/or daylight.

Despite a few setbacks, overall it was an extremely busy and productive day. Much was accomplished. Even better, once I got home, I sewed up my coveralls. This will no doubt also contribute to keeping me warm during future build days.

Thursday, June 13, 2013

TARDIS Build Update - Part 16

For those of you who have been kind enough to have been following my blog for this build, I want to start by saying thank you! I really appreciate knowing that some folks out there are enjoying the pictures I'm posting, and the occasional bit of build wisdom I'm committing to paper. Or print. Or internet. Hard to say really, as these times we are in are changing so quickly! hehehe

This will actually be the LAST build post for my TARDIS. By the time you hit the bottom of this post, the beast is done. BUT I will be posting more pictures in the future, most likely ones taken with a much better camera than the one found on my phone. But let us get started, shall we??

First up, a nice shot of the front doors. Sign is in place, handles in place, and the lock in place.

Here's a rather ominous view from the side.

Inside the TARDIS, showing how the lock and catch are mounted.

Fully functional, I might add.

Here's how everything looks without the roof on. I believe by this point I had finished repainting the side wall, and it's all done.

So pretty!

Here's the view from the inside. Notice that the windows are all in place, and the paper backing has been removed.

With the roof put on, there's only about six inches of clearance to the roof. Not enough for the lantern, I'm sad to say.
But that didn't stop me from doing some touch up painting on the chimney topper. It took a little sanding to get it to fit.

But look! It fits perfectly!

If only there was a lantern on top of it!

One of the last remaining tasks was to put the magnetic catch in place for the phone door. I had to mount a little block of wood to the inside of the tardis to hold the magnet part. The metal part just screwed into the door. Here you can see that I've painted the block black.

The only thing really remaining was to make and attach the Ambulance disk. It's stuck to the front door with some VHB tape.

And yet the journey continues! Here you can see Ewan's TARDIS in the foreground taking place, as my finished one sits handsomely in the background.

So hop in, grab on, sit down... and let's see what's out there!!!!

(Cue closing theme music, roll end credits)

OH, also check out the latest Team Tardis build video. It's not as current as this blog post, but still shows some fun building action.

Tuesday, June 11, 2013

TARDIS Build Update - Part 15

As you may have seen in a previous blog post, my primary door needed some trimming along the bottom. That way it would sit at the same height as the other door. I came up with a way to router off tiny bits of the doors in measurable increments. Here's how it's done:

See? They are now even!

Here you can see the door fit into place. Looks really great!

Meanwhile I popped the roof of the tardis off and painted the inside with a coat of semi-flat black enamel. This is purely cosmetic. I just want it to look pretty on the inside. Cuz it's what's on the inside that counts.

I needed to do some more painting, so I covered the tardis with a tarp. Didn't want to get any overspray on her accidentally.

I put of the semi-flat black enamel on the backs of the doors.

I wanted to see what it looked like with some windows in place, so I put one in just for a pic. Looks great!

And with the front door now painted, I temporarily put the lock in place so I can see how that looks too. AND IT LOOKS GREAT!!!

I've also put up another build video that shows some progress that wasn't included in this blog post. Please check it out!

TARDIS Build Update - Part 14

I'm definitely knee deep in painting at this point in the build. It's messy and not much fun, but I carry on. I did some more work on the posts, in an attempt to give them a nice, rich coat of paint.

And then it was onto the sign boxes. I used my router table to trim down the signs bit by bit until they fit perfectly into the boxes. This is the first one I completed.

The rest came together pretty quickly after that.

To get everything out of the way, I put as much of the TARDIS together as I could. Here are the posts, inserted into the base.

Then I painted the sign boxes.

On top of each sign is a plexiglass rectangle that also needed to be cut to size. In this pic, you can see the entire assembly.

Then I put the sign boxes in place on the posts.

I then put the walls in.

Looks pretty snappy with the roof on it!!