Showing posts with label Mermaid Tail. Show all posts
Showing posts with label Mermaid Tail. Show all posts
Friday, April 27, 2012

Sunday, February 12, 2012
Mermaid Tail Technique
The experimentation really never ends when it comes to urethane. With each new project comes new demands on the materials, which means developing new ways to use them.
Regular readers will know that the "holy grail" of urethane for me is a product that can be applied in very thin layers, but will be very opaque and most of all will not pull back from silicone. My existing molds are silicone, and I don't want to have to remake them as rigid molds. Though frankly, that probably would have been a lot faster, and saved me a lot of heart ache.
HINDSIGHT!!
My favorite product for silicone molds right now is Smooth-On Brush-on 50. Or 40. It's a great product that does most of what I want. Ideally, I would be able to apply this with an airbrush. The problem is that when I thin it with mineral spirits so that it will flow through a spray gun or airbrush, it tends to lose some of its more interesting properties. I've been searching for a better method, and the other day decided it might be worth trying to apply it with a paint roller.
I picked up one of those dinky little touch-up rollers from home depot, and gave it a try.

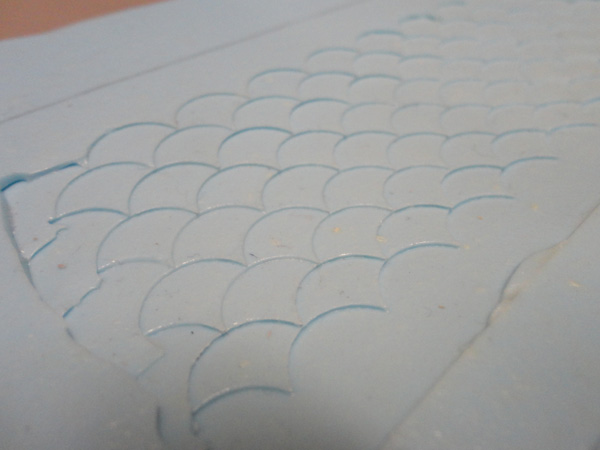
The results were fantastic. In this picture, you can see how the detail of the mold was not lost. No bubbles either. Pretty much any flaw you see in this pull was a flaw in the mold. Very nice!

Here's what it looks like on the inside. Not as uniform or smooth as one might get from an airbrush, but still workable.

Because this is VERY thin, it is also very flexible. I doubt I would ever brush it on this thin in a production piece, but this is a neat image as it shows just how much abuse this stuff can take.

Regular readers will know that the "holy grail" of urethane for me is a product that can be applied in very thin layers, but will be very opaque and most of all will not pull back from silicone. My existing molds are silicone, and I don't want to have to remake them as rigid molds. Though frankly, that probably would have been a lot faster, and saved me a lot of heart ache.
HINDSIGHT!!
My favorite product for silicone molds right now is Smooth-On Brush-on 50. Or 40. It's a great product that does most of what I want. Ideally, I would be able to apply this with an airbrush. The problem is that when I thin it with mineral spirits so that it will flow through a spray gun or airbrush, it tends to lose some of its more interesting properties. I've been searching for a better method, and the other day decided it might be worth trying to apply it with a paint roller.
I picked up one of those dinky little touch-up rollers from home depot, and gave it a try.

The results were fantastic. In this picture, you can see how the detail of the mold was not lost. No bubbles either. Pretty much any flaw you see in this pull was a flaw in the mold. Very nice!

Here's what it looks like on the inside. Not as uniform or smooth as one might get from an airbrush, but still workable.

Because this is VERY thin, it is also very flexible. I doubt I would ever brush it on this thin in a production piece, but this is a neat image as it shows just how much abuse this stuff can take.

Monday, January 23, 2012
General Progress Update Thread
I posted a new Grapple Gun video tonight:
I realized today that documenting a project via episodic youtube is a VERY time consuming effort. I am many months into this build, and I have to believe that one of the reasons it is taking so long is because of the overhead involved in filming and editing the vids. Still, they are their own reward, so I'm not complaining. The purpose of the build isn't really to get a grapple gun, but is instead to make a set of videos that will forever more be used as reference for my fellow prop builders.
I have finished cleaning up the new batarang master, and I am quite happy with it:

Please recall that this began life as a casting taken from an ICONS Ice-Rang from the movie Batman & Robin. It didn't really take all that much work, but the work took place among numerous other in-flight projects. I would like to get this under rubber tomorrow.
Mermaid tail master pattern continues. I'm roughly half way done gluing down all of the styrene. It's just very meticulous and boring work. I try to do the scales in sets of ten strips. That's about all my patience can handle before I have to switch gears and do something else.
Zero progress on Han in Carbo.
I've started a new project too. Vic Mignogna / JediVic has asked me to build a Star Trek Tri-Viewer, as seen in the conference room of the original NCC-1701 Enterprise. This will be used in his upcoming series "Star Trek Continues." I'm very excited to be able to contribute something to this production, which promises to be the finest fan made Trek show to date. I've done some initial research, some preliminary drawings, and have kicked around a few details with some fellow trek enthusiasts on the RPF. I have some dimensions that feel good. I think the next step is to build a mock up.
I'm also making a series of props for a project that I don't think I'm allowed to talk about at this time. So far, it's been a really fun process. I designed a few props using adobe illustrator, while going back and forth with the producer using iphone photos over txt message. It's really amazing how technology allows people to collaborate in ways that would simply not have been possible a few years ago. As it stands, I will be delivering about a dozen or so props to this production, though a few will be duplicates.
So as you can see, there's a lot going on right now.
I'll end with a quick story. The other day, I was having lunch at Dreamworks with a friend. (does that count as a name drop?? If you name a studio? is that a name drop????) He was giving me the tour, and he spotted a co-worker/friend of his a cube or two away. He said he wanted me to meet him, as he was cool. My friend introduced me as "Matt" and the guys response was "Oh! Rise of the MattMobile! I love your blog!!!!"
Mind. Blown.
I tell ya man, it's a funny old world when little ol' Matt Munson is being recognized by people who work at a major Hollywood studio! It was a pretty major day for me, as I assumed the PREVIOUS time someone recognized me from my videos/blog was bound to be the last.
In closing, I really do want to give my honest and sincere thanks to all of the folks who read my blog, watch my videos, give feedback, and tell me that they either enjoy the blog or are learning something from it. It's really VERY gratifying to know that my hard work is appreciated, especially when it is appreciated by people who I respect and admire. So thank you!
I realized today that documenting a project via episodic youtube is a VERY time consuming effort. I am many months into this build, and I have to believe that one of the reasons it is taking so long is because of the overhead involved in filming and editing the vids. Still, they are their own reward, so I'm not complaining. The purpose of the build isn't really to get a grapple gun, but is instead to make a set of videos that will forever more be used as reference for my fellow prop builders.
I have finished cleaning up the new batarang master, and I am quite happy with it:

Please recall that this began life as a casting taken from an ICONS Ice-Rang from the movie Batman & Robin. It didn't really take all that much work, but the work took place among numerous other in-flight projects. I would like to get this under rubber tomorrow.
Mermaid tail master pattern continues. I'm roughly half way done gluing down all of the styrene. It's just very meticulous and boring work. I try to do the scales in sets of ten strips. That's about all my patience can handle before I have to switch gears and do something else.
Zero progress on Han in Carbo.
I've started a new project too. Vic Mignogna / JediVic has asked me to build a Star Trek Tri-Viewer, as seen in the conference room of the original NCC-1701 Enterprise. This will be used in his upcoming series "Star Trek Continues." I'm very excited to be able to contribute something to this production, which promises to be the finest fan made Trek show to date. I've done some initial research, some preliminary drawings, and have kicked around a few details with some fellow trek enthusiasts on the RPF. I have some dimensions that feel good. I think the next step is to build a mock up.
I'm also making a series of props for a project that I don't think I'm allowed to talk about at this time. So far, it's been a really fun process. I designed a few props using adobe illustrator, while going back and forth with the producer using iphone photos over txt message. It's really amazing how technology allows people to collaborate in ways that would simply not have been possible a few years ago. As it stands, I will be delivering about a dozen or so props to this production, though a few will be duplicates.
So as you can see, there's a lot going on right now.
I'll end with a quick story. The other day, I was having lunch at Dreamworks with a friend. (does that count as a name drop?? If you name a studio? is that a name drop????) He was giving me the tour, and he spotted a co-worker/friend of his a cube or two away. He said he wanted me to meet him, as he was cool. My friend introduced me as "Matt" and the guys response was "Oh! Rise of the MattMobile! I love your blog!!!!"
Mind. Blown.
I tell ya man, it's a funny old world when little ol' Matt Munson is being recognized by people who work at a major Hollywood studio! It was a pretty major day for me, as I assumed the PREVIOUS time someone recognized me from my videos/blog was bound to be the last.
In closing, I really do want to give my honest and sincere thanks to all of the folks who read my blog, watch my videos, give feedback, and tell me that they either enjoy the blog or are learning something from it. It's really VERY gratifying to know that my hard work is appreciated, especially when it is appreciated by people who I respect and admire. So thank you!
Sunday, January 15, 2012
Scales Progress

Progress continues on laying out the scales. These were all laser cut. It's quite a meticulous process to get these strips glued into place. I'm trying to get them as uniformly spaced as possible. I also ran out of the glue I was using, and it took some time to find the same stuff again. Amazing E-6000. Great stuff. Turned out Michael's had it, which is rare for them. To have anything of use, that is :)
Thursday, September 22, 2011
Urethane Test Results
Much progress on the urethane front, all of it good.
Here's the stuff coming out of the scale mold. Recall that the first layer was airbrushed in, then I used a chip brush to glob in a second layer.

Very good results! I wish I had added pigment to that layer I airbrushed in, but that's cool. The goal was to simply see if the stuff could be airbrushed, which indeed it can. I'm really happy with the results. I think the mermaid tail project is going to turn out really nicely, if I can continue to get results like this. It's also very cool that I can airbrush the stuff, as that means I can do different coats in different colors, creating a really cool effect without painting it.

Here is how the diamond pattern looks. Same thing as above, the first layer was airbrushed, the second was chip brushed in. Again, very satisfactory result. The real take-away from this round is that in order to use a rigid mold, you need to put down a coat of mold release. It did not at all effect the quality of the pull. I'm pretty stoked about this. It basically means that this urethane can be used successfully on both rigid molds and flexible ones.

With those test behind me, and a few lessons learned, I moved on to the next round. This time, I added some So-Strong pigment to the urethane, and used a chip brush to put it into the mold. I also backed it with some fabric. I'll post the results of this round once I have them.

Here's the stuff coming out of the scale mold. Recall that the first layer was airbrushed in, then I used a chip brush to glob in a second layer.

Very good results! I wish I had added pigment to that layer I airbrushed in, but that's cool. The goal was to simply see if the stuff could be airbrushed, which indeed it can. I'm really happy with the results. I think the mermaid tail project is going to turn out really nicely, if I can continue to get results like this. It's also very cool that I can airbrush the stuff, as that means I can do different coats in different colors, creating a really cool effect without painting it.

Here is how the diamond pattern looks. Same thing as above, the first layer was airbrushed, the second was chip brushed in. Again, very satisfactory result. The real take-away from this round is that in order to use a rigid mold, you need to put down a coat of mold release. It did not at all effect the quality of the pull. I'm pretty stoked about this. It basically means that this urethane can be used successfully on both rigid molds and flexible ones.

With those test behind me, and a few lessons learned, I moved on to the next round. This time, I added some So-Strong pigment to the urethane, and used a chip brush to put it into the mold. I also backed it with some fabric. I'll post the results of this round once I have them.

Tuesday, September 20, 2011
Brush On Urethane Tests Continue
It's been a very busy and distracting time recently, and the urethane tests have sort of gone to the back burner. But I got back on it this morning, and did some more work.
This time, I actually brushed in the urethane, since I've already established that spraying works pretty well. Brushing the stuff in will let me clean out my molds easily, and will also give me some information about brushing.
My first instinct is that the brushed in stuff isn't going to level out. It's too high viscosity to self level. That's not really a bad thing or a good thing, it's just interesting to note. I've also experimented with some so-strong pigments this round. Ultimately, I'm hoping that an inbound pigment will give me what I need for the cape, but we shall see. I'll save that for another day
Here's a snap of all the different surfaces and treatments I'm testing.

Here's a closeup of some urethane I brushed directly onto a silicone mold. Notice that it does not lift-off or peel back at all. This is really very encouraging, and makes me extremely happy. I really feel like I'm on the right path with this product.

This time, I actually brushed in the urethane, since I've already established that spraying works pretty well. Brushing the stuff in will let me clean out my molds easily, and will also give me some information about brushing.
My first instinct is that the brushed in stuff isn't going to level out. It's too high viscosity to self level. That's not really a bad thing or a good thing, it's just interesting to note. I've also experimented with some so-strong pigments this round. Ultimately, I'm hoping that an inbound pigment will give me what I need for the cape, but we shall see. I'll save that for another day
Here's a snap of all the different surfaces and treatments I'm testing.

Here's a closeup of some urethane I brushed directly onto a silicone mold. Notice that it does not lift-off or peel back at all. This is really very encouraging, and makes me extremely happy. I really feel like I'm on the right path with this product.

Friday, September 16, 2011
Very Exciting Urethane News
After a couple of years of experimentation (though not consistently!) I think I've really had a breakthrough on the Superman Returns cape front.
If you'll recall, the big problem I've really run into is finding a suitable material to use for the outer skin of the cape. The part that is textured with a micro-diamond pattern.
I've tried a dozen or so different materials, ranging from various mixes and viscosities of latex rubber, to a bunch of different brands and shore hardnesses of urethane. It's extremely frustrating. Each one of the materials I try has its advantages and disadvantages, but none are able to produce the results I want. I came really close with a certain brand of latex rubber and a mixture of pigments, but it proved to be a bit transparent (necessitating multiple coats), extremely time consuming and error prone, and worst of all, when exposed to sunlight it would turn white and powdery.
At San Diego Comic Con this year, I sat down for dinner with the very talented David Pea of Universal Designs, (the company that brings us leather motorcycle gear that happens to be identical to some of the most awesome movie costumes ever!!) where he shared with me some of his hard earned wisdom. He suggested a few different materials and a number of techniques that I should explore. I recently did some experimentation with leather spray that did not turn out as I hoped, but it led me down a previously unexplored path.
The summary is this. I picked up a kit of Smooth-On Brush-on 50 Urethane, thinned it with mineral spirits (as per the websites suggestion) and sprayed it into my molds with an airbrush. I experimented with both a silicone mold and a rigid (BJB 1630) mold. Here are some close up photos of the results.


It may not be entirely clear from the photos, but the end result is that the urethane coated the molds VERY evenly, and did not lift up or pull back from either substrate. This is amazing to me!!!!!
What remains is to test the opacity of this spray. I need to pigment a batch, do a couple layers of spray, and see how much light passes through. I really feel VERY encouraged by my latest developments, and this is really exciting for me. The urethane goes on VERY thin when sprayed on like this, which is just great. Yes, it will mean I have to do a number of coats, but that's really no problem. The fact that it currently appears to satisfy all of my requirements is enough to offset any labor expense I may incur as a result.
Part of me doesn't want to get too excited, as I have experienced so much failure with this project over the years. Still, with results like this, it's hard not to get excited
If you'll recall, the big problem I've really run into is finding a suitable material to use for the outer skin of the cape. The part that is textured with a micro-diamond pattern.
I've tried a dozen or so different materials, ranging from various mixes and viscosities of latex rubber, to a bunch of different brands and shore hardnesses of urethane. It's extremely frustrating. Each one of the materials I try has its advantages and disadvantages, but none are able to produce the results I want. I came really close with a certain brand of latex rubber and a mixture of pigments, but it proved to be a bit transparent (necessitating multiple coats), extremely time consuming and error prone, and worst of all, when exposed to sunlight it would turn white and powdery.
At San Diego Comic Con this year, I sat down for dinner with the very talented David Pea of Universal Designs, (the company that brings us leather motorcycle gear that happens to be identical to some of the most awesome movie costumes ever!!) where he shared with me some of his hard earned wisdom. He suggested a few different materials and a number of techniques that I should explore. I recently did some experimentation with leather spray that did not turn out as I hoped, but it led me down a previously unexplored path.
The summary is this. I picked up a kit of Smooth-On Brush-on 50 Urethane, thinned it with mineral spirits (as per the websites suggestion) and sprayed it into my molds with an airbrush. I experimented with both a silicone mold and a rigid (BJB 1630) mold. Here are some close up photos of the results.

It may not be entirely clear from the photos, but the end result is that the urethane coated the molds VERY evenly, and did not lift up or pull back from either substrate. This is amazing to me!!!!!
What remains is to test the opacity of this spray. I need to pigment a batch, do a couple layers of spray, and see how much light passes through. I really feel VERY encouraged by my latest developments, and this is really exciting for me. The urethane goes on VERY thin when sprayed on like this, which is just great. Yes, it will mean I have to do a number of coats, but that's really no problem. The fact that it currently appears to satisfy all of my requirements is enough to offset any labor expense I may incur as a result.
Part of me doesn't want to get too excited, as I have experienced so much failure with this project over the years. Still, with results like this, it's hard not to get excited
Friday, September 2, 2011
Mermaid Scales
And now for something completely different.
Laamberry is working on a mermaid tale. She took a lot of the lessons that other tail makers have learned, and applied them to her own project, with fantastic results. Here's a pic of the almost complete tail she is working on.

Here is the monofin that is going to go inside the tail. Yup, it's totally perfect for swimming.

As Laamberry was putting this together, I got to thinking about how she could apply techniques that *I* have learned over the years to make it even better. I also have an array of services and supplies at my disposal that she and the average mermaid tail maker might not have. I figured it was a good opportunity for me to contribute something to the effort.
I started off by calling on my pal Philip Wise, who has been mentioned on this blog many times before for his assistance with laser cutting and engraving. I did some thinking about how I could best reproduce a "scale" look, but on a large scale (no pun intended), while doing it quickly and inexpensively. Looking around online, and after watching Laamberry do her tail, what I've noticed is that the process is very time consuming, difficult to repeat properly, and also tends to be hard to get it just right. My goal in my projects like this is to get it repeatable, easy to do, quick, and pretty inexpensive. The idea is that if someone wants a tail like hers, or wants to buy some fabric so they can sew their own, it's just a few hours work in the garage with the right materials to crank it out.
So, with that said, I put together a plan in my head on how to make it work. I figured the best idea was to draw up a single, long strip of scales, have it laser cut, then repeat it. I put together a simple drawing in Illustrator very quickly, estimating what would look good as far as scale width. I sent that off to Philip, and a couple days later, these two long strips arrived.

I cut them into small segments, so I could test my idea about how they would look overlapped and glued together.

Here they are glued together.

And finally with some primer on it to hide the imperfections.

Overall, I'm IMMENSELY satisfied with the way this turned out. In fact, I think it came out better than expected, and my mind is reeling with possibilities for this pattern. Again, ideally this would end up as a fabric. My thought is that I will make a mold out of this shape, cast them up with a thin layer of urethane, then embed fabric in it. This is pretty much the exact same construction technique I perfected while working with my Superman Returns cape. All of the R&D has been done.
I think this would also make a great fabric for an Aquaman costume. Because urethane pigments are available in tons of colors, and even metallics, I think it could be really cool.
Next steps are to make a mold of this pattern, then pull out some fabric. I'd like to see how the fabric moves and sews. I may need to go with a thinner styrene, but right now, this is looking pretty darn good.
Laamberry is working on a mermaid tale. She took a lot of the lessons that other tail makers have learned, and applied them to her own project, with fantastic results. Here's a pic of the almost complete tail she is working on.

Here is the monofin that is going to go inside the tail. Yup, it's totally perfect for swimming.

As Laamberry was putting this together, I got to thinking about how she could apply techniques that *I* have learned over the years to make it even better. I also have an array of services and supplies at my disposal that she and the average mermaid tail maker might not have. I figured it was a good opportunity for me to contribute something to the effort.
I started off by calling on my pal Philip Wise, who has been mentioned on this blog many times before for his assistance with laser cutting and engraving. I did some thinking about how I could best reproduce a "scale" look, but on a large scale (no pun intended), while doing it quickly and inexpensively. Looking around online, and after watching Laamberry do her tail, what I've noticed is that the process is very time consuming, difficult to repeat properly, and also tends to be hard to get it just right. My goal in my projects like this is to get it repeatable, easy to do, quick, and pretty inexpensive. The idea is that if someone wants a tail like hers, or wants to buy some fabric so they can sew their own, it's just a few hours work in the garage with the right materials to crank it out.
So, with that said, I put together a plan in my head on how to make it work. I figured the best idea was to draw up a single, long strip of scales, have it laser cut, then repeat it. I put together a simple drawing in Illustrator very quickly, estimating what would look good as far as scale width. I sent that off to Philip, and a couple days later, these two long strips arrived.

I cut them into small segments, so I could test my idea about how they would look overlapped and glued together.

Here they are glued together.

And finally with some primer on it to hide the imperfections.

Overall, I'm IMMENSELY satisfied with the way this turned out. In fact, I think it came out better than expected, and my mind is reeling with possibilities for this pattern. Again, ideally this would end up as a fabric. My thought is that I will make a mold out of this shape, cast them up with a thin layer of urethane, then embed fabric in it. This is pretty much the exact same construction technique I perfected while working with my Superman Returns cape. All of the R&D has been done.
I think this would also make a great fabric for an Aquaman costume. Because urethane pigments are available in tons of colors, and even metallics, I think it could be really cool.
Next steps are to make a mold of this pattern, then pull out some fabric. I'd like to see how the fabric moves and sews. I may need to go with a thinner styrene, but right now, this is looking pretty darn good.
Subscribe to:
Posts (Atom)