Monday, February 11, 2013

Many New MattMobile Flaws Revealed

Mostly a pictorial update today, as it's kind of the same stuff you'll find in many other of my blog posts.

Painting on the primer revealed a lot of little flaws all over the place, and today I spent some time adressing some of the more obvious ones. I really just sort of pick a spot, look for problems, then attack. The types of things I'm working on now are what I'm referring to as "spider cracks", even though they are not cracks, nor are they made by spiders.

But they SORT OF look like spider webs. I think these were just flaws introduced into the molds, maybe due to cracked paint or something. Who knows.

Here's how the front looks now. I didn't do any sanding on the primer, but instead decided to fill the obvious holes that were revealed by the light color.

There was a lumpy imperfection right down at the bottom, behind the drivers side front wheel well. Sanding it fixed most of it, but there were some recesses which have since been puttied over. I'm beginning to depend a bit more on my mouse sander for knocking down stuff like that. I really don't like using mechanized sanders on the body, mainly due to a fear that I will knock down too much too fast. This has happened to me in the past on other projects.

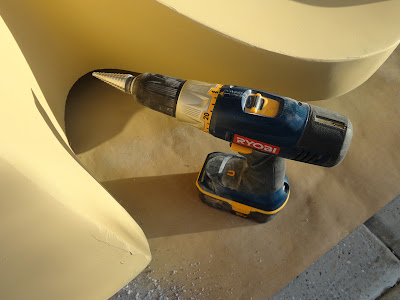
I also got started on cutting out the headlight recesses. I used this drill bit to chew out big holes, which will be used as starting points for my jig saw. This thing goes through fiberglass like magic!

Here's a general look at how things currently sit on the drivers side. You can see where I've applied some VERY thin swipes of putty in order to fill in scratches and the like.

Another imperfection I noticed after I applied the primer was attended to here. Just a slight rise in the body along the ridge.

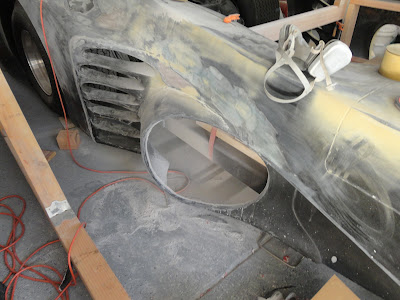
Lastly, here's my most significant accomplishment of the day. I took out the side air intake cover. I finished the job using my grinder, and then went in with a disk sander on my drill. The latter gives me more control and a more smoothness. Hard to tell in this photo, but it turned out really nicely.

Also, I'd like to take a moment to thank all of the folks who are following my blog, reading it, and even commenting on it. Your words of encouragement are really appreciated, as are your questions and comments. All are thought provoking, and many help me think of solutions that I had previously not considered. Please don't read this blog thinking I am an expert at making Batmobiles. I'm not. This is my first one, and It's ALL new to me. So if you see me doing something that looks wrong, or you know of a better way to do it, please don't hesitate to let me know!

Sunday, February 10, 2013

MattMobile Shell Leveller and Captain Jack Harkness

Progress continues at a brisk pace!

Bo The Welder has ABSOLUTELY outdone himself with the creation of an amazing piece of engineering. BTW designed and built an adjustable wooden harness that fits inside the car, and allows him to position the shell at the EXACT location it needs to be on the frame. Once positioned, BTW will be able to take precise measurements and start building out the metal infrastructure which will be used not only to add stability to the shell, but more importantly to keep it in place. I'm absolutely thrilled with the brilliance Bo delivered on this task, and I could not be happier!

Meanwhile, I continue to contribute in the little ways that I can. lol. Just today I used my reciprocating saw to remove the flat part of the side air intake.

I also did a little bit of work cleaning up the flash on the intake, but I burned through my last sanding disk before I could finish.

I also spent about an hour working on the passenger side and gas cap area. This part is really coming together. It might not be entirely obvious from this photo, but you can sort of see all the different layers of putty and sanding that have gone into making this side the proper shape. Even more work has been done right where a drivers side door would be, if the car had that feature. The next coat of primer will cover up this area so I can figure out where else I need to work.

Lastly, with Gallifrey One nearly upon us, some friends of mine are putting together a little video that is a mashup of Doctor Who and The Big Lebowsky. They needed a Captain Jack Harkness to play the part of Jackie Treehorn (Noted pornographer and producer of fan favorite "Log Jammin'") and who better than me!

It's a bad photo, but you get the idea. As soon as the video is finished and on youtube, I'll be sure to post a link.

Thursday, February 7, 2013

MattMobile Update: New Coat of Primer

It's been a strange mix lately of super productivity, and extreme lack thereof. The lack I speak of has been largely brought about by travel, which has taken me out of town. I spent ten days in southern Georgia working on Star Trek Continues, then just last weekend went to Toronto for four days for a bit of business. (not the funny kind, mind you)

But the work continues, nonetheless.

I have definitely gotten to understand the long-running problem faced by fellow batmobile builders, which is one of lack of progress. I think what happens (as I suspected) is that a project this daunting is just simply hard to stay motivated on. When you look ahead at the ocean of work you have ahead of you, and the tiny puddle of accomplishments behind you, it's easy to be dissuaded. It's almost a daily exercise of simply forcing myself out into the garage to do some work.

The upside is that once that mental threshold is crossed for the day, and I start in on the car, the time really flies. I actually really enjoy working on the car. I find it both relaxing and theraputic. And it's also pretty darn awesome knowing that I'm getting closer to having a finished batmobile. But alas, as mentioned, I understand the dilemma.

That said, today was pretty productive. If there's one thing I hate more than sanding, it's painting. Actually, the painting part is pretty fun. It's all of the prep and clean up that makes it no fun. My goal for today was to lay down a coat of buff primer. This is a thick, heavy, sandable primer whose goal is to not only fill in minor scrapes and pin holes, but also to reveal problem areas. And reveal it did!! I found about one million little areas that need attention.

The counter to this is that it also revealed just how much I've already accomplished. The front fenders are REALLY looking beautiful, and I'm super happy with how they have come together. These were the most obviously wonky part of the shell, and I thought it very important that the first thing you see when the car is coming at your face look symmetrical and smooth. I'm definitely getting there.

Here's how the drivers side looks. I've put in many hours working on this side, primarily on the side intake hole and the vents. Still a lot of micro-details to work on, but it's really taking shape. Not really sure if the pictures properly convey how far this has come... or how much more work there is to do.

A closeup view of the side intake. Looking really smooth!

And here are the side vents. Still a lot of work remaining here, and a little bit of symmetry I'll need to establish. I'll need to wrap my head around how to best approach that, as I currently don't know. For the record, many of the names for parts of the car are simply being made up by me as I go :D

Here's a bit of a wider view of the front fender, which shows the drivers side also.

Alas, our old friend the gas cap. It seems like ages ago that I first glassed this into place and started working on smoothing out the seam lines. I've learned so much since then, both through research and trial and error. The work I've done on the front fenders was all based on things I learned while doing this little feller.

You can see from this picture that I'm starting to work my way around to the passenger side. I've done a lot of work cleaning up the seam line that rolled over the front fender and down into the wheel well. It's come a VERY long way, and for the most part I'm happy. But the wheel well hole itself is not perfectly round... or even close. There's a big lump on one side that will need to be attended to. But one step at a time.

LOTS of work has been done on this fin. It's really looking good, and many of the problems have been attended to. I think the focus will now shift to cleaning up the seam line that runs down the back of it, and making sure the profile is nice.

That's about it for now! As you can see, much accomplished. Also much to go. Bo should be here tomorrow to do some more work on the frame, so that should be cool. And yes, there is more travel in my future, so stay tuned.