Friday, May 24, 2013

TARDIS Build Update - Part 13

Painting is now well under way, and this post sort of focuses on that effort.

As is typical with all things Project Work Bench related, I do want to say this: ALWAYS wear a respirator when spray painting. Whether from a spray gun, or a rattle can, ALWAYS wear a respirator. I'm not talking about a dusk mask. Or a bandanna over your mouth. I'm talking about a respirator. The kind with the removable and replaceable cartridges. Get one from Home Depot. What's that you say? You don't have thirty bucks to spare? Well then, don't paint. The money you spend on that respirator could very well save your life. Best money you will ever spend. And if you're thinking "Yeah, but lung cancer happens to OTHER people. People who spray paint all day." Wrong.

With that PSA out of the way, let's cut to the chase.

I was pretty much just grabbing parts that were nearby and painting them. Here's a few.

Though probably not necessary, I painted the inside of the roof pyramid with a satin black enamel. Just brushed it on. This will never be seen from the outside, but if someone is inside, I certainly want to present a finished tardis to them.

Even more painted parts. Each one of these needed at least three coats.

Here's one of the walls all painted up. Looks good, man! That paint really brings the tardis together!

As with the inside of the roof pyramid, I painted the back sides of the walls with the satin enamel. Just rolled it on using a paint roller. Since all of the edges of the walls will be entirely invisible when the beast is constructed, I didn't really pay too much attention to making sure they were crisp and clean.

The idea for the base was to have the inside part the satin black, but of course the edges would be blue. I started by masking off an area, then rollering on the satin black.

Turned out very nicely!

Then I masked off the black stuff I had just painted, so that the blue and black would be distinct.

Here's a kind of wide shot of the garage. You can see the base up against the wall in the back, where I have painted the outer lip with the satin black. Probably entirely unnecessary, but who knows.

I needed to touch up the underside, inside edges of the pyramid, so I masked off the parts I had painted with the flat black. This is really a study in bad planning, as I should have done all the blue before doing the black.

Painting the pyramid and base. I used a dolly I got from Home Depot under the base so that I could move it easily, and keep it off the ground during painting. The base is immensely heavy, and hard to manage alone.

The roof base was up next. With all the nooks and crannies, painting this took a bit of time.

Base is all done, and looking great!

That's it for the painting pics for now. While waiting for some paint to dry, I cut out the hole for the door lock. Used a special bit I got from Home Depot, which happened to be the perfect fit. Lucky! Please note that this lock and key are dead on accurate for the Smith tardis. Granted, the pattern of notches on the key is different, but you get the idea.

Whew! That about wraps things up for now. As of this writing I'm still doing more painting, and in a big push to get the beast done. I was hoping to get it all finished by Sunday, May 26th, but with the final coats of paint requiring more care, I'm not sure if that will happen. Worst case, it will be sometime during the week following.

As always, thanks for reading! I hope you're enjoying the build!

Thursday, May 23, 2013

TARDIS Build Update - Part 12

Welcome back! As usual, much to report. First up, I have a picture of the tardis fully constructed. At this point, all of the sub-assemblies are complete, and the overall build is complete.

But that doesn't mean there isn't still a lot of work to do. Though my overall plan was just to "git-er-done", there are some things that just bugged me too much to ignore. One was a seam line between cove strips that did not match up very well. Though it was only about a 1/16" gap, it was on the front face, and I felt drew attention.

Using the ever popular ted smith "Bondo Squish" technique, I packed the crack full of bondo.

After some clean up, it looked one million times better.

Now it was time to start painting. For reference, the paint I chose cost almost 500 bucks for one gallon, plus a gallon of reducer. Not cheap.

Because I'm going to be painting in the garage, and wouldn't mind if my entire garage didn't turn blue, I masked off one corner. Very Dexter looking, if you ask me.

Here's a pic of the very first shot of paint!

After a couple of coats, the posts were looking like this. The wood I used soaks up that paint like a sponge, so many coats were needed. Still, the overall effect is very nice.

I had a little bit of paint left in the gun, and since it didn't occur to me to pour it back into the bucket, I sprayed it on the tardis.

What I was really doing was trying to get a feel for how the paint would work with the plywood, and how the wood grain would stand out.

Though not the best photo, the lesson learned here is that everything was going to work out just fine.

In the mean time, my handles arrived from the UK. A fellow RPFer wrangled these up for me, and I am extremely grateful for his help. Thanks Matt!

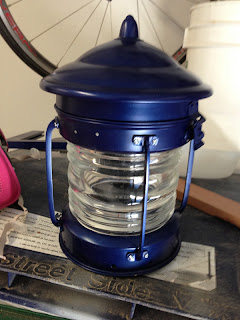
Wanting something cool to show for my work, I decided to tackle the paint on the lantern and the phone door.

The lantern looks great, though I still need to paint the screws that I used to hold the whole thing together.

And the door looks absolutely stunning. This is the entire thing assembled. Hinges in place, handle in place, everything working!

Then my Police Box signs showed up from Canada. Thank you Justin for the quick turn around, and quality product. They look amazing.

There will be another update to follow shortly. I still have about 15 progress photos that I need to post. I've definitely been spending more time focused on the build than on the documentation, which honestly is how it should be.

Speaking of which, I've recently put together a couple more Team Tardis videos. They apparently are quite amusing. Please check them out, subscribe to my channel, and let me know what you think.

This first one is pretty wild, if only because of its introduction by Star Trek alum, Walter Koenig. He played Chekov in the original series.

Thursday, May 9, 2013

TARDIS Build Update - Part 11

It has indeed been a while since my last blog update, the work on the tardis has been screaming along. Fear not! Also, since my last post, I have NOT had a close encounter with a saw blade. Apparently I learn from my mistakes.

To finish up the roof, I used my router to cut a chamfer along the edge of the inner lip that I installed in order to keep it in place on the base. This helps in the assembly of the roof ,and happens to work really well.

I believe this is the first picture I have of the tardis fully assembled. All of the primary construction elements are in place. From here on out, it's all details.

Because the thing is so tall, it's actually kind of hard to get a look at the pyramid that sits on top. I think I'm standing on a chair here.

Honorary Team Tardis member and award winning costumer, Hannah Black came by one day on her lunch break to check things out. I snapped this picture. When posted to Tumblr with the caption "Hanhardis", the internet shut down for a few days due to overuse.

Back to the main plot, a big box of water jet cut window frames arrived from master builder Philip Wise. The frames are great, and I love them all. Even though I only need eight of them.

I ended up doing some more work on the door sign, as a minor calculation error caused the sign to be too narrow. As of now, it is absolutely perfect and I consider it done.

The window frames that Philip sent were all cut slightly too big, which allows me to router them down so they fit perfectly in MY tardis build. As experience has shown me, measurements are extremely subjective when it comes to woodworking, so Philips plan of leaving some wiggle room was definitely the right one.

Here's the first window in place after re-sizing.

After A LOT of work on the router, including the building of a jig which would allow me to shave off a measured width from the frames each time, I got all of the frames in place.

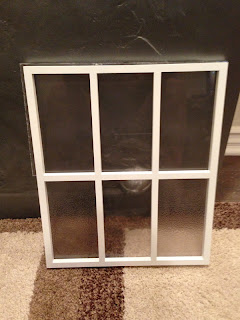
A sheet of pebbled plex showed up, which I then cut into the proper sized pieces for the windows. Please note that these go in the bottom left and bottom right sections of the window frames.

At about the same time, my lantern showed up. Mine is the one on the left. At the end of the day, depending on which screen grabs you are looking at, it appears that Ewans is more accurate. It has the correct number of vent holes around the base. However, the overall shape of both lanterns is really great, and I'm absolutely thrilled to have this part of the build locked down and rolling.

Also we have some castings of the correct lantern topper.

After a ton of work with the dremel to pull the lantern apart and cut off the top, it's all primered and ready for painting.

Here's how it looks all primered and put back together, minus the struts.

And now the project really takes a turn into the un-fun zone. While this is all work that had to be done, it was just so painfully tedious that it made my brain melt. The fact that there were eight of these window frames to be managed made it really tough. I had already invested a lot of work sizing the frames properly, so this wasn't even the beginning.

I started out doing some puttying on the insides of the frames. The water jet cutter caused some blowouts and tiny places on EACH of the window openings that needed to be attended to. There was also a texture left by the cutter that I wanted to smooth out. In short, every surface of the window frames needed attention. Recall that there are eight of them. ouch.

Distraction came with another Team Tardis build day. Ewan is seen here working on laying up his first wall.

We also managed to glue up Ewans roof pyramid on this day. The roof base is also complete, meaning that the next step here is to attach the pyramid to the base.

With all of the window frames now sanded and puttied, it was time to paint. Long story short, these need to be primered first, then painted. This is not how I did things. I thought painting directly on them would work, but the auto paint I chose wasn't nearly opaque enough to cover the primer, so I ended up doing everything twice. This included three trips to two different auto parts stores to buy the paint I needed.

For reference, here's the paint I used. I don't have any inside intel into what the BBC woodsmen used on theirs, but this is what I used on mine. White is white.

Here's the primer I used. I usually steer FAR clear of rustoleum products, but this one seemed to do the trick.

With the windows painted, it was time to turn my attention to attaching the plex. Like Philips build, I used VHB tape to do it. A roll of the stuff cost me 75 bucks, and I'm pretty sure I burned through more than half of it. I started by gluing on the clear and the pebbled. Cutting the clear to the proper size and dimension took MUCH longer than I expected, and it took me quite a while to figure out a tactic that would allow me to cut the stuff without damaging the plex. I ended up using a coping saw and a jig that would support the weight of the plex as I cut it. The first few times the plex snapped off right as I was nearing the completion of the cut. Oy. Very frustrating.

Today I went to a local plastics place and picked up a bunch of white plex to go behind the clear plex. I used VHB tape once again to secure this.

All told, these darn windows took about five days to get finished. BUT, once in place, they look just great.

That is where things stand as of right now, on the evening of May 9. I have my "Police Box" signs on order, and hope they arrive soon. Aside from a little bit of clean up, I think I'm about ready to paint. I picked up my paint today, mind you. For a gallon of the stuff and reducer, it was just under 500 bucks. Tardis buildin' ain't cheap.