
Just a quick pic of a build up I am in the middle of. It's going together really quickly, so I decided it was finally time to do a video tutorial. As soon as I'm done with this build I will start. Stay tuned for more!
Just a quick pic of a build up I am in the middle of. It's going together really quickly, so I decided it was finally time to do a video tutorial. As soon as I'm done with this build I will start. Stay tuned for more!
I'll provide the executive summary here, rather than at the end. Be sure to read the entire post to make sense of each of these points.
Now let's dig into each of those points a little deeper, and give a better explanation of the reasoning behind them.
My entire strategy hinges on one key assumption: that America will continue. That the USA will continue to grow, to exist, and to prosper. If you do not share this assumption, then my investment strategy is not for you. If you DO believe this, then I have some very simple advice to offer you. The strategy I believe in will not get you rich quick. It will make you money over time, assuming our key assumption plays out. It will net you a lot more money than just putting it into a savings account, and in my opinion is one of the best investment strategies around. It's simple, it's safe, it's affordable, and best of all as America grows, so does your net worth.
If you haven't seen the movie "Wolf of Wall Street" yet, I highly recommend it. There's a great little scene in there were Matthew McCaunahey's character is explaining the fundamentals of the investment business to newcomer what's his name.
Your first assignment is to watch this entire video.
The crux of it is this: the people trying to "help" you invest your money and increase your net worth are actually just trying to make money for themselves. SURPRISE! Go figure, right? Turns out, this is entirely true.
Almost universally, financial advice, management or leadership comes with a stiff price tag, be it implied or actual. Every time your investment manager convinces you to do a trade to better position yourself to outpace the market, he gets a commission. Every time you buy a product from them, they get a commission. There's an old joke about money managers: they will continue to manage your money until they've managed it all into their pockets. The other oddity about money managers is that almost universally, they don't know more than you do. They don't have access to any more information than you do, or that which is publically available. What they have is an infrastructure, one which is created to craft the illusion that they can help you beat the stock market, and turn your dollars into millions. The truth is far less appealing. Where do you think they get the money to pay for the big offices, the commercials that run during prime time tv, the bonuses that they pay for their best sellers? They get it from you, the investor. So this begs the question, why give your money to them when it can be put to work for you?
The highest earning sales guys (and that's exactly what they are, sales guys) will tell you that on your own, you don't stand a chance of outpacing the market, and that with them, they can leverage their giant network and access to help make that happen. This is nothing but a sales ploy, in order to get their hands on your money so they can fee you into oblivion.
I say all of this to set up the first pillar of my investing strategy: Manage your own money. Open an account with a brokerage house like Fidelity, and make your own decisions. Don't give your money to some money manager who is free to move it around as he sees fit, and charge you fees with every change. Shop around for a place that you like. There are plenty of them out there. Find a place where you can put your money, manage your trades yourself. Typically there's a transaction fee for each trade, and they will vary. There are lots of great discount brokerages that offer very low transaction fees, and great service. Find the place that works best for you. There are loads of online resources for finding a good place to keep your money. I use Fidelity.
Let's go back to that primary assumption I spoke about earlier. The belief that America will continue to survive and prosper. A brief look at the stock market will show that in general, over time, it has shown improvements and has continued to grow. Just like America. I remember in the late 90's when the Dow Jones Industrial Average broke 10,000 and we were all stunned. Since then it has almost doubled. So since the DJIA began being calculated in 1896, up until the late 90's we go to 10,000, and then less than 20 years later we've almost doubled. THAT is incredible growth. For some reason investors are obsessed with beating the market, when simply FOLLOWING the market will show significant returns over time. FAR superior returns to many other investing vehicles that are available.
This leads to my second pillar: The plan is to follow the market, not beat it. By simply following the market, working under the assumption that America will survive, you stand to make a lot of money over time. Pull up a chart that shows the growth of the S&P 500 over the past 20 years. If those seem like acceptable gains to you, then we are on the same track here. The problem with trying to beat the market is that you need one of two things: critical information on which companies are going to grow unexpectedly over time, or a bunch of money, time AND BLIND LUCK to constantly shift your money into higher earning stocks. Remember, nobody knows which stocks are about to explode. Anyone who tells you that they know is trying to sell you something. And by that, I mean "part you from your money". Remember that moving money around in the stock market costs money. The fees are what will whittle down your nest egg, and rob you of any gains that you make over time. Nobody can predict the stock market. If they could, they would literally own all the money in the world. Even just a slight advantage over time would lead to someone with extra-market knowledge to a position where they would literally own everything. So put aside the fantasy that you can outthink the market, or that you know someone who can do it for you. That's a fantasy. Which leads us conveniently to the next point:
Follow a buy and hold strategy. Shifting money costs money. For every story you hear about a savvy investor who moves his money around frequently and has gotten rich, there are thousands of stories of people who lost tons of money following the same strategy. For many investors, investing in stocks is akin to gambling. They get a good feeling about a company, or a friend gives them a tip about a company THEY have a good feeling about, so they throw a bunch of money at it and cross their fingers. And they lose. Just like gambling at a casino. And honestly, gambling at a casino is more fun because you get free drinks and just might get a free room. Recall that the strategy you are following here is to build wealth over decades, so that when you are ready to retire, you are sitting on a giant pile of cash. If your goal is to get rich quick by identifying companies that are about to blow up, I can assure you that your time, money, and efforts are better spent at the race track or casino, where at least you will have fun losing your money. Once you buy a stock, don't sell it. Don't let the ups and downs of the market force you into thinking that you need to sell. That is the path to the poor house. The sad thing is, this is what many investors do. When they see a drop in the stock price, they sell out of fear that the stock is about to crash. What happens is they lose a chunk of their original investment, and then move onto another stock... where the cycle repeats. Folks, here's how the market works: it goes up and down. it fluctuates. There will be days when you see the value of your investment go down. There will be days when the value of your investment goes up. But over the course of decades, if you believe that America will survive and it continues to do so, you will see your investment grow into something huge. Buy a stock, and hold onto it. Don't sell until you are in your retirement.
And now we really hit the biggest question of all. Which stocks do I buy? The answer is really simple. I recommend you buy an index fund, one that tracks the S&P 500. The S&P 500 is a broad index that covers a large part of the market, and in my opinion, is a good metric of how America is doing. While the Dow Jones is a more well known index, it follows large companies that are more industry leaders than representative of how America is doing. That's just my opinion. Research this if you are curious. There are all kinds of indices as out there, and all kinds of funds that follow them. I like the S&P 500 because it's broad, it's general... it's America. Once you sign up with a brokerage, find which funds or spiders they have that track the S&P 500, and start buying. Look for a no-load fund. That means there are no extra fees on the front when you are buying, and none on the back when you are selling.
How much should you buy? As much as you can afford, and as often as you can. Do not let market fluctuations thwart you. If the market is up one week and the spider you want to buy is more expensive than it was last week, DO NOT try to wait it out and see if the price drops. It might be MORE expensive next week. Trying to outthink the market is NOT the game you want to be in. You want to be the slow and steady investor who is completely unemotional. I recommend you set aside a part of each paycheck that you dedicate to investing. If you can afford 100 dollars, do that. If you can afford more, do that. If you can afford less, do that. There are a number of investment strategies out there that dictate how much to buy each period. For example, if the stock happens to be low when your paycheck arrives, you buy a little more. If it happens to have gone up, you buy the fixed amount you typically buy. This helps reduce the peril of emotional purchases, but also helps you hit it a little harder on the downside. Personally, I think a simple strategy is the best one, where you just buy what you can each month. Set a minimum that you are comfortable with, and stick with that NO MATTER WHAT. If you can afford to buy more on a particular month, do that. The key here is that you are consistent. Don't sit out the month of December because you need that extra money to buy gifts. Budget your money so that you have money available, but are still able to buy your monthly stock.
When should you start investing? Right away. Today. Yesterday would have been better, but today is just as good. Remember, trying to outthink the market is a fool's errand, and anyone who tells you they can is trying to sell you something, or to steal your money. Don't sit on your money hoping that the market will be softer next week. It might not. And whatever you heard on CNBC to suggest that it will could be utter nonsense.
One of my favorite parables about investing is this one: Even the blind squirrel finds the occasional acorn. I bring this up because the investing industry is full of these blind squirrels. People are screaming at the top of their lungs that they saw the housing crash coming, that they knew the fed was going to lower rates, that they saw such and such coming from a mile away, etc. It's all ex post facto posturing. And while the squirrel may have indeed correctly predicted a certain event coming or transpiring, that in no way means they are aware of the next one. I have been reading financial news, articles and blogs on and off for 25 years now, and honestly they have all been saying the same thing over and over and over. And remember, they're ALL trying to sell you something. Whether it's tuning into their show so you are forced to watch the commercials, paying for the latest issue of their online paper, or flat out buying their investing product, the whole money making industry is geared around taking your money from you, not making money for you. My point here is that you shouldn't listen to any "expert" whose ultimate goal is to sell you something.
My last piece of strategic advice is to roll your dividends and profits straight back into your account. If any of the companies in your index pay out dividends, don't take that out as cash, but instead be sure to invest that money straight back into your nest egg. Many places offer to do this automatically, which is an option you should definitely take. It's basically compound interest, which is where great gains can be made over time.
I think the only rebuttal to my strategy is really this question: But what about Birkshire Hathaway? Warren Buffet is probably the single most successful and popular investor on the planet. He makes piles of money investing, and typically outpaces the market. He is really the golden egg laying goose. The man and his company really know what they are doing, and I respect them tremendously. I personally would recommend them as an alternative investing strategy, because they have consistently shown themselves to be profitable. I think the only caveat is that their run could just as easily end tomorrow. Buffet could die, and the new guy that takes over could be a total schmuck. Remember that the first question I asked you was about America surviving. If you believe that and it turns out to be true, then the strategy I have outlined will be successful. You do not have the same level of certainty with BH. I actually really like Birkshire Hathaway, but I prefer to be in control of my own money, so I follow my own strategy.
And that's it! That's all you need to know. Remember, the real key to my strategy is that money managers are really just self serving, and don't have any true insight into the market or mastery of money making. If they did, they sure as heck wouldn't share it with us! By managing your own money, you save a fortune on fees, and will ride along with the market as American continues to grow. Good luck!
Here is my recently acquired steering wheel for the MattMobile:

To my eye, it is perfect! I can't wait to get it installed.
While kicking around ideas for the Wonder Woman Dawn of Justice shield, which I am also blogging about, I decided it would be in my best interest to build my own vac forming table. It's something I've wanted for a long time, but never really had a great reason to build. But with this project upon me, the timing was right. I watched a few youtube videos on how they are made, and to get a good machine up and running seems surprisingly simple. I already have a shop vac, so most of the expense is already done.
I started with a piece of plywood that I had lying around the shop. I believe this is left over wood from the Tardis build. I cut a couple 26" x 26" squares. I then measured off a grid of 1"x1" squares.

The fun really began when I had to drill out all of those holes. Tedious, but really no way around it.

I then cut out the walls and glued them into place on the top piece.

A few wood screws later and it was time to attach the base.
And no, I didn't drop it.

I then used a hole boring drill bit and a set of metal files to carve out the hole for the hose. Fits like a glove!

And after a couple short hours of work, the table was complete. The next thing I need to do is build a frame for holding the plastic, and a chimney to channel the heat from the heating source. Honestly I think the hardest part of this project will be finding a good heat source. I already have a few things in mind, but the bummer is heaters are out of season right now.
Anyhow, that's it for now! I'll post again once I have some more progress.
I am once again revisiting the fabric. I'm sad to say that if you snooze, you lose. This proved to be true recently in my case. A year or so ago, I found some great fabric in the fashion district which was 65" wide. I purchased enough for a couple of capes. I went back the other day to buy more, and they are all sold out. Should have gotten the whole bolt.
I still have other options. One is a VERY nicely colored heavy weight jersey knit. I currently have enough for two capes. In my older blog posts, I was lamenting the fact that I couldn't seem to get the center crease out of it. I even took it to the dry cleaner to have them press it out. I don't know why I didn't think of it then, but all it needed was a good wash in the washing machine. I did this just today with this length, and voila, the crease is gone. In this pic, the fabric is draped across my dinner table drying.

But I digress. Let's get back to the workshop and talk about the cape mold. As you will recall, I am using a latex from the Motion Picture FX company to do my cape layups.
The other night, after reading some stuff online, I decided to experiment with my spray gun, to see if the latex I am using can be sprayed, and better yet if it will stick to the mold properly. I figured this would save me a ton of time and hassle if it works.
Sure enough, my spray gun is indeed able to spray the stuff. It's not perfect, and I will probably purchase a cup gun shortly, but the idea is sound. Next step was to see how it would work on a silicone mold.

As you can see below, it worked AMAZINGLY!
The latex went on nice and thin, extremely smooth, evenly, AND it didn't pull up from the silicone at all. I was thrilled!

I put the fan on it and let it dry for a few minutes. I peeled up the corner to see how it looked. Absolutely perfect.

Here's a close up. The punchline is that it captured every tiny detail. No bubbles. Zero bubbles. It feels like it's christmas time!
Also, for reference, please note the color difference between the wet latex and how it looks after it's dry. When it's wet, it looks bright pink. When dry, it's dark red. And that is MADDENING! It's essentially impossible to mix the color of latex on sight, as it changes so drastically once it dries. This has proven to be a pain in my rear for many years now. But read on, dear reader, for there is good news ahead.

And now I had a new purpose in life. I was also out of latex, so it was time to get more. I made my way to the Motion Picture FX Company up in the valley. They have a really great store! If you're ever in the area, be sure to check them out.


While I was there, I picked up some more urethane pigments that I'm going to experiment. I'm certain you'll be able to find the results on this blog eventually.
Meanwhile, back at the shop, I started to do some experimentation with attaching fabric to the cape. Sadly, it didn't go too well, but it gave me an excuse and an opportunity to experiment with different techniques and materials.
Here you can see the two different fabrics that DIDN'T go down too well, along with a few scraps that I was using to test different spray adhesives.

After this round of tests, I have completely abandoned the spray adhesive approach. Though it could be made to work, it is highly error prone. Long story short, if you get a little drop of spray onto the cape, it ruins the latex. And it's impossible to not get drops. So that's out.

I also did another pour up of the chest emblem. I was once again experimenting with pigments, and also with a different shore hardness. This time I used PMC-770, which ultimately proved to be to soft. I definitely think PMC-780 is the right material to use on the chest emblem and the belt.

The last topic for this post is regarding pigment for the latex. You may recall from my last blog post that I was revisiting some paint I acquired while in Ohio a few years ago. Montpelier Velvet Red. I walked to Home Depot only to learn that they cannot match the paint, which meant it was off to Lowes. A super friendly dude in the paint department was able to grant my wishes, which was for not only a pint of the red, but also a pint of JUST the pigments that they use to turn the white Valspar primer into the Velvet Red. Thank you, anonymous stranger at Lowes. You are the man.
I took the paints back to the workshop and mixed up a little batch, just taking a guess at the percentages of paint to pigment to latex. I did a tiny layup in a mold and OH MY GOD the color is beautiful!!!!!! I do believe I have solved the problem of getting the color I want for the cape's outer shell, and I am extremely happy. I have to give a quick shout out to David at UD Replicas, who originally provided me with the idea of mixing latex paints directly into the latex rubber. It took a while to get it right, and a bit of ingenuity of my own, but I really think I've finally got that part locked down.
So yes, it's bean a very productive week, with a lot of great breakthroughs. The main problem I have right now is that I don't have a fool proof method for attaching a giant sheet of fabric to the back of the outer shell of the cape. I'm trying to come up with some kind of rig that will help me do it, and I have a few ideas. I think one of the next things on my plate is dying the cape fabric with the correct ombre that I'm looking for. More on that soon.
As always, thanks so much for reading! I hope you enjoy witnessing my progress as much as I do making it.
Recently I sat down with my trusty Dremel tool with a sanding drum attachment and cleaned up the two belts I had cast up the other week. (Also, for reference, "Casted" is not a real word. Don't use that word when talking about molding and casting things. It makes you sound like an idiot. Just saying.)
I cleaned up the flash from behind the "S" symbol, and also along the edges. These turned out great.

On the screen used belts, there would be a little segment of fabric behind the buckle, and behind that a piece of velcro. The fabric is the same stuff that the briefs were made of. Yay costume trivia!
I am once again back on the experimentation train with the cape. I keep coming up with new ideas that I want to try, based on old ideas that I had previously messed around with. The other thing on my mind right now is the ultimate fragility of the silicone mold I made of the cape. That cape mold is about seven years old right now, and frankly, silicone doesn't last forever. The last pour I did of urethane ended up doing a TINY bit of damage to the mold, as mentioned in a previous post. It happened when I was doing some color tests, and the damage was done to the edge of the mold, where there wasn't even a diamond pattern. But the fact is, the mold is getting old and I fear that my next coat of urethane on it could end up doing some damage.
What I'm in the process of doing now, in conjunction with some color and process experimentation, is doing a preservation pull of the cape. I want to get a top quality pull out of the mold, so that if for some reason it dies, I have a copy of it available for making another mold. I know this may sound like overkill, but honestly if that mold gives out in the middle of a pull now, the project is pretty much cancelled.
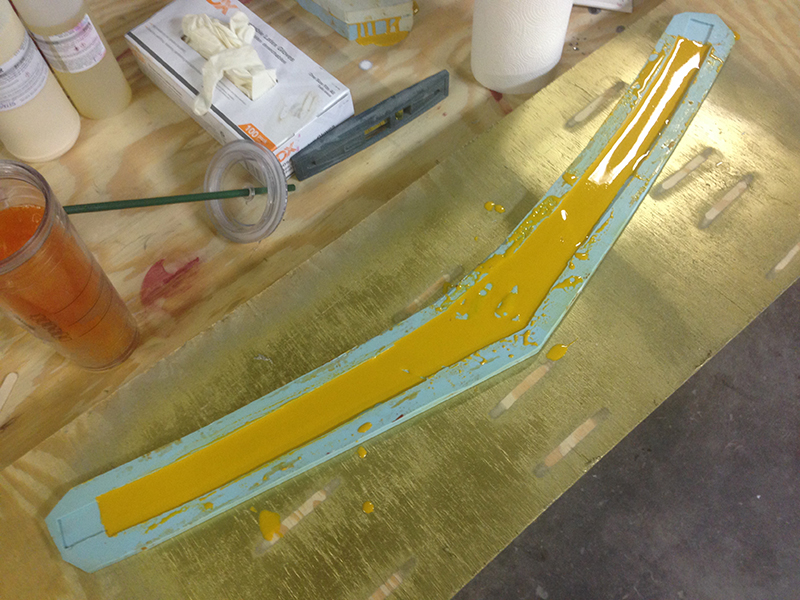
Here's where the mold stands as of the last round of applications.

I really should have reviewed some older blog posts before taking on this task, as I had to re-learn my process for applying the latex to the mold. It's not as easy as you might think, and there is some mystery to the technique necessary to get a good surface out of this. Though the color in this photo is not at all representative of the actual color, you get the general idea. This is three coats of latex.
For reference, this is the color I am using. If you took this color and painted it on a white wall, it would be exactly the color I want my cape outer shell to be. However, when this paint is mixed with the latex that I am using, the stuff from Motion Picture FX Company, it lightens it up a little. Heck for all I know the only reason it appears lighter is because it's still pretty thin. Maybe I just need to add more paint to the latex.

At this point, it's still just an assumption that this process of mixing off the shelf paint with latex rubber is even going to work. It might not. The paint may very well not bond properly with the latex rubber. Who knows. Hence the experiment.
Kind of funny that this is paint I purchased when I was living in Ohio. Sheesh, that was like four years ago. What a wreck.
Here's the stuff.

I think the plan is to mix up one more serving of this latex, apply it to the cape, and then apply a fabric backing to it. Honestly, I don't even think this will be a usable cape, as the first layer of latex was a real mess, due to me forgetting my application technique. But as with every time I do anything on this project, it's a learning experience.
I don't remember if I posted this before, but it seems relevant given that my post began with the belt. Check it out and let me know what you think!

What you are looking at of course is the chest emblem and belt from the Superman Returns costume, in this case these are straight out of the molds. Off to the right is a piece of cape fabric. It's like all the magic is happening in one place!
Let's dig into the meat and bones of this post, which is an update on some R&D work I've done lately on the cape.
For reference, this is the new product I got from Sil-Pak that I am experimenting with. It's called RU-420.

It's VERY soft, with a 20 shore hardness BUT it's an opaque, light amber color, which is very interesting to me.
No surprisingly, when I mix Sil-Pak pigments with it, I get very predictable and nice results.
To demonstrate to you, dear reader, how well the pigments work with it, allow me to wow you with this photo. What you are looking at is a test pour I did of RU-420 into a scrap mold, surrounded by all of the pigment tests that I did a few days earlier, using VytaFlex40. Now don't get me wrong, I'm sure much of the problem is me, but what this picture clearly reveals is that I was able to mix together a very respectable red using the RU-420 as a base, whereas I was unable to achieve good results using VytaFlex. Take away from that whatever you will.

As I don't really have a mental guage of how shore duromteres evaluate to real world hardness, I thought it was a good time to do a test pour of the new stuff into the Superman Returns chest emblem. With the color looking as good as it did, I thought it might make for a nice new display piece, along with teaching me what 20 shore hardness feels like.
I had a bit extra in the pour, and that's what is sitting all over the top of the mold.

In a separate brain storm that led to a test, I wanted to try my hand at getting a solid color match across multiple pours of urethane. The secret, of course, is to mix up one batch of Part A with pigment, and then split that into two parts when mixing it with part B. So lets say your mold requires 200 grams of urethane. And your urethane mixes at a 1:1 by weight ratio. You would pour up 100 grams of part A, and then pigment that to your desired color. THEN pour 50g of that into a cup, and mix it with 50g of part B. Then pour that into the mold. Once that has cured, mix up the remaining 50g of part A with another 50g of part B, THEN pour that into the mold.
Here is my mold for the belt, half filled with pigmented PMC-780 Dry.
And here's the mixing cup, still loaded with a bit of pigmented part A.

Now what the loyal reader SHOULD be asking themselves is this: why would you want to do multiple pours of urethane into a belt mold. Why not just do it all at once?
The answer in this instance is two-fold. First, I want to embed in this casting some yellow belt webbing that will be used to close the belt up at the back. Once the first pour cures, I lay the webbing in place, and then pour the next layer on top of it. That way, the webbing is totally encased in urethane. Because the two pours of urethane are going to bond with each other VERY strongly, the webbing will therefore be suspended in the middle of. You may be asking yourself, why not just dip the webbing into the urethane as it pours, and just do it all at once? The answer is that you cannot guarantee the positioning of the webbing in that scenario. I've done that method before, and sometimes the webbing sinks to the bottom of the mold, and ends up being visible in the pull once you de-mold. So by pouring in a layer first, you guarantee that your belt will be pretty from the front, and that the webbing will not be visible. This is also much stronger than say gluing the webbing to the back of the belt.
The second reason for doing this is really just as a test. I wanted to see how the colors would turn out, how the bond would be, etc. When I finally get around to doing a cape layup, I doubt I will be able to do it all in one pour, so by testing this I am able to see if I will be able to do the cape in multiple pours. Which I now believe I will be.
Which brings me nicely to this next picture, in which you can see the belt with the webbing embedded in it.
Nice, Right??

On the right in the above picture is the back side of the chest emblem mold. There are two molds necessary to build a chest emblem. One is for the yellow back plate, and another is for the main "S". What you are looking at is a pull of the back plate sitting on top of the back side of the "S" plate.
Which brings us full circle, and back to the picture that I started this blog post with.

The big take-away here is that 20 durometer urethane is WAY too soft fo the chest emblem. It's extremely soft and delicate, and kind of barely holds it's shape. While this test was extremely valuable in terms of coloring, it did not produce a useable chest emblem.

This is a closeup of the SECOND belt I poured. Why did I pour a second one? Because in my rush to do the multi-pour pigment test, I forgot to powder the mold. As a result, I had a few little air bubbles in the thing. And for those of you who are familiar with my work, I don't do air bubbles.
It also gave me an opportunity to perfect my pigment mixture for the belt.
The belt on the top is my second pour. You can see the difference between the two. The first one took on a bit of an avocado tint, which is not cool.

With those test behind me, and me hot on the trail of some new discoveries, I did a text mix of PMC-720 and tried mixing up a good, deep red using the new assortment of pigments I had purchased from Sil-Pak just the other day.
To skip to the punchline, the red I got was AMAZING!!! EVEN BETTER than the red I achieved with RU-420, which I was already completely pleased with. If you look at the picture below, you can see where I poured this new red mixture on top of the mold so that I could see the difference between my new red and the one I had mixed previously.

The reason this is important is because it re-invigorates my interests in the PMC line of urethanes for the cape. While I originally dismissed PMC780 as a choice for the cape based on the fact that it cures to a translucent dark amber AND I was unable to mix a satisfactory shade of red AND I was unable to brush it into the mold, my recent discoveries of mixing in cabosil/Thixo-HP and the new batch of pigments I've acquired from Sil-Pak have me revisiting this material. In fact, I dare say that as of this moment, I think one of the PMC urethanes will ultimately prove to be the one I use for the cape shell.
For reference, this is the latex that I use on my cape mold, WHEN I'm doing latex tests.

Let us now turn our attention back to the cape, where more experimentation has taken place.
Sadly, I ran out of Douglas and Sturgess "Thixo HP", which is the cabosil replacement I have been using for a while now. Really fantastic stuff. I turned to a batch of stuff I got from Smooth-On, and I'm sad to say it just wasn't the same. It didn't mix in half as well as the Thixo HP, and there were clumps. Not fatal, but I am definitely going to back to Thixo HP right away. I ordered a bunch more from the D&S website just the other day. If you're curious, give them a visit.
Sadly, their URL and website are from 1998, but hey what they lack in internet pizazz, they make up for with great products and really knowledgeable folks!!!

It was time to experiment with the RU-420 on the cape. I mixed up a small batch and threw in some of the Smooth-On thixo, and decided to mix it up with a little blue this time instead of red. Aside from the clumpiness I mentioned earlier, and the fact that the mix ratio is different than the Thixo HP, I think the first tests went fairly well. Here's the first attack:

As you can see from the close up, the first layer is not totally opaque, which is to be expected. You can see the edge of the differently colored mold through the layer of blue urethane.

And that's where we leave things for this update on the Superman Returns suit. Lots of stuff learned, and I cranked out a chest emblem and a couple belts. All good.
In other news, my Man of Steel suit from UD Replicas is here. It's absolutely stunning, by the way. Please check out UD Replicas and my good pal David at their website:

Also in the pipeline now are a couple of pieces from the new Supergirl TV show. I very much like the new costume, and I'm working on the chest emblem right now. I have artwork all drawn up, and am sending it off to the laser cutter shortly. Once I have the laser cut pieces, those will be molded and urethane pieces will be produced.

That wraps it up for this update. That's what's going on at the workshop right now! I expect this next week to be a very busy and productive one, and hope to have more cool stuff to show off. I really want to get a cape out of the mold soon!
The thing that keeps getting in my way is the cape. As a quick review, the cape is made up mainly of two parts. There is an outer shell, which is made out of some kind of flexible, rubber like fabric. It's made up of tons of tiny micro diamonds, or pyramids. Attached to that is a big piece of fabric. To keep things interesting, the fabric is ombre dyed, taking it from a bright crimson red at the bottom, to a deep red/brown near the top. There's really nothing simple about this cape. And somehow, the two separate layers are miraculously held together.
The good news is that I have a mold taken from a screen used cape, so the micro diamond pattern is on lock down.
From there on out, the challenges begin to pile up.
By my estimations, the outer shell must be made of either latex rubber or urethane.
My search for the right type of latex rubber took me in many directions. I ultimately found a product which dries relatively opaque, and does the service of NOT pulling back from the silicone mold when applied.
And that is a summary of the two main challenges when reverse engineering the outer shell. The material I'm looking for will be opaque when cured, will not pull away from the silicone, can be pigmented, and will be fairly light weight. Though that may sound like a reasonable list, it turns out it's really difficult to find something that satisfies all of those criteria. TRUST ME. It's not easy. I've spend many, many dollars experimenting with materials trying to get this right. It ulimately came down to a matter of compromise. It did not seem possible to find one product that did all of those things, so I had to chose which one I could live without.
And that frustrated me, and that kind of made me lose some traction on the project.
For the longest time, I was dead set on using latex. It's very inexpensive, is easy to work with, and with a little bit of experimentation, I was able to get a color that I was mostly satisfied with. It wasn't a perfect color, but to the untrained eye it would certainly pass.
BUT then I learned that when the latex I had selected, based on it's properties of opacity and tenacity, fades significantly when exposed to UV radiation for any length of time. Which means it's essentially useless.
Therefore, I switched my plan of attack to urethane.
Which also presented it's own series of challenges.
UNTIL...
And now we get to the heart of the story, which also serves as a lesson in tenacity. I was at Reynolds Advanced Materials, my local Smooth-On distributor, and was asking questions about different types of urethanes. I'm very familiar with many of them, not so much with others. I was talking to a gent there about their Vyta-Flex line. He informed me that it's like the newer version of their PMC line, which I have been using for years. Seeing as how vytaflex cures to be a near opaque, light amber color, I found this very interesting. PMC cures to be a dark, medium translucency amber, which is OK if I have some really strong pigments that I can use to block it out. Anyhow, I'm talking to the dude, and he mentions in passing that their Brush-On urethanes are the same as Vyta-Flex, but have cabosil mixed into it.
Hmmmmmmmmmmmm.
Brush-On was originally what I had pegged as the urethane to use on the cape, as it's the ONLY one that would lay flat on the silicone when I brush it on. ALL other urethanes I tested would bead up, or pull back from the silicone, rendering them useless. There was nothing I could do, no technique I had found, that would let me use any kind of urethane in the mold other than Brush-On.
Could it be that the secret differentiator was something as simple as cabosil? For reference, Cabosil is a super light, silica product that is basically a thickener, or thixotropic agent. I've talked about it elsewhere in this blog, but for different applications.
I picked up some vyta-flex and ran back to the workshop.
I mixed up a tiny batch, threw in some cabosil, and went to work on the mold. Sure as pooh, it worked!!! I was able to brush on vyta-vlex in VERY thin coats, and it would lay flat on the mold. This was miraculous.
I pulled out the old mermaid scale mold I used previously as a test bed for this project, and ran a couple dozen tests. Different urethanes, different percentages of cabosil, and finally found a formula that worked. I felt like I was back in business.
After running a couple of weeks worth of tests, I decided I had what I needed, and it was time to bust out Ye Olde Cape Mold and give it a shot on the real thing.
The mold has been crated up for a couple of years now, ever since I moved back to CA from Ohio, now that I think about it. As I was clearing out the shop and prepping for the uncrating, I became terrified that the mold had somehow decayed during the time it had been crated. Or that the mold had been resting on some uneven surface for the past 2 years, and had gotten creased or distorted.
Here's the crate, brought out from behind the previous locations of some supply shelves.

Fortunately, my foresight paid off. When I boxed up the mold in Ohio, I brushed in a few layers of latex to help protect the silicone. I was also smart enough to lay some butcher paper on top of it to keep the cardboard boxes from dinging it up. Long story short, the mold was completely undamaged by it's long term storage.

Earlier I spoke about the micro-diamond pattern on the cape exterior. Here's a closeup of said diamonds.

With the mold back in action, I got to testing the urethane and cabosil mix on the cape mold. It works EVEN BETTER than it did on the mermaid scale mold. It was going down extremely thin, and after just a couple of coats, it was completely opaque.
Even better, once I pulled it off the mold, it was extremely light and flexible. I must confess I was completely surprised by how light and soft the hand was on it. Everything is looking really good.

Back at the mermaid scales, I was testing some techniques for getting fabric to stick to the outer layer. I ended up just rolling on another thin layer of urethane and cabosil mixture, and then laying the fabric down on top of that. Worked like a charm.

The long pole in the tent from here on out is really the color. It's very important to get this right, or as close as I am capable. I set up a series of tests to try to determine the right recipe for pigmentation. I have a number of different pigments from a variety of companies. My hope is that a combination of them will get me the right results.
I started with a little scoop of sil-paks CU Pigment in each of my test cups. Sil-Pak's stuff is great because it really impregnates the urethane and makes it opaque. It serves as a good base for adding in other pigments.

From there it was just a matter of mixing in other colors. I added some UVO pigments, some so-strong tints, some douglas and sturgess pigments, and anything else I could get my hands on.

Then I just scooped a little bit out and added it to the cape.

Sadly, none of the colors really ended up being what I needed, but I learned a lot about how the colors interact when mixed. I think I've also noticed that the colors change non-trivially once the urethane is cured. For example, sometimes a color with a very bold brown tint will turn out to be completely red once cured. This makes mixing the perfect color very difficult, but I feel confident that with another six to eight years of experimentation, I will get there.
Hah just kidding!
So yeah, work continues. And honestly, I have to say this has been one of the most fun and fulfilling projects I have ever taken on. I have learned SOOOOOO much from this project, have met some great people, and have gained knowledge of so many new products and vendors.
One of the most recent things I did was an adhesive test. I was operating under the assumption that there might be an adhesive out there that I could use to join the outer shell to the inner shell. The reason I'm looking for this is because the process of attaching the two via a coat of urethane is problematic. Too thin, and they won't hold. Too thick, and you'll get bleed through. Basically, wet spots. I have already tested and dismissed a number of adhesives, but found a few more that I hadn't tried before. The basic problem is that the adhesive is either too strong and as a result corrodes the urethane, or it's too weak and won't stick at all.

Sadly, all of the candidates on this round of testing fell into one of those categories. As mentioned earlier, I am currently set on using a layer of urethane to join them, but I still hope that a magic adhesive will make itself known.
Hopefully some more updates will follow soon, and the cape will get closer and closer as the days go by.