Friday, June 28, 2013

Bat Boat, Bites, Bat Mobile, Bench.

It's interesting. I've been operating a blog and a youtube channel under the name "The Project Work Bench" for quite some time now, and it isn't until yesterday that I ACTUALLY had a project work bench. Check this out:

I had a lot of wood left over from the TARDIS project, and now that I SORT OF know what I'm doing when it comes to working with the stuff, I figured I would take a few hours to put together something that I would get some use out of. The total build time was just about three hours, and frankly, I'm shocked that I didn't do this years ago. The thing is so amazingly useful, it's just kind of stunning.

In a rare move, I took on a commission recently. I'm making a set of Black Widow Bites for friend and fellow costumer Tally Smith. Tally is working on an upcoming video project and had some very specific requirements about what she needed. She will be doing stunts, and therefore needed something both low profile, and impervious to damage. I recommended we put together a powder coated urethane, which would make it flexible, but also give a gold finish that should look pretty good.

I started by patterning out one of the cylinders from MDF. This is the raw shape, all sanded to where it needs to be. This design is an original one, based on some feedback I got from Tally and some sample pictures and drawings. I really enjoy the creative collaboration in a project like this, and I think that's what makes it fun. Reminds me of the work I did with Damian Buerer on the Batgirl webseries. As of this writing, I've since sanded and painted this master, and also molded it.

I posted this picture on facebook the other day, and the reaction was really great. As it turns out, I'm NOT making a bat boat. I promise. Bo the Welder is working on a boat project, and I have offered to let him store stuff in the Batcave as necessary. It made for a great picture though.

But on to more pressing things. Batmobile work continues. I went down to the Batcave last week and did a little fiberglassing work. Due to the shape of the shell, there's a couple little gaps that were left out of the casting. I decided I wanted to fill them in.

Here you can see where I roughed out the shape I wanted using foam core and painters tape. I covered the inside with vaseline, then started laying in the glass.

Here's how one side looked after a couple of layers.

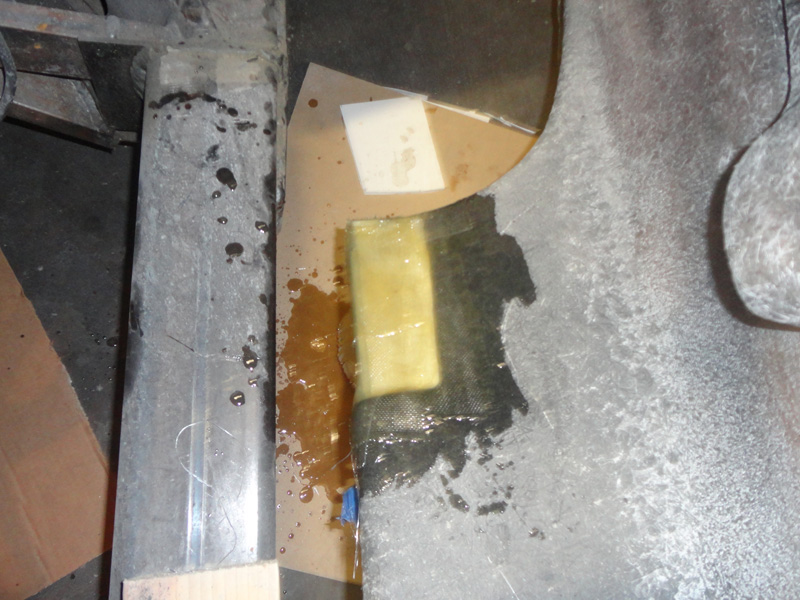
And here's the other. Still need to lay in a few more layers, then I'll do some trimming and clean up.

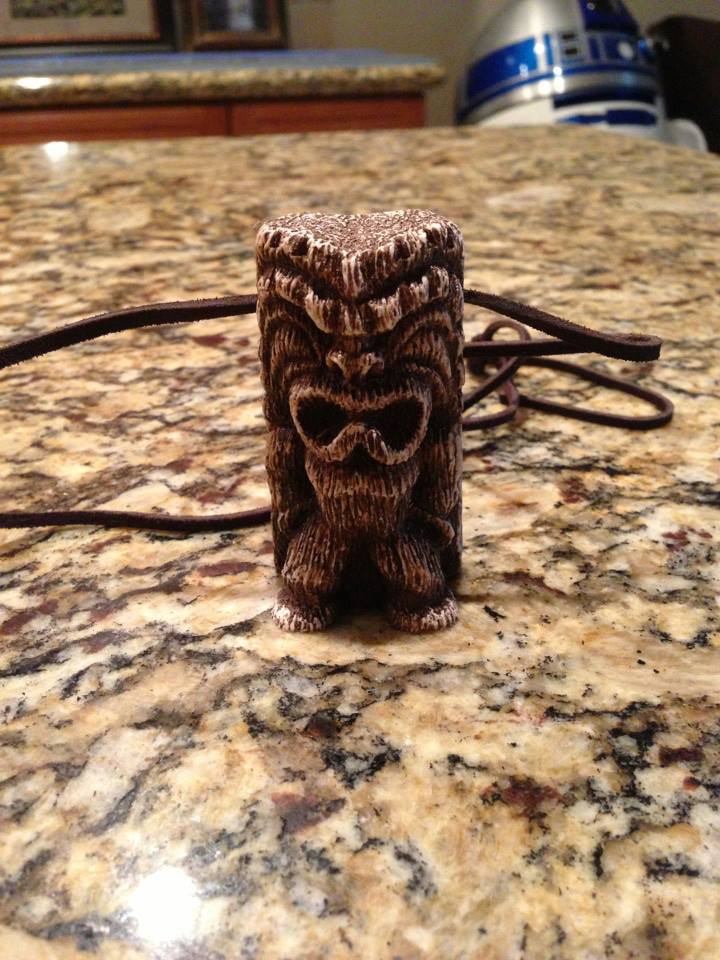
Lastly, here's a little Brady Bunch Tiki that I put together for my friend Tim. Last time Tim came over to my house, he was admiring the one in my collection, so I figured I would make him one.

That's all for now! Please don't forget to check out my youtube channel where I'm not only posting progress videos for the Batmobile and Tardis, but also lots of Star Trek interviews and Star Trek Continues Behind the Scenes videos. Here's the latest I did with the special effects makeup dude from both projects, Tim Vittetoe:


Tuesday, June 18, 2013

Vektor CP-1 Castings For Sale

Many years ago, I got ahold of a deactivated CP-1, an exceedingly rare African firearm that was used as the base for the Korben Dallas gun in The Fifth Element. Of course, my plan was to eventually build an all machined replica of that gun, but it still hasn't quite happened.

For a list of movies and TV shows that the Vektor was used in, please check out this website.

Since interest in this piece continues to climb, and with the Tardis build now behind me and some free time on my hands, I finally got around to pouring rubber on it.

If you're interested in one, please email me at my yahoo address, BanishedInOhio. I will NOT sell a casting to you if I do not know you, or have not done business with you in the past. This is mainly in an effort to minimize the possibilities of recasting. To my knowledge, NOBODY offers castings of this gun. While I understand how this hobby works and recognize that one of these will eventually fall into the hands of a recaster, I want to minimize that possibility in any way I can. I will also NOT ship outside of the US. Despite the fact that it's solid cast resin, I just can't imagine any good coming from trying to get it through customs. Sorry.

Castings are available in White and dark grey. I use SmoothOn casting resin. Shrinkage is VERY nominal. These castings are ridiculously clean, and require very little clean up.

Castings are $55 dollars, shipped anywhere in the US. If you want more than one, let me know and I'll knock a few bucks off for combined shipping.

As you can tell, the castings are coming out BEAUTIFULLY! Registration is top notch, and for this casting there were NO noticeable air bubbles. I'm absolutely thrilled with the results.

If you purchase a casting from me, it will arrive in basically the condition you see here. I barely did ANY clean up on the gun before taking these photos simply so you could see what it will look like when it shows up.

For reference, here is a pic of the mold I made for this piece.

Friday, June 14, 2013

MattCave Pics

I went to the MattCave this morning to drop off some stuff, and happened to take with me my Canon. I took some photos of the shop and the car, though there's not a lot of progress to show since the last round. Most of the progress lately has been in the form of some steel that has been welded into place to help support the shell. Not very glamorous work, but entirely necessary.

For reference, here's the most recent episode of Rise of The MattMobile that shows the progress I'm talking about. Best of all it's got an introduction by Walter Koenig, the dude who played Chekov in Star Trek.

Studio Scale Fifth Element Taxi Cab Kit

As the title says, this kit is for sale. Notice that the front end IS different than the filming miniature. I've spoken to a friend who worked on the production, and I'm convinced that THIS is the model that was delivered to the shop, which then had the front end modded. Not knowing much about what happend in the shop during production, I cannot say for sure why. If I had to guess, I would say it was because someone changed their mind about how the taxi was supposed to look at the last minute, and by that time they had already created the master pattern. This piece has been sold, but I'm keeping this page here as reference.

Kit measures about 22" long. Comes in two parts. A piece on the bottom has cracked off, and will need to be re-attached.

For reference and comparison, I'm dropping in a few screen grabs from the movie.

And while I've got your attention, here's a part of my interview with Ted Smith, my friend who worked on the movie. In this clip we speak specifically about the Taxi miniature for the show.

Thursday, June 13, 2013

TARDIS Build Update - Part 16

For those of you who have been kind enough to have been following my blog for this build, I want to start by saying thank you! I really appreciate knowing that some folks out there are enjoying the pictures I'm posting, and the occasional bit of build wisdom I'm committing to paper. Or print. Or internet. Hard to say really, as these times we are in are changing so quickly! hehehe

This will actually be the LAST build post for my TARDIS. By the time you hit the bottom of this post, the beast is done. BUT I will be posting more pictures in the future, most likely ones taken with a much better camera than the one found on my phone. But let us get started, shall we??

First up, a nice shot of the front doors. Sign is in place, handles in place, and the lock in place.

Here's a rather ominous view from the side.

Inside the TARDIS, showing how the lock and catch are mounted.

Fully functional, I might add.

Here's how everything looks without the roof on. I believe by this point I had finished repainting the side wall, and it's all done.

So pretty!

Here's the view from the inside. Notice that the windows are all in place, and the paper backing has been removed.

With the roof put on, there's only about six inches of clearance to the roof. Not enough for the lantern, I'm sad to say.

But that didn't stop me from doing some touch up painting on the chimney topper. It took a little sanding to get it to fit.

But look! It fits perfectly!

If only there was a lantern on top of it!

One of the last remaining tasks was to put the magnetic catch in place for the phone door. I had to mount a little block of wood to the inside of the tardis to hold the magnet part. The metal part just screwed into the door. Here you can see that I've painted the block black.

The only thing really remaining was to make and attach the Ambulance disk. It's stuck to the front door with some VHB tape.

And yet the journey continues! Here you can see Ewan's TARDIS in the foreground taking place, as my finished one sits handsomely in the background.

So hop in, grab on, sit down... and let's see what's out there!!!!

(Cue closing theme music, roll end credits)

OH, also check out the latest Team Tardis build video. It's not as current as this blog post, but still shows some fun building action.

Tuesday, June 11, 2013

TARDIS Build Update - Part 15

As you may have seen in a previous blog post, my primary door needed some trimming along the bottom. That way it would sit at the same height as the other door. I came up with a way to router off tiny bits of the doors in measurable increments. Here's how it's done:

See? They are now even!

Here you can see the door fit into place. Looks really great!

Meanwhile I popped the roof of the tardis off and painted the inside with a coat of semi-flat black enamel. This is purely cosmetic. I just want it to look pretty on the inside. Cuz it's what's on the inside that counts.

I needed to do some more painting, so I covered the tardis with a tarp. Didn't want to get any overspray on her accidentally.

I put of the semi-flat black enamel on the backs of the doors.

I wanted to see what it looked like with some windows in place, so I put one in just for a pic. Looks great!

And with the front door now painted, I temporarily put the lock in place so I can see how that looks too. AND IT LOOKS GREAT!!!

I've also put up another build video that shows some progress that wasn't included in this blog post. Please check it out!