Showing posts with label Superman Returns Belt. Show all posts

Saturday, August 15, 2015

Superman Returns Costume - Belt and Cape

As always, work on the Superman Returns costume continues, though as of late, at a brisk pace.

Recently I sat down with my trusty Dremel tool with a sanding drum attachment and cleaned up the two belts I had cast up the other week. (Also, for reference, "Casted" is not a real word. Don't use that word when talking about molding and casting things. It makes you sound like an idiot. Just saying.)

I cleaned up the flash from behind the "S" symbol, and also along the edges. These turned out great.

On the screen used belts, there would be a little segment of fabric behind the buckle, and behind that a piece of velcro. The fabric is the same stuff that the briefs were made of. Yay costume trivia!

I am once again back on the experimentation train with the cape. I keep coming up with new ideas that I want to try, based on old ideas that I had previously messed around with. The other thing on my mind right now is the ultimate fragility of the silicone mold I made of the cape. That cape mold is about seven years old right now, and frankly, silicone doesn't last forever. The last pour I did of urethane ended up doing a TINY bit of damage to the mold, as mentioned in a previous post. It happened when I was doing some color tests, and the damage was done to the edge of the mold, where there wasn't even a diamond pattern. But the fact is, the mold is getting old and I fear that my next coat of urethane on it could end up doing some damage.

What I'm in the process of doing now, in conjunction with some color and process experimentation, is doing a preservation pull of the cape. I want to get a top quality pull out of the mold, so that if for some reason it dies, I have a copy of it available for making another mold. I know this may sound like overkill, but honestly if that mold gives out in the middle of a pull now, the project is pretty much cancelled.

Here's where the mold stands as of the last round of applications.

I really should have reviewed some older blog posts before taking on this task, as I had to re-learn my process for applying the latex to the mold. It's not as easy as you might think, and there is some mystery to the technique necessary to get a good surface out of this. Though the color in this photo is not at all representative of the actual color, you get the general idea. This is three coats of latex.

For reference, this is the color I am using. If you took this color and painted it on a white wall, it would be exactly the color I want my cape outer shell to be. However, when this paint is mixed with the latex that I am using, the stuff from Motion Picture FX Company, it lightens it up a little. Heck for all I know the only reason it appears lighter is because it's still pretty thin. Maybe I just need to add more paint to the latex.

At this point, it's still just an assumption that this process of mixing off the shelf paint with latex rubber is even going to work. It might not. The paint may very well not bond properly with the latex rubber. Who knows. Hence the experiment.

Kind of funny that this is paint I purchased when I was living in Ohio. Sheesh, that was like four years ago. What a wreck.

Here's the stuff.

I think the plan is to mix up one more serving of this latex, apply it to the cape, and then apply a fabric backing to it. Honestly, I don't even think this will be a usable cape, as the first layer of latex was a real mess, due to me forgetting my application technique. But as with every time I do anything on this project, it's a learning experience.

I don't remember if I posted this before, but it seems relevant given that my post began with the belt. Check it out and let me know what you think!

Sunday, August 9, 2015

Superman Returns Costume - R&D Update

I've discovered that it's important to start a blog post out with an attention grabbing photo, as that is the one that will be displayed if this post is linked to a social media site or something, so I will begin with this picture:

What you are looking at of course is the chest emblem and belt from the Superman Returns costume, in this case these are straight out of the molds. Off to the right is a piece of cape fabric. It's like all the magic is happening in one place!

Let's dig into the meat and bones of this post, which is an update on some R&D work I've done lately on the cape.

For reference, this is the new product I got from Sil-Pak that I am experimenting with. It's called RU-420.

It's VERY soft, with a 20 shore hardness BUT it's an opaque, light amber color, which is very interesting to me.

No surprisingly, when I mix Sil-Pak pigments with it, I get very predictable and nice results.

To demonstrate to you, dear reader, how well the pigments work with it, allow me to wow you with this photo. What you are looking at is a test pour I did of RU-420 into a scrap mold, surrounded by all of the pigment tests that I did a few days earlier, using VytaFlex40. Now don't get me wrong, I'm sure much of the problem is me, but what this picture clearly reveals is that I was able to mix together a very respectable red using the RU-420 as a base, whereas I was unable to achieve good results using VytaFlex. Take away from that whatever you will.

As I don't really have a mental guage of how shore duromteres evaluate to real world hardness, I thought it was a good time to do a test pour of the new stuff into the Superman Returns chest emblem. With the color looking as good as it did, I thought it might make for a nice new display piece, along with teaching me what 20 shore hardness feels like.

I had a bit extra in the pour, and that's what is sitting all over the top of the mold.

In a separate brain storm that led to a test, I wanted to try my hand at getting a solid color match across multiple pours of urethane. The secret, of course, is to mix up one batch of Part A with pigment, and then split that into two parts when mixing it with part B. So lets say your mold requires 200 grams of urethane. And your urethane mixes at a 1:1 by weight ratio. You would pour up 100 grams of part A, and then pigment that to your desired color. THEN pour 50g of that into a cup, and mix it with 50g of part B. Then pour that into the mold. Once that has cured, mix up the remaining 50g of part A with another 50g of part B, THEN pour that into the mold.

Here is my mold for the belt, half filled with pigmented PMC-780 Dry.

And here's the mixing cup, still loaded with a bit of pigmented part A.

Now what the loyal reader SHOULD be asking themselves is this: why would you want to do multiple pours of urethane into a belt mold. Why not just do it all at once?

The answer in this instance is two-fold. First, I want to embed in this casting some yellow belt webbing that will be used to close the belt up at the back. Once the first pour cures, I lay the webbing in place, and then pour the next layer on top of it. That way, the webbing is totally encased in urethane. Because the two pours of urethane are going to bond with each other VERY strongly, the webbing will therefore be suspended in the middle of. You may be asking yourself, why not just dip the webbing into the urethane as it pours, and just do it all at once? The answer is that you cannot guarantee the positioning of the webbing in that scenario. I've done that method before, and sometimes the webbing sinks to the bottom of the mold, and ends up being visible in the pull once you de-mold. So by pouring in a layer first, you guarantee that your belt will be pretty from the front, and that the webbing will not be visible. This is also much stronger than say gluing the webbing to the back of the belt.

The second reason for doing this is really just as a test. I wanted to see how the colors would turn out, how the bond would be, etc. When I finally get around to doing a cape layup, I doubt I will be able to do it all in one pour, so by testing this I am able to see if I will be able to do the cape in multiple pours. Which I now believe I will be.

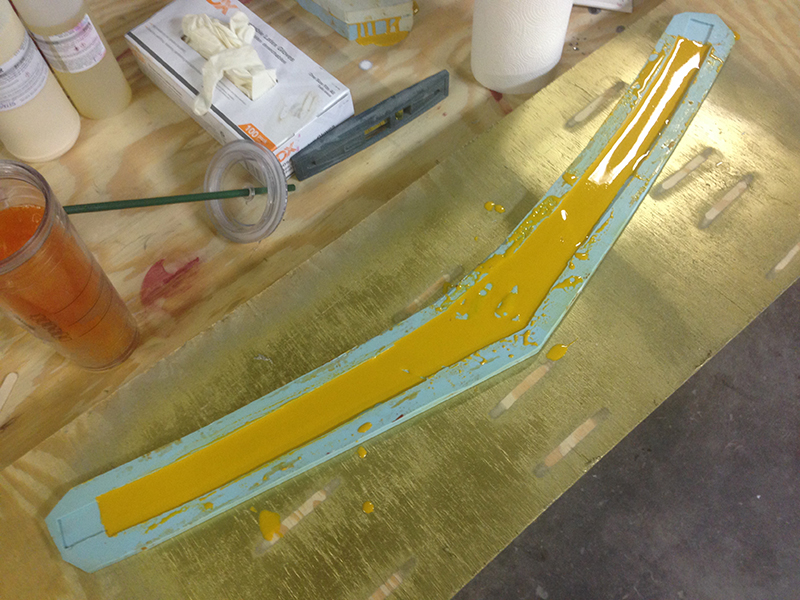
Which brings me nicely to this next picture, in which you can see the belt with the webbing embedded in it.

Nice, Right??

On the right in the above picture is the back side of the chest emblem mold. There are two molds necessary to build a chest emblem. One is for the yellow back plate, and another is for the main "S". What you are looking at is a pull of the back plate sitting on top of the back side of the "S" plate.

Which brings us full circle, and back to the picture that I started this blog post with.

The big take-away here is that 20 durometer urethane is WAY too soft fo the chest emblem. It's extremely soft and delicate, and kind of barely holds it's shape. While this test was extremely valuable in terms of coloring, it did not produce a useable chest emblem.

This is a closeup of the SECOND belt I poured. Why did I pour a second one? Because in my rush to do the multi-pour pigment test, I forgot to powder the mold. As a result, I had a few little air bubbles in the thing. And for those of you who are familiar with my work, I don't do air bubbles.

It also gave me an opportunity to perfect my pigment mixture for the belt.

The belt on the top is my second pour. You can see the difference between the two. The first one took on a bit of an avocado tint, which is not cool.

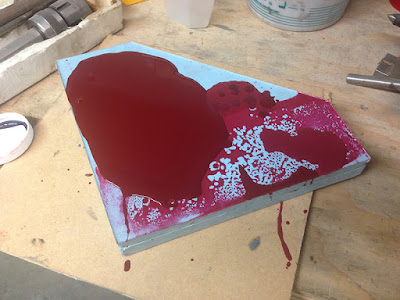
With those test behind me, and me hot on the trail of some new discoveries, I did a text mix of PMC-720 and tried mixing up a good, deep red using the new assortment of pigments I had purchased from Sil-Pak just the other day.

To skip to the punchline, the red I got was AMAZING!!! EVEN BETTER than the red I achieved with RU-420, which I was already completely pleased with. If you look at the picture below, you can see where I poured this new red mixture on top of the mold so that I could see the difference between my new red and the one I had mixed previously.

The reason this is important is because it re-invigorates my interests in the PMC line of urethanes for the cape. While I originally dismissed PMC780 as a choice for the cape based on the fact that it cures to a translucent dark amber AND I was unable to mix a satisfactory shade of red AND I was unable to brush it into the mold, my recent discoveries of mixing in cabosil/Thixo-HP and the new batch of pigments I've acquired from Sil-Pak have me revisiting this material. In fact, I dare say that as of this moment, I think one of the PMC urethanes will ultimately prove to be the one I use for the cape shell.

For reference, this is the latex that I use on my cape mold, WHEN I'm doing latex tests.

Let us now turn our attention back to the cape, where more experimentation has taken place.

Sadly, I ran out of Douglas and Sturgess "Thixo HP", which is the cabosil replacement I have been using for a while now. Really fantastic stuff. I turned to a batch of stuff I got from Smooth-On, and I'm sad to say it just wasn't the same. It didn't mix in half as well as the Thixo HP, and there were clumps. Not fatal, but I am definitely going to back to Thixo HP right away. I ordered a bunch more from the D&S website just the other day. If you're curious, give them a visit.

http://www.artstuf.com/

Sadly, their URL and website are from 1998, but hey what they lack in internet pizazz, they make up for with great products and really knowledgeable folks!!!

It was time to experiment with the RU-420 on the cape. I mixed up a small batch and threw in some of the Smooth-On thixo, and decided to mix it up with a little blue this time instead of red. Aside from the clumpiness I mentioned earlier, and the fact that the mix ratio is different than the Thixo HP, I think the first tests went fairly well. Here's the first attack:

As you can see from the close up, the first layer is not totally opaque, which is to be expected. You can see the edge of the differently colored mold through the layer of blue urethane.

And that's where we leave things for this update on the Superman Returns suit. Lots of stuff learned, and I cranked out a chest emblem and a couple belts. All good.

In other news, my Man of Steel suit from UD Replicas is here. It's absolutely stunning, by the way. Please check out UD Replicas and my good pal David at their website:

http://www.udreplicas.com/

Also in the pipeline now are a couple of pieces from the new Supergirl TV show. I very much like the new costume, and I'm working on the chest emblem right now. I have artwork all drawn up, and am sending it off to the laser cutter shortly. Once I have the laser cut pieces, those will be molded and urethane pieces will be produced.

That wraps it up for this update. That's what's going on at the workshop right now! I expect this next week to be a very busy and productive one, and hope to have more cool stuff to show off. I really want to get a cape out of the mold soon!

Thursday, December 3, 2009

The Urethane Slinging Festival Continues

Tonight I finished burning through my latest batch of PMC-80, which means it's high time to experiment with a different brand of urethane. A freind has recommended another supplier, which I will investigate shortly.

But let me share my latest progress.

Here's the latest belt I poured up. I learned an interesting lesson on this one. When I use the black so-strong pigment, it tends to add a bit of a green tint to the yellow. If I use brown to darken it, it keeps the yellow color more pure. Interesting to know.


Tonight I used the very last drop of urethane to pour up another chest emblem, but just the outer part. I'll need to pour up the back plate next. That will bring my total to three.


I made a chest emblem the night before, but I screwed it up. I THOUGHT I had poured in too little urethane, and an hour later, decided I would clean out the mold so I could do it "properly" next time. As luck would NOT have it, the mold was totally filled with urethane, and it was probably the most bubble free pour to date. This is a crappy picture, but I suppose it doesn't really matter as it was an aborted pour. Also, I had forgotten to add the white pigment, which really serves to make the emblem really opaque. So this one was a lost cause on many levels.


Finally, here's where I stand on belts so far. I've got six all poured up. Two have minor defects, and will make for great test beds for the painting. All is certainly not lost on the defective ones, as they will serve an honorable purpose.


I played around with the cape again tonight, and really want to get that fabric sourced. I should really spend some more time on that!

My sample of possible outer shell cape material did NOT show up again today. I am bummed! I want to see it. I did find another supplier online that sells a similar looking product. I have ordered a sample from them through their website, but we all know how that goes!

Wednesday, December 2, 2009

The Belt Lunacy Continues

No pics again in tonights post, since it's the same old stuff. BUT I did pour up yet another belt tonight, brining the total to six. Tonight's belt is the darkest yet. I've really nailed how the different pigments work together, and I can pretty much get the exact results I want every time.

I think I might pour up another chest emblem, just to sort of round out the supplies.

I also had the brain storm tonight of making a brief video showing the pour-up process of the belt from start to finish. It took me many tries to perfect the technique, and I sort of want to document it, perhaps just so I can refer back to it in the future. Should the need arise.

Tuesday, December 1, 2009

Another Day, Another Belt

No photos to show today, since it's pretty much the same thing I've shown a few times before. I poured up another belt today, bringing the total that I have lined up for painting to five.

I tried something a little different this time with the color formula, so I expect this one to turn out quite differently. I think it will be cool when all is said and done, as I will have a number of different belts to choose from.

Sunday, November 29, 2009

Superman Belt Assembly Line


I found time to bang out four belts this weekend, each of the slightly different in color than the others. From the picture, you can see how they are all subtle shades of yellow, but the picture does not really show the colors properly. Oh well. I'm really just going from memory on the color, but the main goal is for it to be visually pleasing in person, not in photos or on film.

Three of the castings are completely without flaw. One has a TINY air bubble one one of the straps. Pretty good hit rate, if you ask me.

I also made a couple changes to the mold in order to make the pulls come out smoother. Just a little flash trimming, and I used my cuticle trimmers to pick some boogers out of the belt loop parts. So as of right now, the belts are just coming along beautifully.

Another reason I'm cranking so many out is because the urethane has a short shelf life. Better to knock out a bunch now and use up my supply than to have it go bad. Also fun to do while I'm "In the zone" as far as belts go.


In other news, my friend Gino has ordered some swatches from his fabric contacts in an attempt to find a close match for the cape fabric. Not sure how long it will take to get results, but nice to know it is still in progress.

I also heard back from one of the companies that is supplying me with samples of the material that I SUSPECT was used for the texture on the outer skin of the fabric. This company is VERY responsive, and I expect to have some samples in my hands shortly. Which is really nice, as I'm VERY eager to find out if I'm on the right track with this stuff.

Saturday, November 28, 2009

Another Day, Another Belt

Now that I have perfected my process for producing Superman Returns belts, it seemed only fair that I move forward with it and produce one for myself. One that I will keep. I will actually bang out a series of them, as there are still a few finishing steps to be done on them that could prove problematic. The paint job is very subtle on it, and I want to have a few belts handy in case I screw it up once or twice.

This should be a familiar site to regular readers. Here is the set up of the belt.


I pulled this one out a few hours later, even though it had not fully cured. My workspace was not entirely level, and the belt turned out to be a bit fatter on one side. I doubt anyone would ever notice it once it was in place on the costume, but this is a nice piece.

The mold was a LITTLE bit dirty for this pour, and some of the junk in the mold was passed on to the casting.


It's still a VERY nice casting, and I feel the color is good. The picture shows it being a little brighter than it is in person, but it's pretty nice. I will probably use this one as a test bed for my painting techniques, and ultimately throw it out. I think my plan will be to crank out five paint-worthy belts, and then put the mold to bed.

For now.

Muahhahhahahahahh!

Sunday, October 25, 2009

Urethane Problem: Solved!

I still don't know why I didn't try this sooner, but I suppose it's better late than never. The secret to pouring up perfect, bubble free urethane belts is none other than our old pal from our resin slinging days: Baby Powder.

Yup, the type of stuff you get at Target. When you powder up a mold prior to pouring in, a force called "Capilary Action" comes into play. This magical force draws the liquid into the tiny nooks and crannies. It works amazingly well. My fear was that by powdering the mold up, I would somehow taint the pigment. When you powder a resin mold, it's not an issue, as the expectation is that you will paint the thing coming out of the mold. Not the case with this project.

Anyhow, on to the victory pics:

Here's a close up of the buckle. I challenge you to find a flaw in this pull:


And just for good measure, I trimmed out the flash so you can see how the finished product would look. It's still a little sloppy, but you get the idea.


For my next trick, I powdered up the mold for the chest emblem backplate. Booya. It came out PERFECTLY. I don't know how well you can see the micro-S pattern in this photo, but take my word for it, there is not a single imperfection in the casting.


Now that I have the technique down pat, it's really just a matter of mixing up a color that is to my liking. More experimentation. But the good news is that no matter what color they come out to be, they will be flawless, bubble free castings. Here's some shots of the next one out of the mold


Overall, I am very pleased. This has been a very productive week, and I've answered a lot of questions. I am getting VERY close to having a repeatable process for producing good quality belts, which is what I'm after.

I am just about out of silicone rubber, so I'll need to order some more from Sil-Pak so that I can finish up the chest emblem mold. I really feel like I'm on the right track now.

There's really only two components to lock down from here. I may try for a harder shore strength urethane, as the 80 I'm using still seems a little soft. I also really need to nail down a REALLY opaque red tint for the chest emblem. I can make due with what I have, but it's not quite perfect.

Friday, October 23, 2009

More Urethane Fun.

Mixed news on the Urethane front, though most of it is not positive. I'll start with the good news.

It looks like my technique for adding the straps AFTER The belt has cured is working out well. The stuff bonds to itself really well.


I got my first pull out of the chest emblem mold only to learn that it is chock full of bubbles. Not cool at all.


And my latest pull from the belt mold also had some bubbles in it. So the popsicle stick technique did not work either.


My next attempt will be to use baby powder in the mold. This is usually the default maneuver, but I have assumed that baby powder will not work well with pigmented stuff. Idea is that it will ruin the surface pigment. I am not sure, but that's where I'm going next.

Thursday, October 22, 2009

Bubbles, Bubbles Everywhere!

All of my tests are certainly getting me somewhere, though I'm at a point where I wish the stuff would just behave the way I had hoped it would. No sweat though, as each failure is a lesson learned.

Here is the completed two part mold for the chest backplate. I probably used way more rubber than I needed, but who cares.


I did my first pour into the chest emblem backplate mold. I just did it open faced. I'm really doing this is a "clean out" pass, to remove any junk from the mold, and to figure out any nuances of the mold that I'll need to account for when I go to make my final pour.


I did another experiment on the belt mold. This time, after I poured in the urethane, I went in after it with a popsicle stick and ran it into every little corner I could find. The theory is that this would push out any air bubbles.


After it had cured for a few hours, I mixed up a smaller batch of urethane and soaked a few lenghts of webbing, then attached it on top of the belt. This will probably turn out to be my new process for making the belts.


And look, here's a whole stack of belts! Seen on top of it is the made for production chest emblem back plate, just to give you an idea of color comparison.


I think I will also need to put some time into thinking about what I want the final pieces to look like, color wise. At the end of the day, what they looked like in person is not how they appeared on screen. There was a lot of color timing done to the final print, and I'll need to decide what I want to do. I don't think I'll ever be able to match the actual colors perfectly, so I suppose it's a moot point anyhow.

Tuesday, October 20, 2009

Pouring Up Some More Test Belts

I have a few things running simultaneously right now, but I'll try to give the full update. First up is the progress on the two part mold of the back plate of the chest emblem. I poured another layer tonight, which basically makes this thing done. Just need to let it fully cure, then I should be able to start running parts out of it.


The rest of this post focuses on what I am doing with the belt mold. Overall, I am very happy with the mold. it's nice and clean. However, there are some challenges that come with it, and I'm trying to debug my pouring method so that I can predictably and repeatably get pristine pulls out of it.

I did a test yesterday that was focused on figuring out if one of the urethanes I have selected would be opaque enough for my likings. I did a couple tests with a couple different types of urethanes, along with a few different pigments. Just for testing.


You can see from that pic that there are a few different colors going on in there. Here is a closeup of the buckle:


Overall, it came out pretty clean, but I did learn some valuable lessons from this pull. First up, I'm not completely satisfied with the pigmentation on any of the urethanes I tried. The belt is just not opaque enough. Even worse, the shore strength is not right. I need to bump it up. These belts were poured at 60, which is just too soft and squishy. I need to drive it up to 80. So that was a good lesson.

So that's what I learned from this multi color belt. Not opaque enough, not rigid enough.

For the next test, I switched to a shore 75 urethane, one that I have used sucessfully in the past. I also stuck with a pigment that I knew would give me the opacity I wanted, but the cost is that it's a VERY bold yellow. Also, because the tint is not part of the "So-Strong" line that I am using elsewhere, it is a bit harder to control the way the tint behaves. If I want to soften it up a bit, by adding black, for example, it tends to turn green. Go figure.


But this test was all about pouring techniques. The goal was to try one technique and see how it pans out. The basic deal is that I poured the urethane into ONE corner of the mold, and let it seep out over the entire mold. I then laid in the straps. Here's the results:


Another problem I have noticed is that the straps tend to sink down to the bottom of the mold while the urethane is curing, and the end result is that you can see the ends of the straps through the belt. Not cool.


So I'm going to change the way I do the straps. From now on, I will do one pour to fill up the mold, and then add the straps in on a second pour. I will mix up some urethane, dip the tip of the strap into it, and then just set it down on top of the cured urethane. This will be cool, as it will also allow me to add some reinforcement to the thinner parts of the belt, like where the belt loops go.

Here is the bright yellow belt all trimmed up. If I leave it out in the sun for a few hours, it will REALLY knock down the boldness of the yellow.


Here's the last pour I did for the night. Two things I did differently this time. I left out the straps, and I used a spray in mold release. Still did the pour from one corner technique. I'm curious to see how the mold release effects it, if at all.


I forgot to outline what the real goal here is. I want a bubble free casting. Every csting I have done so far has one or two bubbles in it. Not cool. To the casual observer, I'm sure they would be invisible. But I want it to be perfect.

More of this, more of that.

I have a bit of a disjointed update today, as I'm sort of all over the place.

I'm STILL experimenting with urethane, and have not found one yet that I am happy with. I did a little test with a product I picked up from Burman. F-60. It takes pigment decently, but it's not as solid as I had hoped.


Here's a sample blob I poured. The color is nice, but it's not solid enough.


I have also concluded that shore 60 is too soft. I'm going to stick with 80 for all of the Superman stuff.

Yesterday I finished building the box up around the chest emblem back plate.


And then poured rubber on it.


I'm going to need to do another pour to get the thickness I want, but it's almost there. Then I will start running some urethane into it. yay!