Showing posts with label Superman Returns Chest Emblem. Show all posts

Sunday, August 9, 2015

Superman Returns Costume - R&D Update

I've discovered that it's important to start a blog post out with an attention grabbing photo, as that is the one that will be displayed if this post is linked to a social media site or something, so I will begin with this picture:

What you are looking at of course is the chest emblem and belt from the Superman Returns costume, in this case these are straight out of the molds. Off to the right is a piece of cape fabric. It's like all the magic is happening in one place!

Let's dig into the meat and bones of this post, which is an update on some R&D work I've done lately on the cape.

For reference, this is the new product I got from Sil-Pak that I am experimenting with. It's called RU-420.

It's VERY soft, with a 20 shore hardness BUT it's an opaque, light amber color, which is very interesting to me.

No surprisingly, when I mix Sil-Pak pigments with it, I get very predictable and nice results.

To demonstrate to you, dear reader, how well the pigments work with it, allow me to wow you with this photo. What you are looking at is a test pour I did of RU-420 into a scrap mold, surrounded by all of the pigment tests that I did a few days earlier, using VytaFlex40. Now don't get me wrong, I'm sure much of the problem is me, but what this picture clearly reveals is that I was able to mix together a very respectable red using the RU-420 as a base, whereas I was unable to achieve good results using VytaFlex. Take away from that whatever you will.

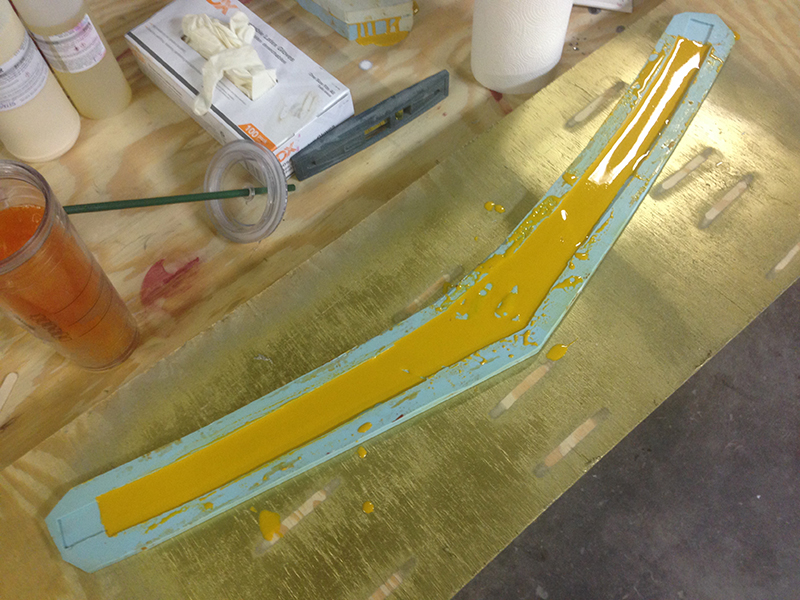
As I don't really have a mental guage of how shore duromteres evaluate to real world hardness, I thought it was a good time to do a test pour of the new stuff into the Superman Returns chest emblem. With the color looking as good as it did, I thought it might make for a nice new display piece, along with teaching me what 20 shore hardness feels like.

I had a bit extra in the pour, and that's what is sitting all over the top of the mold.

In a separate brain storm that led to a test, I wanted to try my hand at getting a solid color match across multiple pours of urethane. The secret, of course, is to mix up one batch of Part A with pigment, and then split that into two parts when mixing it with part B. So lets say your mold requires 200 grams of urethane. And your urethane mixes at a 1:1 by weight ratio. You would pour up 100 grams of part A, and then pigment that to your desired color. THEN pour 50g of that into a cup, and mix it with 50g of part B. Then pour that into the mold. Once that has cured, mix up the remaining 50g of part A with another 50g of part B, THEN pour that into the mold.

Here is my mold for the belt, half filled with pigmented PMC-780 Dry.
And here's the mixing cup, still loaded with a bit of pigmented part A.

Now what the loyal reader SHOULD be asking themselves is this: why would you want to do multiple pours of urethane into a belt mold. Why not just do it all at once?

The answer in this instance is two-fold. First, I want to embed in this casting some yellow belt webbing that will be used to close the belt up at the back. Once the first pour cures, I lay the webbing in place, and then pour the next layer on top of it. That way, the webbing is totally encased in urethane. Because the two pours of urethane are going to bond with each other VERY strongly, the webbing will therefore be suspended in the middle of. You may be asking yourself, why not just dip the webbing into the urethane as it pours, and just do it all at once? The answer is that you cannot guarantee the positioning of the webbing in that scenario. I've done that method before, and sometimes the webbing sinks to the bottom of the mold, and ends up being visible in the pull once you de-mold. So by pouring in a layer first, you guarantee that your belt will be pretty from the front, and that the webbing will not be visible. This is also much stronger than say gluing the webbing to the back of the belt.

The second reason for doing this is really just as a test. I wanted to see how the colors would turn out, how the bond would be, etc. When I finally get around to doing a cape layup, I doubt I will be able to do it all in one pour, so by testing this I am able to see if I will be able to do the cape in multiple pours. Which I now believe I will be.

Which brings me nicely to this next picture, in which you can see the belt with the webbing embedded in it.

Nice, Right??

On the right in the above picture is the back side of the chest emblem mold. There are two molds necessary to build a chest emblem. One is for the yellow back plate, and another is for the main "S". What you are looking at is a pull of the back plate sitting on top of the back side of the "S" plate.

Which brings us full circle, and back to the picture that I started this blog post with.

The big take-away here is that 20 durometer urethane is WAY too soft fo the chest emblem. It's extremely soft and delicate, and kind of barely holds it's shape. While this test was extremely valuable in terms of coloring, it did not produce a useable chest emblem.

This is a closeup of the SECOND belt I poured. Why did I pour a second one? Because in my rush to do the multi-pour pigment test, I forgot to powder the mold. As a result, I had a few little air bubbles in the thing. And for those of you who are familiar with my work, I don't do air bubbles.

It also gave me an opportunity to perfect my pigment mixture for the belt.

The belt on the top is my second pour. You can see the difference between the two. The first one took on a bit of an avocado tint, which is not cool.

With those test behind me, and me hot on the trail of some new discoveries, I did a text mix of PMC-720 and tried mixing up a good, deep red using the new assortment of pigments I had purchased from Sil-Pak just the other day.

To skip to the punchline, the red I got was AMAZING!!! EVEN BETTER than the red I achieved with RU-420, which I was already completely pleased with. If you look at the picture below, you can see where I poured this new red mixture on top of the mold so that I could see the difference between my new red and the one I had mixed previously.

The reason this is important is because it re-invigorates my interests in the PMC line of urethanes for the cape. While I originally dismissed PMC780 as a choice for the cape based on the fact that it cures to a translucent dark amber AND I was unable to mix a satisfactory shade of red AND I was unable to brush it into the mold, my recent discoveries of mixing in cabosil/Thixo-HP and the new batch of pigments I've acquired from Sil-Pak have me revisiting this material. In fact, I dare say that as of this moment, I think one of the PMC urethanes will ultimately prove to be the one I use for the cape shell.

For reference, this is the latex that I use on my cape mold, WHEN I'm doing latex tests.

Let us now turn our attention back to the cape, where more experimentation has taken place.

Sadly, I ran out of Douglas and Sturgess "Thixo HP", which is the cabosil replacement I have been using for a while now. Really fantastic stuff. I turned to a batch of stuff I got from Smooth-On, and I'm sad to say it just wasn't the same. It didn't mix in half as well as the Thixo HP, and there were clumps. Not fatal, but I am definitely going to back to Thixo HP right away. I ordered a bunch more from the D&S website just the other day. If you're curious, give them a visit.

http://www.artstuf.com/

Sadly, their URL and website are from 1998, but hey what they lack in internet pizazz, they make up for with great products and really knowledgeable folks!!!

It was time to experiment with the RU-420 on the cape. I mixed up a small batch and threw in some of the Smooth-On thixo, and decided to mix it up with a little blue this time instead of red. Aside from the clumpiness I mentioned earlier, and the fact that the mix ratio is different than the Thixo HP, I think the first tests went fairly well. Here's the first attack:

As you can see from the close up, the first layer is not totally opaque, which is to be expected. You can see the edge of the differently colored mold through the layer of blue urethane.

And that's where we leave things for this update on the Superman Returns suit. Lots of stuff learned, and I cranked out a chest emblem and a couple belts. All good.

In other news, my Man of Steel suit from UD Replicas is here. It's absolutely stunning, by the way. Please check out UD Replicas and my good pal David at their website:

http://www.udreplicas.com/

Also in the pipeline now are a couple of pieces from the new Supergirl TV show. I very much like the new costume, and I'm working on the chest emblem right now. I have artwork all drawn up, and am sending it off to the laser cutter shortly. Once I have the laser cut pieces, those will be molded and urethane pieces will be produced.

That wraps it up for this update. That's what's going on at the workshop right now! I expect this next week to be a very busy and productive one, and hope to have more cool stuff to show off. I really want to get a cape out of the mold soon!

Tuesday, February 9, 2010

More Opacity and Color Tests

Over the past 12 hours, I've run a few more tests using the techniques described by David Pea, which are turning out really well. Overall opacity is good, though not completely perfect. However, given the fact that the only time you see problems are when you hold it up to light, I think I am willing to sacrivice a sliver of opacity for the tradeoff of having a much more lightweight end product.

Here's how a scrap looks right when it comes off the mold. The color of the outer skin is still not quite right, but fairly close. A little too strong on the brown side.


Here are a couple of samples together, from different pigment tests.


Here's a layup of my third and final run. Shows how I embed the fabric on top of the latex.


And here are the three final samples together.


I consider this test and new process a total success. The opacity is good, bubbles in the latex are absolutely minimal, and the overall finish is very nice. Better than what I was getting before. My next step is to order up some supplies to do a full cape.

In other news, I went to demold the chest emblem that I repaired yesterday, only to learn that there was another little bubble in it. I patched that this morning, so it should be ready to go tonight. This will be my third chest emblem out of the mold so far, and I'm really excited with how nice they look. I will probably retire the mold after this. I just want to make sure I have a few on hand for costuming needs.

It's currently snowing like a mofo out here, so I will be trapped at home for the next few days. This will give me a good opportunity to focus on a few remaining items on the cape, like getting supplies lined up and ordering a sewing machine.

Monday, February 8, 2010

Cape Opacity Tests

After a blisteringly painful week or two without internet access (Damn those pesky neighbors for finally figuring out how to secure their wireless modem!!!) I am finally back with a few updates to the progress on the Superman Returns costume.
Not a whole lot to report, but definitely some interesting progress. I did a little poking around online to get some insight into how to best move forward with the cape. My main concern moving forward is about the thickness of the latex. As it stands, I had to go on pretty thick to get the opacity I wanted, though I think due to the way I did it, I ended up going much thicker than I needed. The end result is that the cape is pretty heavy, and doesn’t quite flow like the screen used one that I examined. My goal was to turn to the online community to see if I could get some tips on how to make the latex more opaque when it dries. The stuff I use from Burman Foam tends to dry a highly translucent light brown.

I think my prototype turned out really nicely, though there were a few shortcomings. I got some good advice from a gent named David Pea, who runs Universal Designs up in Canada. They happen to have a license to produce leather wear based on Batman Begins and The Dark Knight. Be sure to check out their website here.

David posted the following suggestions about materials when it comes to pouring up a cape:

Matt,
The easiest and most effective way to do this is to tint a 5 gal pale of latex with 1 quart of indoor latex pant, satin base. Dump the whole quart into a 5 gal pale and mix.
The trick will be to find your red base color but I'd expect that you'd need to do a light misting of actual red color on your demolded cape once it's cast up. Latex is not like urethane when it comes to colors, even from a fiberglass mold you may get clouding and shades of your intended color which is why you may need to find a good base match...but then spray the cast cape at the end for the desired color.

A tip on casting it up....I wouldn't use balloon latex...stick with slip latex and stipple in a full coat (tinted as I suggested above) to ensure you dont trap any air-bubbles inside. Then, dump about half a gallon of your tinted latex onto the mold and use a roller to evenly 'paint' it over your stippled coat. Once set, repeat as often as you need for your desired latex thickness. On your last latex coat...try to thicken it to a paste and once you've coated the mold apply your wool backing and lightly press it down using a clean roller. It may take a few days to fully dry but when it does you'll be good to go.

Like I said above, once demolded you 'may' have to lightly mist spray the cape to your desired color unless you find the proper base color, or can mix it yourself but try the indoor latex satin paint trick. It works...

I hope this helps.


I took it to heart, and went down to the local Lowes in order to get my hands on some latex paint. I took a sample of the cape fabric with me, in order to use their fancy schmancy color match system. After a couple different tries, we gave up on that approach. I guess the color matching device was getting reflections off the fabric, or maybe light was passing through it. I’m not really sure what the problem was, but the end result was that I didn’t get the color I wanted. I went and perused the swatches they have in stock, and weirdly enough, I actually found one that was pretty close. It’s not perfect, but for an off the shelf color, it’s pretty close. It’s not quite red enough, and not quite blue enough, but if you did not know any better, you would say this was pretty close. I had them mix me up a small jug of it, just so I could experiment.


I came home and mixed up a little batch of the stuff, and did some experimenting. It actually turned out pretty good. The color definitely dilutes when I mix it into the latex, and the color it dries to is very different than the color the paint dries to. However, I believe that with a little patience and experimentation, I can get a really good color match. The fact that it also really adds to the opacity is really great, and is ultimately what I was after.


Meanwhile, I’m working yet another angle. A friend of mine has volunteered to help me develop the ultimate body suit. He has access to techniques and knowledge that are far beyond my resources, and he is already quite well versed in this angle of the hobby. So he and I have chosen to collaborate on it. My task is to find a good color match for the base. I went down to Jo-Ann’s in the hopes that I could find SOMETHING on the shelf that would come close. I found a couple of fabrics that looked decent when I was in the store, but when I got home, they turned out to be pretty far off. I think the plan will be to simply send my pal the swatch I have of the real suit, and let him take it from there.


Meanwhile, the experiments with the cape continue. Based on the advice of David Pea, I tried a stipple approach to the first coat. I’m not sure if David’s advice was given knowing that I am using a silicone mold, but since this is a technique I have not tried, I’m curious to see what the results will be.

I started by laying down one coat of stipple.


Let it fan dry, then went in and did another coat of stipple. The third coat was brushed on.

According to the interview I read, the screen used capes had three layers of latex. Boom. There you have it.

Next I brushed on a quick layer and embedded the fabric in it. That’s always the hard part, and it is even trickier when you are doing it on a large scale. As of this writing, I am still waiting for that fabric to dry.


In the mean time, and since I am on a roll, I decided to FINALLY do some patch work on a chest emblem I had poured up many moons ago. This one came together and had a solitary air bubble on the back side that needed patching. I poured up a little amount of urethane, and dripped it in. Voila!


That’s it for now. No updates on the boots, though I have some things cooking. Now that I have internet access back, I should probably get around to sending out my monthly “tickler” emails to a few of my sources and see what comes back. That’s all for now folks.

Thursday, December 3, 2009

The Urethane Slinging Festival Continues

Tonight I finished burning through my latest batch of PMC-80, which means it's high time to experiment with a different brand of urethane. A freind has recommended another supplier, which I will investigate shortly.

But let me share my latest progress.

Here's the latest belt I poured up. I learned an interesting lesson on this one. When I use the black so-strong pigment, it tends to add a bit of a green tint to the yellow. If I use brown to darken it, it keeps the yellow color more pure. Interesting to know.


Tonight I used the very last drop of urethane to pour up another chest emblem, but just the outer part. I'll need to pour up the back plate next. That will bring my total to three.


I made a chest emblem the night before, but I screwed it up. I THOUGHT I had poured in too little urethane, and an hour later, decided I would clean out the mold so I could do it "properly" next time. As luck would NOT have it, the mold was totally filled with urethane, and it was probably the most bubble free pour to date. This is a crappy picture, but I suppose it doesn't really matter as it was an aborted pour. Also, I had forgotten to add the white pigment, which really serves to make the emblem really opaque. So this one was a lost cause on many levels.


Finally, here's where I stand on belts so far. I've got six all poured up. Two have minor defects, and will make for great test beds for the painting. All is certainly not lost on the defective ones, as they will serve an honorable purpose.


I played around with the cape again tonight, and really want to get that fabric sourced. I should really spend some more time on that!

My sample of possible outer shell cape material did NOT show up again today. I am bummed! I want to see it. I did find another supplier online that sells a similar looking product. I have ordered a sample from them through their website, but we all know how that goes!

Tuesday, November 17, 2009

Oh, Now I'm Just Getting Greedy!

In an attempt to prove that I've gotten my molds and pouring technique perfected, I set out to bang out another chest emblem in one day.


Which of course worked like a charm! The colors are a little different, with the red being a bit more red, and a little brighter. The yellows are shockingly similar.

So very cool. I think I may crank out another one or two, just to have on standby in case something goes wrong, but I can now consider this part of the project done. yay!

Sunday, November 15, 2009

Third Time Is A Charm

The turkey baister approach worked, and I managed to output a very respectable front half of the chest emblem.

After a little bit of trimming, I put it together with the backplate I made a week or two ago. Here are the final results:


Overall, I am incredibly happy with the results. It looks frickin' great, and I love it. But, being Matt Munson, it's only fair of me to notice the flaws. On the one hand, the main flaw that I was worried about turned out to be a complete non-issue. This is the blunder that I made on the mold due to negligence. It ended up causing zero problems. There are a couple of flaws in the master, which were passed onto the copy. Nothing I can do about that, and they are not terribly noticeable. If anyone ever stops me on the street and says "Great costume, but I couldn't help but notice that tiny flaw in your chest emblem", I will promptly pound them into the ground using my heat vision.

I adjusted the colors a bit too. The master S is almost a dark brown/burgandy, and the yellow part is an orange/yellow/green. While I'm sure this looked great on the screen all color corrected and perfect, I think it looks a little odd in person. That, AND it's almost impossible to match colors that closely by eye. I think the right move was to make the colors bolder, but at the same time maintain the overall "muted" tones of the ones seen on screen.

I have to say, getting this piece to come together has been a LONG road, and has proven very expensive. Time consuming is an under statement, but along the way I really learned A LOT about urethane, working with it, and how to get pigments to behave the way you want them to. I think if I ever tackle another project that involves urethane in any way, I will be VERY well prepared for it.

Third Pour Into The Mold

For my third pour, I tried a different approach. Previously, I was pouring urethane into the open mold, then closing the top onto it once it was full. This time, I'm starting with the mold closed, on an incline, and used a turkey baister to squirt urethane into the mold. I started at the bottom of the incline, so the urethane had to work its way upward into the mold.


The turkey baister was one of the 99 cent ones from the grocery store. nothing fancy. I actually didn't even use the squeeze ball. I had to open up one of the vents a little bit with an exacto blade so I could get the tip in there a little better. I filled up the baister with urethane, and let gravity do the rest. After a while, I ended up blowing into the thing to push more urethane into the mold, which worked out really good.

A few hours from now, and we shall see how it turned out.

Second Pull Out Of The Mold

After I learned a few lessons from my first pull from the mold, I made a few changes. First, I popped another vent into the mold, way up high in one of the corners. The idea is that for the next pour, I will actually have the mold sitting on an incline, so any air bubbles will (theoretically) escape through that new vent.

Sadly, it didn't quite turn out that way.

The color on this one is also a bit wrong, but it's an interesting learning experience nonetheless.


Over on the left hand side, you can see the pour sprue that resulted from the new vent. Down at the bottom, you can find two huge air bubbles.


I'm going to switch gears again for the next pour. The idea here is that with each pour, I'm getting closer to getting it right. That way, I don't have to think of each one as a failure, but more a learning experience.

First Pull Out of The Mold

The mold of the chest emblem front plate is all ready to rock, so I poured one up using my newly perfected urethane techniques.

Here's the mold. You can see where the eurethane came squishing through the vents. I suppose that means they are doing their job.


A day later, here's the results. This picture was actually taken shortly after I did some dorking around with it, so there are a few smears on it.


It's not perfect, but in general, I am very pleased. The detail on the front is captured VERY nicely, and there are no bubbles on the front side. The back side is another story. There were a number of substantial bubbles in the urethane, meaning I need to do a little more work to get the mold working properly. There's also a TINY flaw in the mold, that was introduced due to some carelessness on my behalf. I think I can work around the flaw, but I am not sure. If it turns out to be impossible to work around, I may need to remold the chest piece. No big deal, as I'm now a total pro at it.

Chest Emblem Mold

Progress has been made on the mold of the top plate of the chest emblem.

Here's how the top half looked when I pulled it out of the box. I needed to cut a thin layer of silicone out.


Here is the back half. I'm going to use a brass rod to cut vents into the mold. This will allow air out of the mold when it is curing, so hopefully no bubbles.


Here's how it looked after the vents were cut.


The next step is to run a few pulls out of the mold. Two sided molds like this always take some time to figure out how they work. You need to play around with it during the pouring process to see where the air pockets tend to gather, and if necessary cut more vents or figure out a way to work around them.

Wednesday, November 11, 2009

Sonic and Molding

Today is Veterans Day, and I took this day off as an opportunity to get a lot of things done around the house, including working on some projects. I'm still trying really hard to maintain my "at least one step of progress per day" policy on my Superman Returns costume. It's been going well so far, though the steps are often really small.

I think the point of that policy focuses on momentum. Often the hardest part is getting started. But once you get started, things tend to keep going. Some days it works, and others it does not. Today was a good example of this working.

I put together another box in order to mold the front piece of the chest emblem. For one reason or another, this is the third time I've molded this piece. Let's hope I get it right this time.


And in the world of my prop collection, today my Sonic Screwdriver arrived from Millenium FX in England! This is (in my mind) the key prop as seen in the past few years of the british television show "Doctor Who". It hasn't quite caught on over here in America, but in the UK, it is CRAZY popular.


This is a prop I have been waiting to see done properly for a number of years now. I was even planning on taking a swing at it myself, and was all poised to purchase a mill and lathe to make it happen. Then I caught wind that this piece was going to come to market, so I waited. It took a LONG wait, but I think it was worth it.

I'm going to try to bang out a belt tonight, now that I've got the technique and the urethane problems solved. Time to move onto the final phase with that one, and then put that element of the costume to bed. I think the chest emblem will follow closely behind, as it will just be a matter of getting the mold to work properly.

Sunday, November 8, 2009

Confirmed: Urethane Problems Are Solved!

Alert the media, film at eleven, it's official: my urethane problems are gone. Today I got a PERFECT pull from the chest emblem back plate mold. Check this out:


Front and back, I cannot imagine it getting any better. The casting on the front side is without flaw. ZERO bubbles. The back side has a couple of small ones, but who cares. The color is even pretty close, which is great. I actually got the color a little better when mixing it, but decided it was not the color I wanted on my final costume, so I lightened it up a little. The real one has a bit of green and orange in it. While this may look great on color corrected film, it looks a little weird in real life, so I softened it up a bit.

But the opacity problems are totally gone, the tinting problems are totally gone. I'm very happy right now! Can't wait for my silicone to arrive so I can finish up the chest emblem and call that chapter done!

To push this post over the edge as far as geek factor goes, it's only fair to include these two bad boys:


Props from the latest Star Trek movie. Got these on markdown at Target. Could not resist. I am a huge tricorder fan, and this one actually looks nice. It only saw a couple of seconds of screen time, and wasn't even seen in full. The phaser is pretty cool too. Nothing spectacular, but for an off the shelf piece, it is indeed quite nice.

Thursday, November 5, 2009

Glue and Opacity

Before I begin, I should mention that I ordered another wallet tonight from the same place I ordered the last couple. I think I've got the dimensions right for the CSM wallet. We will find out in a few days.

I stopped at Lowe's this evening and picked up some supplies. A bunch of different glues to try to get the fabric to stick to the back of the latex cape, and also some mineral spirits to thin out urethane, should I decide to do some experimentation with that on the cape.


The backplate of the chest emblem turned out just plain beautifully! The red is nice and opaque, though still a TAD bit milky. Nothing another drop or two of red pigment would not fix. But still, as far as I am concerned, this problem is solved, and I'm moving forward.


I also have a lead on some boot intel, but I don't want to spoil it quite yet. I will keep everyone posted when the facts materialize

Wednesday, November 4, 2009

Misc Musings and Progress

I have a whole jumble of little things to report today, but nothing really photo worthy.

I ordered some more silicone rubber for mold making. I order my stuff from http://www.silpak.com/. Always a pleasure doing business with them. I ordered a one gallon kit of their R1328A, and to kits of the R1324B catalyst. I ordered two because I still have some rubber left over from my last purchase, and don't want to see it go to waste.

I did another test pour of the chest emblem backplate, this time doing a test of the color red to see if I can get the color depth and richness I am looking for. Unlike last time, I powdered the mold for this one. I am curious to see how it turns out.

On the cape front, I ordered a couple of samples from different rubber sheet manufacturers to see if I can find a match for the diamond pattern. I'm really not sure what level of confidence I should have in this. It might be a shot in the dark, or there may exist some industry standards that make finding it easy. Who knows.

I took some measurements off the CSM XFiles wallet that I got in the mail the other day, and compared them to some measurements I saved from when Propstore posted it. The wallet is precisely one half inch wide. Great news is that the company that sold me the last one makes one that is precisely one half inch narrower. I'm going to order one. I need to do the same thing for the Alias wallet. I'm not sure why I am suddenly so passionate about finishing up those long dead projects. Maybe it's just because once I bite my teeth into something, I'm loathe to let go.

That's it for now. Tomorrow I should have some pictures of the chest emblem back plate. As soon as the rubber shows up, I will mold the top plate. Now that I've got my urethane problems all solved, the chest emblem should come together very quickly. And with the white opacifier stuff I found recently, I should probably revisit the belt, as I will now have great precision control over the final color.

So yeah, it's pretty much all coming up roses!

Opacity Problem Is Solved

A very exciting day for me over here at the Project Workbench. This morning, I am pleased to discover that I have found a solution for the opacity problems I was experiencing with my urethane!

Regular readers will know that I have searched high and low for a urethane that will cure VERY opaque, as that is what I want and need for my Superman Returns costume parts. I found a yellow pigment that works really well, but have struggled long and hard to find a good red.

Here's a sample that came out of the mold this morning


Granted, the color is off a bit, but that's not the point. The point is that it's REALLY DARN OPAQUE! And that is precisely what I was after. This is really geat news for me, as I can now move forward.

Here's the stuff I used. I put in a little bit of the white stuff, and it just makes it brick-wall opaque. Just like the yellow. Only without the yellow.


I'm very excited right now, and looking forward to moving ahead. This opens up all kinds of doors for me regarding different parts of the costume, and may also let me pursue a different direction with the cape.

SPEAKING OF THE CAPE, I'm still having trouble with it. Right now, I'm trying to develop a technique to attach the red fabric to the back side of the latex shell I have poured. I've tried using brushed on latex, and I've tried using brushed on urethane. None of those work as an adhesive. The next move is spray77, though I don't have high hopes for that. One thing that concerns me is fabric I am using. It is not the thickest stuff, and I think the final product will be. So I may hold out until I find something better.

In the mean time, I have been thinking about starting again with the cape, but this time making a rigid mold. This will allow me to be more flexible in the materials I use to pour it up. I'm no longer convinced that the originals were made of latex. Though an interview with the costume makers claims it is, there are some contradictory facts. I cannot say with utter certainty, but the cape I handled certainly didn't FEEL or move like latex, nor did it react like it. Hard to explain. It just didn't feel right. To make a urethane cape (which I feel confident now that I can do, seeing as how I've found a really opaque urethane mix!!) I will need a rigid mold, as the urethane just beads up when you pour it thin onto silicone. I will do some more testing to confirm this, and experiment with materials, but this has been my experience in the past.

So it occurred to me to make a rigid mold. The screen used cape was made using three sections of diamond pattern material. My guess is they picked up a roll of some industrial coating, cut three strips, lined them up, and then molded it. THe capes then came out of that. For the record, you can see the seams in the screen used cape for the three sections I'm talking about. I'm not just taking pot-shots in the dark on this one. Which means the trick is to find that rubber. I've had some luck lately using google, but need to do some more research. I'm not sure how to proceed. If I can find the EXACT same rubber that was used to make the capes for the movie, I think I will pursue a rigid mold. It will give me some more freedom, and eliminate some of the nagging issues I have with the current mold. It'll also be good in case the mold is somehow damaged, as it will be easy to recreate it if necessary.