This is something of a stealth update, as I have no actual progress to discuss, or even photos to share.
However, I've been speaking with a freelance welder recently, working on getting a quote for the caprice stretch. As mentioned previously, this is a critical component to the build, and one I'm not willing to risk to my own meager talents. So I'm hiring a big gun. The price is not cheap, but I figure it will be money well spent.
We've both agreed that the right thing to do is to wait for the shell to show up so we can get measurements directly off it, to make sure it fits perfectly.
Wednesday, September 14, 2011

Tuesday, September 13, 2011
Screen Used ZF-1
This is sort of old news for me, but I wanted to share a couple of photos of the screen used, hero flame shooting ZF-1 from The Fifth Element. This piece was on display at San Diego Comic Con this year, at the Propstore of London booth. Stephen Lane was kind enough to take it out of the case for me and let me hold it for a few photos and some video. Pretty darn awesome.


The ZF-1 is one of my all time favorite props, and I hope to one day own a very detailed replica of it. And yes, it's on the way :)


The ZF-1 is one of my all time favorite props, and I hope to one day own a very detailed replica of it. And yes, it's on the way :)
Tuesday, September 6, 2011
Batman Dead End Rang Progress
Not a ton of progress to show today. I put down some metallic bright silver on the lower half of the batarang today. I had a lot of direct sunlight, which means this will dry quickly, and well. The next step is to mask the silver off, and then paint some dark grey onto the piece.

After that, I'll need to decide weather or not to whether it. I think I will, but I'm not totally sure how.

After that, I'll need to decide weather or not to whether it. I think I will, but I'm not totally sure how.
Friday, September 2, 2011
Varon-T Is Finished.
Here it is. All finished. Tonight, I masked off that tylenol shaped gap above the thumb trigger and painted it black. I also cut and applied the strips of mirrored mylar. One piece of reference material I found showed a little faux trigger made out of the same mylar, so I included it on my build. I'm not totally sure if it's accurate, but it looks neat.


Next up, I need to finish that Batarang.


Next up, I need to finish that Batarang.
Mermaid Scales
And now for something completely different.
Laamberry is working on a mermaid tale. She took a lot of the lessons that other tail makers have learned, and applied them to her own project, with fantastic results. Here's a pic of the almost complete tail she is working on.

Here is the monofin that is going to go inside the tail. Yup, it's totally perfect for swimming.

As Laamberry was putting this together, I got to thinking about how she could apply techniques that *I* have learned over the years to make it even better. I also have an array of services and supplies at my disposal that she and the average mermaid tail maker might not have. I figured it was a good opportunity for me to contribute something to the effort.
I started off by calling on my pal Philip Wise, who has been mentioned on this blog many times before for his assistance with laser cutting and engraving. I did some thinking about how I could best reproduce a "scale" look, but on a large scale (no pun intended), while doing it quickly and inexpensively. Looking around online, and after watching Laamberry do her tail, what I've noticed is that the process is very time consuming, difficult to repeat properly, and also tends to be hard to get it just right. My goal in my projects like this is to get it repeatable, easy to do, quick, and pretty inexpensive. The idea is that if someone wants a tail like hers, or wants to buy some fabric so they can sew their own, it's just a few hours work in the garage with the right materials to crank it out.
So, with that said, I put together a plan in my head on how to make it work. I figured the best idea was to draw up a single, long strip of scales, have it laser cut, then repeat it. I put together a simple drawing in Illustrator very quickly, estimating what would look good as far as scale width. I sent that off to Philip, and a couple days later, these two long strips arrived.

I cut them into small segments, so I could test my idea about how they would look overlapped and glued together.

Here they are glued together.

And finally with some primer on it to hide the imperfections.

Overall, I'm IMMENSELY satisfied with the way this turned out. In fact, I think it came out better than expected, and my mind is reeling with possibilities for this pattern. Again, ideally this would end up as a fabric. My thought is that I will make a mold out of this shape, cast them up with a thin layer of urethane, then embed fabric in it. This is pretty much the exact same construction technique I perfected while working with my Superman Returns cape. All of the R&D has been done.
I think this would also make a great fabric for an Aquaman costume. Because urethane pigments are available in tons of colors, and even metallics, I think it could be really cool.
Next steps are to make a mold of this pattern, then pull out some fabric. I'd like to see how the fabric moves and sews. I may need to go with a thinner styrene, but right now, this is looking pretty darn good.
Laamberry is working on a mermaid tale. She took a lot of the lessons that other tail makers have learned, and applied them to her own project, with fantastic results. Here's a pic of the almost complete tail she is working on.

Here is the monofin that is going to go inside the tail. Yup, it's totally perfect for swimming.

As Laamberry was putting this together, I got to thinking about how she could apply techniques that *I* have learned over the years to make it even better. I also have an array of services and supplies at my disposal that she and the average mermaid tail maker might not have. I figured it was a good opportunity for me to contribute something to the effort.
I started off by calling on my pal Philip Wise, who has been mentioned on this blog many times before for his assistance with laser cutting and engraving. I did some thinking about how I could best reproduce a "scale" look, but on a large scale (no pun intended), while doing it quickly and inexpensively. Looking around online, and after watching Laamberry do her tail, what I've noticed is that the process is very time consuming, difficult to repeat properly, and also tends to be hard to get it just right. My goal in my projects like this is to get it repeatable, easy to do, quick, and pretty inexpensive. The idea is that if someone wants a tail like hers, or wants to buy some fabric so they can sew their own, it's just a few hours work in the garage with the right materials to crank it out.
So, with that said, I put together a plan in my head on how to make it work. I figured the best idea was to draw up a single, long strip of scales, have it laser cut, then repeat it. I put together a simple drawing in Illustrator very quickly, estimating what would look good as far as scale width. I sent that off to Philip, and a couple days later, these two long strips arrived.

I cut them into small segments, so I could test my idea about how they would look overlapped and glued together.

Here they are glued together.

And finally with some primer on it to hide the imperfections.

Overall, I'm IMMENSELY satisfied with the way this turned out. In fact, I think it came out better than expected, and my mind is reeling with possibilities for this pattern. Again, ideally this would end up as a fabric. My thought is that I will make a mold out of this shape, cast them up with a thin layer of urethane, then embed fabric in it. This is pretty much the exact same construction technique I perfected while working with my Superman Returns cape. All of the R&D has been done.
I think this would also make a great fabric for an Aquaman costume. Because urethane pigments are available in tons of colors, and even metallics, I think it could be really cool.
Next steps are to make a mold of this pattern, then pull out some fabric. I'd like to see how the fabric moves and sews. I may need to go with a thinner styrene, but right now, this is looking pretty darn good.
Thursday, September 1, 2011
The MattMobile Build: 45 Days In.
My first actual act of destruction was on July 19, 2011. Today is September 1, 2011. I ran the numbers, and this means that I began tear down 45 days ago. I am essentially finished with tear down, save for the disconnecting of a couple fuel and brake lines, but I'm saving that for the stretch.
Overall, I'm pleased with the progress, and consider myself on schedule. The shell seems to be about half way done, which is a bit slower than I had hoped, but it's really not a pipeline problem at this point. There's still plenty of purchasing I need to do before the shell arrives, which is a good thing.
As for mechanical work, stretch aside, there's nothing I can really do until the shell shows up, so it looks like the MattMobile project may go a little bit dormant for a while, as far as building is concerned. I'll still be posting about things I learn and parts I acquire, but there's not much else to do for now.
This is why my focus has drifted to building up little hand props, which is always fun. They only take a couple of shop sessions to complete, so I get some good bang for my buck.
Overall, I'm pleased with the progress, and consider myself on schedule. The shell seems to be about half way done, which is a bit slower than I had hoped, but it's really not a pipeline problem at this point. There's still plenty of purchasing I need to do before the shell arrives, which is a good thing.
As for mechanical work, stretch aside, there's nothing I can really do until the shell shows up, so it looks like the MattMobile project may go a little bit dormant for a while, as far as building is concerned. I'll still be posting about things I learn and parts I acquire, but there's not much else to do for now.
This is why my focus has drifted to building up little hand props, which is always fun. They only take a couple of shop sessions to complete, so I get some good bang for my buck.
Varon-T Almost Complete
After spending far too much time puttying and sanding, I finally got the emitter head to a point where I was happy with it.

And it was only then that I looked at some reference pictures and noticed that the emitter on the screen used piece is shorter than the one I was working on.

I needed to remove a few ribs from my nozzle for it to be accurate. I pulled out my mini vice and coping saw. These made short work of it.

Here's how it looked after I sawed it. I spent about a minute with some sand paper getting the freshly sawed surface smoothed out.

By this time, I was pretty sick of all the puttying and sanding, and decided it was time to get this project finished. I sprayed the emitter with a coat of silver, then masked it off to do the black. I'm using a Dupli-Color bright silver, and a krylon semi flat black. It's always important to test these paints to make sure they work together before painting the parts. I did a test nozzle earlier to ensure no problems. Here you can see why I put those long screws into each piece. It gives me something to hold onto while painting.

Here's the piece after my first two passes.

I needed to do one more pass to paint the barrel itself. I made a stencil out of a piece of painters tape, using one of those multi-hole geometry class thingies that I saved from school. I knew it would come in handy someday. And to think, my math professors said I would never use that math stuff in the real world.

After the various masking and paintings, I was ready to do the final assembly.

I removed the screws, and used an exacto blade to scrape off some of the paint. This gives the epoxy something to bite into other than paint. That way, the strength of the bond isn't limited by the strength of the paint bond.

And here's how it looks after that operation.

There are still a few things to do before this is complete. There's another tiny piece on the trigger area that needs to be masked and painted black. I also need to apply some mirror vinyl strips. Then it will be finished. I'm quite certain I can finish this before the weekend hits.
In other news, tonight I finished editing the latest episode of Rise of The MattMobile. Episode 8, to be precise. Episode 7 still has not premiered on the youtube channel, so it will probably be a week before 8 airs. Stay tuned!
Wednesday, August 31, 2011
Batman : Dead End Batarang
I had some extra energy left over today, and since I'm on a Batman kick, I busted out a resin kit that has been sitting in a box for about a year. This is the Batarang from the really awesome fan film "Batman: Dead End."
Here's how the kit looked as it came out of the box.

I started by sanding the back sides of each casting. The main purpose here is to smooth out the lumps so the halves will mate up properly.

Next up was to grab the 90 second epoxy. This stuff actually kicks a LITTLE too fast for my liking, but it was all I had on hand.

I glued the two halves in together, holding them in place with a bunch of clamps I got at Home Depot.

The first thing I did was putty over the seam line. I did two passes at the seam, using my dremel and sand paper in between to knock it into shape.

The faces of the castings were also pretty wonky, so I knocked them down with the mouse sander, and filled in some of the bigger gaps with putty.

I then hit it with a couple of coats of primer. This is really just to reveal where I need to do more puttying.

This is another one of those props that I'm not trying to make perfect. I just want to get it done, and for it to look pretty good. I'm still on the fence about how to paint it. I saw a really great example of a weathered rang online, and I think I may try to copy that.
Here's how the kit looked as it came out of the box.

I started by sanding the back sides of each casting. The main purpose here is to smooth out the lumps so the halves will mate up properly.

Next up was to grab the 90 second epoxy. This stuff actually kicks a LITTLE too fast for my liking, but it was all I had on hand.

I glued the two halves in together, holding them in place with a bunch of clamps I got at Home Depot.

The first thing I did was putty over the seam line. I did two passes at the seam, using my dremel and sand paper in between to knock it into shape.

The faces of the castings were also pretty wonky, so I knocked them down with the mouse sander, and filled in some of the bigger gaps with putty.

I then hit it with a couple of coats of primer. This is really just to reveal where I need to do more puttying.

This is another one of those props that I'm not trying to make perfect. I just want to get it done, and for it to look pretty good. I'm still on the fence about how to paint it. I saw a really great example of a weathered rang online, and I think I may try to copy that.
Sunday, August 28, 2011
Varon-T Disruptor Progress
A side project I'm working on right now is the infamous Varon-T Disruptor, as seen in the TNG episode "The Most Toys." Here is my current status:

And here's a few reference photos, in case you're curious about what I'm going for:


This pistol, and variants of it, were seen frequently in a number of trek shows and series. But this is the original version. This is how it looked when it first showed up on screen.

And here's a few reference photos, in case you're curious about what I'm going for:

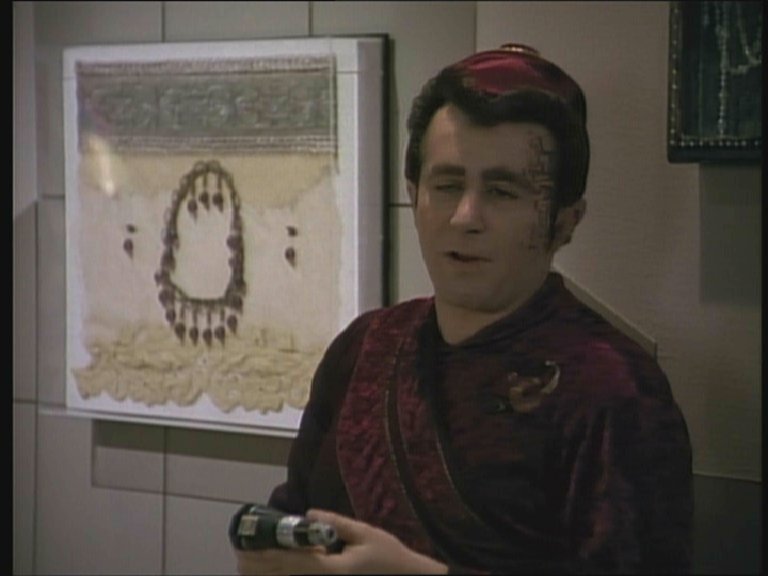


This pistol, and variants of it, were seen frequently in a number of trek shows and series. But this is the original version. This is how it looked when it first showed up on screen.
Stripped Bare.
Today the reciprocating saw got a good workout, as I managed to saw off the last of the floor pan. I sawed it up the middle, then across right below the firewall. So the firewall is still in tact.
But yes, I'm basically down to the frame now. The only thing that I really need to do prior to the stretch is remove those last few pieces that are attached to the frame, and then the engine will be ready to be lifted out. I'm hoping to do that entire process in one day, and I'll hire in a pro to do it. I figure even if he brings his own cherry picker, the engagement will pay for itself.


http://www.blogger.com/img/blank.gif
But yes, I'm basically down to the frame now. The only thing that I really need to do prior to the stretch is remove those last few pieces that are attached to the frame, and then the engine will be ready to be lifted out. I'm hoping to do that entire process in one day, and I'll hire in a pro to do it. I figure even if he brings his own cherry picker, the engagement will pay for itself.


http://www.blogger.com/img/blank.gif
Subscribe to:
Posts (Atom)