Folks, I cannot stress enough the importance of safety. I'll cut directly to the punchline and confess that I nearly chopped my thumb off a few days ago. It scared the crap out of me. In many of my videos and blog posts, I talk about "Safety first" and how important it is. No project is worth getting injured over. No project is worth losing a finger, thumb, or hand over. Or your vision. While I am usually EXTREMELY careful, sometimes I slip up. Here's how it went down.
As usual, I hadn't gotten much sleep the night before. First mistake. Second mistake, I had gotten comfortable with my tools. The third really big mistake was that I was in a rush. I was using my chop saw, and for the life of me it all happened so fast I can't really tell you what happened, or where I went wrong. I put a piece of wood in, started up the blade and lowered it down. In the next instant there was an INCREDIBLY loud popping noise and I felt a super sharp pain in my thumb. I pulled my hand instantly to my stomach and grabbed it. Honestly, I was just waiting for the blood to start gushing. I was looking around for the part of my thumb that must have been chopped off. A few seconds passed, and I felt no blood. I reluctantly withdrew my thumb from the clench of my hand to examine it. It has already started swelling up and changing colors. It had a few cuts on it. A tiny bit of blood.
Had my thumb been about two inches in the other direction, or had the piece of wood pushed my hand a tiny bit over, I wouldn't be typing this blog entry. I'd be in the hospital recovering. Racking up medical care bills.
The violence of the event was immense. It was so fast, so brutal, and so shocking. I feel like I may actually be suffering from post traumatic stress disorder. I cannot stop thinking about the brutality of the incident, and how life changing it COULD have been had things only been slightly different. Inches different.
The thing that keeps running through my mind is that there was no allotted reaction time. I didn't see it coming. It's not like I could have pulled my hand away and avoided it had I been paying attention. There would not have been a moment for me to stop the blade from spinning or plunging in order to save my hand, had it been in the blades path. Before I was even aware that something had gone wrong, my thumb was already crushed.
As far as I can figure, what happend is that the wood I was cutting wasn't up against the back guard rail. I even think there was a bit of scrap wood in the blade well, keeping it from sitting in place properly. As I was in a hurry, I didn't think to clear it out. Figured it wouldn't make a difference or matter. I put the wood down, started the blade and lowered it. I think what happened was the blade grabbed the wood, picked it up, slammed it into the back wall and then straight down. My thumb must have slipped under the wood and got crushed when it came down.
I feel so incredibly lucky to still have my thumb. I cannot even tell you. I cannot express how mad I would be if I lost my thumb just to build a tardis. There is no amount of TARDIS that can make up for a lost thumb, or use of my left hand.
The real upside to this story is that I'm recovering extremely quickly. It's only a couple days after the incident happened and I'm already back to work. My thumb remains a bit sore and a tiny bit discolored, but nothing was broken, torn, or ruined. It just took a good thumping. I'm extremely happy to NOT be a cautionary tale. Don't let this happen to you, folks. Please be careful. Don't work when you're tired. Don't try to go fast. Don't be lazy. Pay attention. Use the tools as they are supposed to be used.
OK!!!! ONWARD AND UPWARD!!!!
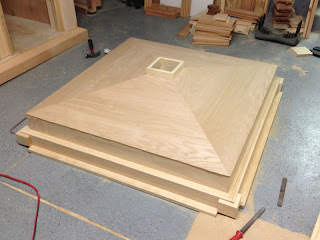
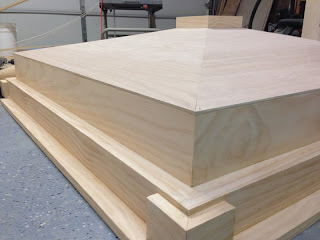
With that out of the way, let's get down to brass tacks. Much progress to share. Let's start with the roof. With the pyramid now finished and dry, it was time to get it attached to the base. Please recall that one of my design goals is to have the pyramid detachable from the base, so that I can fit a MOSTLY assembled tardis inside my house. With the pyramid on, it's too tall. My idea was to have a lip on the underside of the pyramid which would allow it to affix with precision onto the base.
I started by getting the pyramid aligned on top of the base. You can see from this pic how uneven the edge is.
I then trimmed it down roughly, using a coping saw.
With a little help from the orbital sander and a sanding block, the edge of the roof is now even with the base. The pyramid is being held in place with a couple wire nails right now. Yes, they make tiny holes in the surface, but I'm not too worried about that. I'll just putty them when all is said and done.
With the roof in position and tacked into place, I flipped it over and installed the lip. I cut four pieces of wood to length, meitered the ends, and then trimmed an angle on one side that is equal to the slope of the roof. It fits very snugly. I lined the edge of the roof base with painters tape. This will not only add a tiny bit of wiggle room, but will also prevent glue from joining the lip I'm building to the roof base itself.
In the picture below, the lowest step of wood is the lip, loosely fit into place. I glued it down after this pic was taken, using only gravity to hold it in place.
Once everything dried, I was able to remove the pyramid. You can see here the lip. It works perfectly! I'm probably going to cut a chamfer on the edge so that it slips into the base more easily, but you get the idea.
With primary construction nearing completion, it was time to turn my attention to the functional details of the build. I plan on back lighting my windows, door sign and sign boxes. For the windows and door sign, this means building boxes to hold the LED's and contain their light. Using specs from Philip Wise's build, I put these together very quickly. For once during the build, precision and accuracy didn't really matter at all. As long as the boxes were a quarter of an inch larger than the diameter of the windows, they would work fine. It was kind of refreshing not having to worry about joints lining up perfectly and all that stuff. I did still use a set square to make sure they were as "right" as possible. Here's my kitchen, once again being put to good use.
Once all the glue was dry, I stood them all up to clean off the counters, and noticed that the whole thing looked like some kind of contemporary art display.
Now it was time to build their backs. I used plywood left over from previous roof prototypes. The wood was not a perfect fit, and I had to cut small triangles to fill in one corner on each box, but I don't care. These boxes will be inside the darkened tardis, and nobody will ever see them. They are purely functional, and not cosmetic. I roughly cut the plywood to size, glued it in place, then held it fast with a few wire nails. I could have clamped them all, but that would have taken much more time as I have a finite number of clamps. I then used a router to go around the edges and trim the plywood to the exact size of the boxes. Worked great! The nails made short work of the boxes, and I'm totally happy with how they turned out.
Now back to some glamorous elements of the build!
It was time to build the frame for the phone door. I followed Philips build for this, and my first version turned out decently. Cutting grooves in the wood using the table saw was cool, but a bit unnerving. What you see here is version one. I was really happy with how it came out, but the knot on the right hand side got to bothering me.
I installed the phone sign, but it wasn't until I got it into place that I thought to do some research on the thing. Which was totally dumb, as I realized I used the wrong sized and colored hinges, and put them in the wrong place. Other than that, it's perfect. Here's how version one fit into the door.
I found this picture online. After doing some work in Adobe Illustrator with this photo, I concluded that the hinges are 1" tall, and are placed 2.5" from the top and bottom of the sign respectively.
Since I cut recesses for the hinges in the first sign frame, AND I didn't like that huge knot on the right, I decided to rebuild it. Hence version 2.
And that's about where the build stands as of right now.
In other Doctor Who related news, the fabric for my Tennant suit arrived the other day. I got this from Indy Magnoli. This was his second round of the fabric, and I believe it looks great! Thanks Indy!!
Check back soon for more pics of the build, and more updates on my shenanigans.


